Setting Up Google AdMob in Your App
This documentation provides a comprehensive guide on how to integrate Google AdMob into your mobile application. Follow these step-by-step instructions to set up your Google Ads account, register your app with AdMob, and implement various ad formats.
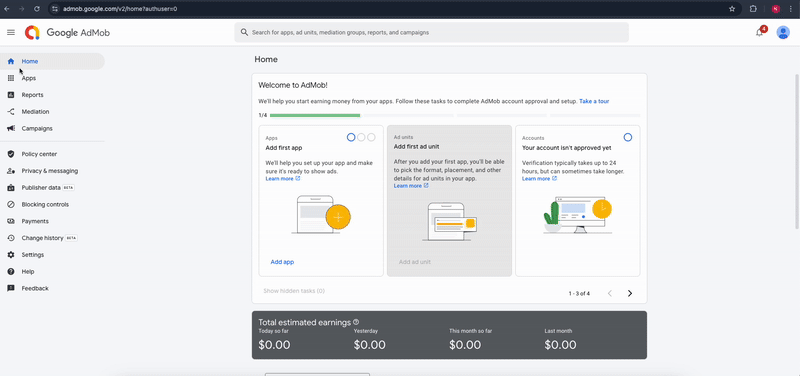
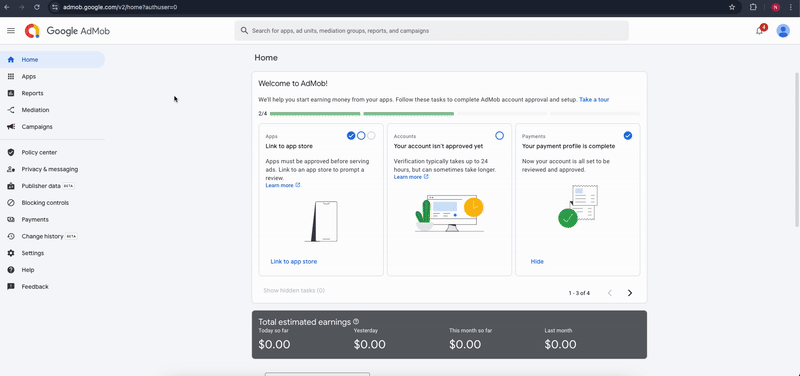
1. Creating a Google Ads Account
Before you can use AdMob in your application, you need to create a Google Ads account.
- Go to the Google AdMob Console
- Sign in with your Google account or create a new one if you don't have one
- Follow the onboarding process to create your AdMob publisher account:
- Enter your account information (name, country, time zone)
- Accept the AdMob terms and conditions
- Set up your payment profile (required to receive ad revenue)
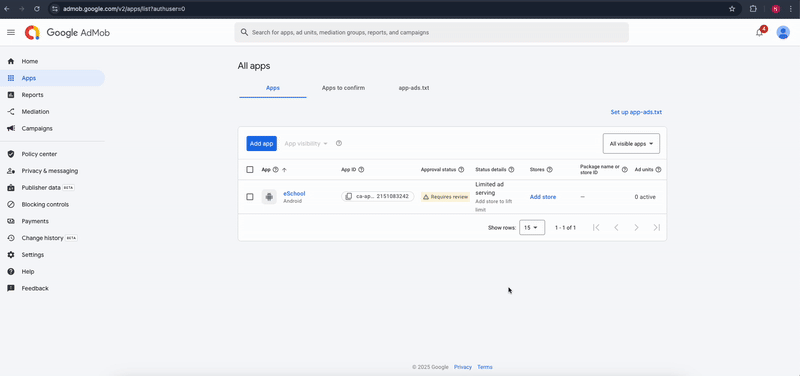
2. Adding Your App to Google AdMob
Once your account is set up, you need to register your application with AdMob.
For Android App:
- In the AdMob console, click on "Apps" in the sidebar
- Click on "Add App" button
- Select "Android" as the platform
- Choose whether your app is already published on Google Play Store
- If published: Search and select your app
- If not published: Enter your app name manually
- Enable user metrics if you want detailed analytics (recommended)
- Click "ADD APP" to register your Android application
For iOS App:
- In the AdMob console, click on "Apps" in the sidebar
- Click on "Add App" button
- Select "iOS" as the platform
- Choose whether your app is already published on App Store
- If published: Search and select your app
- If not published: Enter your app name manually
- Enable user metrics if you want detailed analytics (recommended)
- Click "ADD APP" to register your iOS application
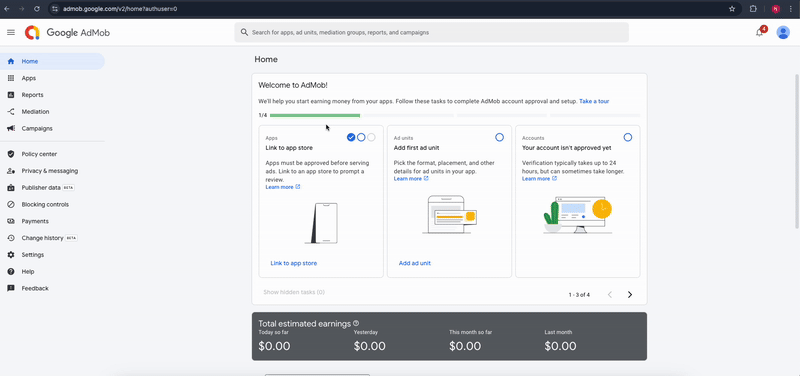
2.1 App Validation & app-ads.txt Setup
Proper validation and app-ads.txt configuration ensure your app is authorized to serve ads and earn revenue.
App Validation
For Published Apps
If your app is already live on the Google Play Store or Apple App Store:
- AdMob will automatically validate your app once the SDK is integrated and users start using the app.
- No manual steps are needed.
- You can monitor the validation status in the AdMob Console under "Apps" > "App settings".
Tip: Make sure the app includes the correct App ID and Ad Unit IDs in the SDK initialization code.
For Unpublished Apps
If your app is not yet published, you must trigger validation manually:
-
Complete SDK Integration:
- Follow the integration steps for Android (using
AndroidManifest.xml) or iOS (usingInfo.plist) as shown in Section 4.
- Follow the integration steps for Android (using
-
Use a Real Device:
- Install your app (debug or release) on a real physical device (not an emulator).
- Launch the app and keep it open for a few seconds.
-
Wait for Validation:
- Google will detect that your app has initialized the AdMob SDK.
- App status in the AdMob dashboard should change from "Not yet validated" to "Ready to serve ads" within a few hours.
-
Verify in Console:
- In the AdMob Console, check your app status under "Apps".
- If validation is successful, you'll see a message like "SDK detected".
Important: Use test ads during validation to avoid any policy violations.
Configuring app-ads.txt for Authorized Sellers
To prevent unauthorized ad inventory sales and improve ad revenue, configure the app-ads.txt file.
Step-by-Step Instructions
-
Generate Your File:
- Go to AdMob Console > Apps > App Settings
- Click "Download app-ads.txt"
- It will look something like:
google.com, pub-XXXXXXXXXXXXXXXX, DIRECT, f08c47fec0942fa0
-
Host the File on Your Website:
- Upload the
app-ads.txtfile to the root directory of your developer website (e.g.):https://yourdomain.com/app-ads.txt
- Upload the
Linking Your Website in App Stores
Google Play Console
-
Go to Google Play Console > All apps > Your App > Store Presence > Store Settings
-
In "Developer Website", add the full domain:
https://yourdomain.com -
Save and publish the changes.
Apple App Store Connect
-
Go to App Store Connect > Your App > App Information
-
In Marketing URL, enter:
https://yourdomain.com -
Save and submit for review.
Validate Your app-ads.txt File
After publishing:
- Go back to AdMob Console > "App settings"
- Under "App-ads.txt status", ensure it shows as "Authorized"
- If not, double-check:
- The file is accessible:
https://yourdomain.com/app-ads.txt - The domain matches the one in Play Store / App Store
Note: Validation can take up to 24–48 hours to reflect in the console.
3. Finding Your App IDs
After registering your apps, you need to obtain the App IDs for both platforms.
Android App ID
- In the AdMob console, go to "Apps" and select your Android app
- In the App settings page, look for the "App ID" field
- This ID starts with "ca-app-pub-XXXXXXXXXXXXXXXX~YYYYYYYYYY"
- Copy this ID for later use in your app integration
iOS App ID
- In the AdMob console, go to "Apps" and select your iOS app
- In the App settings page, look for the "App ID" field
- This ID starts with "ca-app-pub-XXXXXXXXXXXXXXXX~YYYYYYYYYY"
- Copy this ID for later use in your app integration

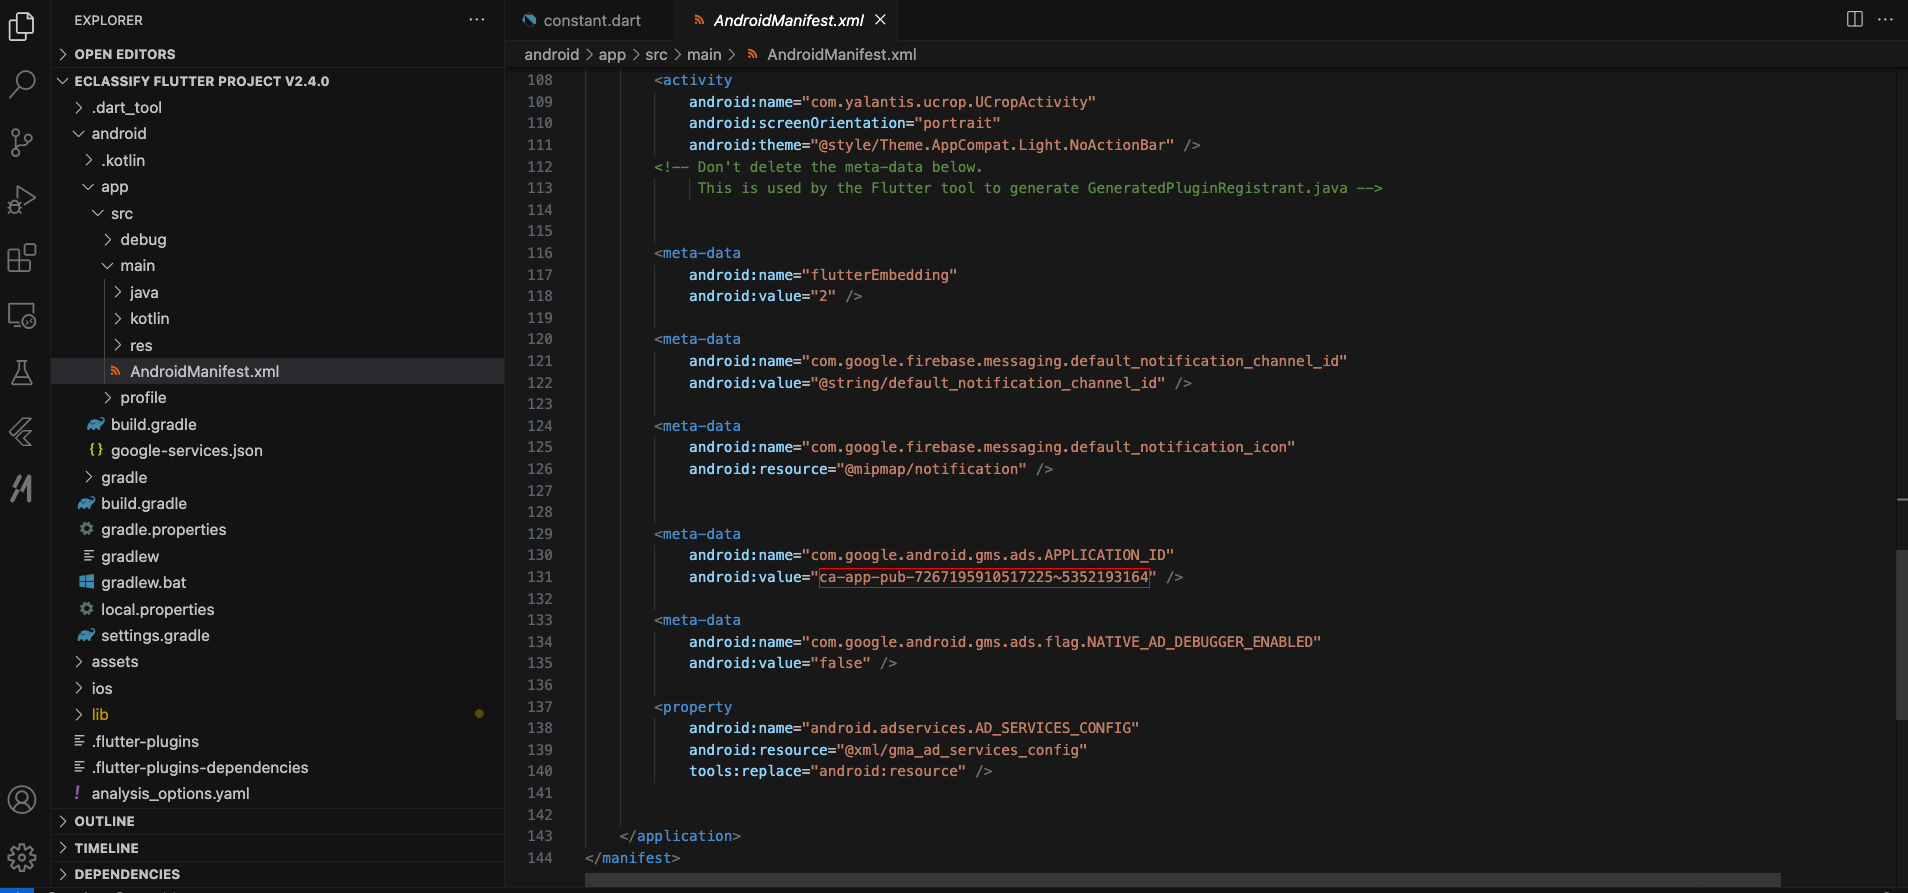
4. Implementing AdMob in Your App
For Android Integration:
- Open your project's
android/app/src/main/AndroidManifest.xmlfile - Find the
<meta-data>tag inside the<application>tag, as shown in the example below.
<meta-data
    android:name="com.google.android.gms.ads.APPLICATION_ID"
    android:value="ca-app-pub-XXXXXXXXXXXXXXXX~YYYYYYYYYY" />
- Replace "ca-app-pub-XXXXXXXXXXXXXXXX~YYYYYYYYYY" with your actual Android App ID
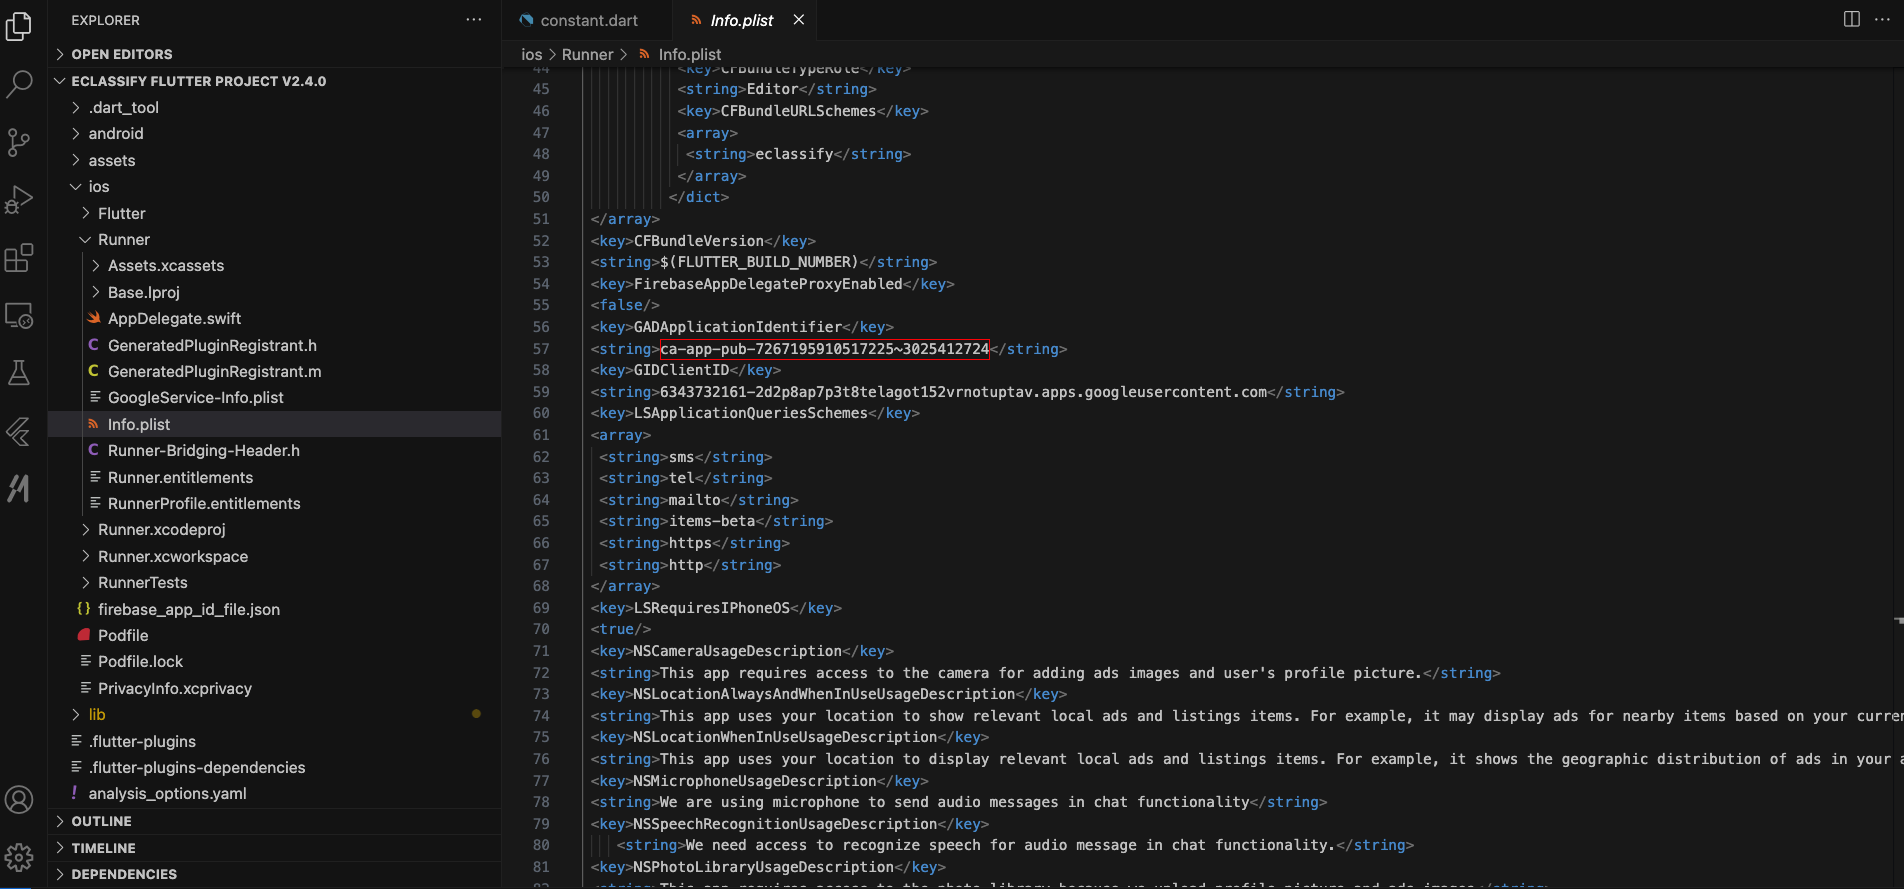
For iOS Integration:
- Open your project's
ios/Runner/Info.plistfile - Find the
<key>GADApplicationIdentifier</key>tag inside the<dict>tag, as shown in the example below.
<key>GADApplicationIdentifier</key>
<string>ca-app-pub-XXXXXXXXXXXXXXXX~YYYYYYYYYY</string>
- Replace "ca-app-pub-XXXXXXXXXXXXXXXX~YYYYYYYYYY" with your actual iOS App ID
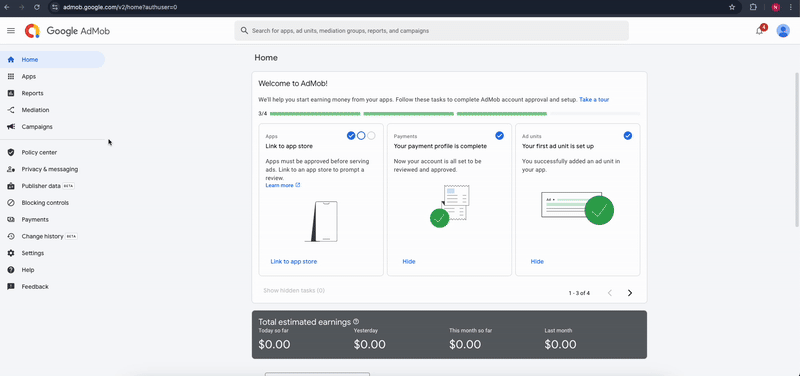
5. Creating Ad Unit IDs
Now you need to create different types of ad units for your application.
Banner Ad Unit ID
- In the AdMob console, select your app
- Click on "Ad units" tab
- Click "CREATE AD UNIT" button
- Select "Banner" as the ad format
- Enter a name for your banner ad unit (e.g., "Main Banner Ad")
- Click "CREATE AD UNIT"
- Copy the generated Ad unit ID that starts with "ca-app-pub-"
Android Banner Ad Unit ID
iOS Banner Ad Unit ID

Interstitial Ad Unit ID
- In the AdMob console, select your app
- Click on "Ad units" tab
- Click "CREATE AD UNIT" button
- Select "Interstitial" as the ad format
- Enter a name for your interstitial ad unit (e.g., "Level Complete Ad")
- Click "CREATE AD UNIT"
- Copy the generated Ad unit ID that starts with "ca-app-pub-"
Android Interstitial Ad Unit ID
iOS Interstitial Ad Unit ID

Rewarded Ad Unit ID
- In the AdMob console, select your app
- Click on "Ad units" tab
- Click "CREATE AD UNIT" button
- Select "Rewarded" as the ad format
- Enter a name for your rewarded ad unit (e.g., "Reward Video Ad")
- Complete the reward settings for this ad unit:
- Reward amount: Enter the number of reward items the user will receive (must be a whole number)
- Reward item: Enter the name of reward item the user will receive (e.g., Coins, extra lives)
- You can check the option to override rewarded settings provided by third-party ad networks
- (Optional) Configure advanced settings if needed:
- Ad type selection
- Server-side verification
- Frequency capping
- eCPM floor settings
- Click "CREATE AD UNIT"
- Copy the generated Ad unit ID that starts with "ca-app-pub-"
Android Rewarded Ad Unit ID

iOS Rewarded Ad Unit ID

Native Ad Unit ID
- In the AdMob console, select your app
- Click on "Ad units" tab
- Click "CREATE AD UNIT" button
- Select "Native" as the ad format
- Enter a name for your native ad unit (e.g., "Home Screen Native Ad")
- (Optional) Complete the advanced settings for this ad unit:
- Media type: Choose the native media type you want to allow
- Image: Only image ads will be shown
- Video: Only video ads will be shown (requires MediaView to render)
- eCPM floor settings: Set minimum eCPM values if desired
- Google optimized: Let Google dynamically set floors based on various factors
- Manual floor: Set your own minimum eCPM values
- Disabled: No eCPM floor on this ad unit
- Country-specific floors: Optional settings for specific regions
- Media type: Choose the native media type you want to allow
- Click "CREATE AD UNIT"
- Copy the generated Ad unit ID that starts with "ca-app-pub-"
Android Native Ad Unit ID

iOS Native Ad Unit ID
6. Configuring Ad Units in Your App's Admin Panel
After creating all necessary ad units, you need to configure them in your app's admin panel:
- Log in to your app's admin panel
- Locate the AdMob section
- Enter your Ad Unit IDs in the corresponding fields:
- Banner Ad Unit ID
- Interstitial Ad Unit ID
- Rewarded Ad Unit ID
- Native Ad Unit ID
- Save the changes
7. Troubleshooting Common Issues
No Ads Appearing
If ads aren't showing in your app:
- Check that you've correctly implemented the Ad Unit IDs
- Verify that you've added the correct App ID in AndroidManifest.xml or Info.plist
- Ensure your device has an active internet connection
- Make sure you're not using an ad blocker
📚 For more detailed information, refer to the Official AdMob Documentation.