Firebase Setup
🔥 How to Set Up Firebase in Your Flutter App
You must use the same Firebase project for the app, web, and panels to ensure seamless integration.
⚙️ Step 1: Install Firebase CLI
Before creating a Firebase app from Flutter, you must install Firebase CLI.
📌 Follow the official guide to install Firebase CLI:
🔗 Firebase CLI Installation Guide
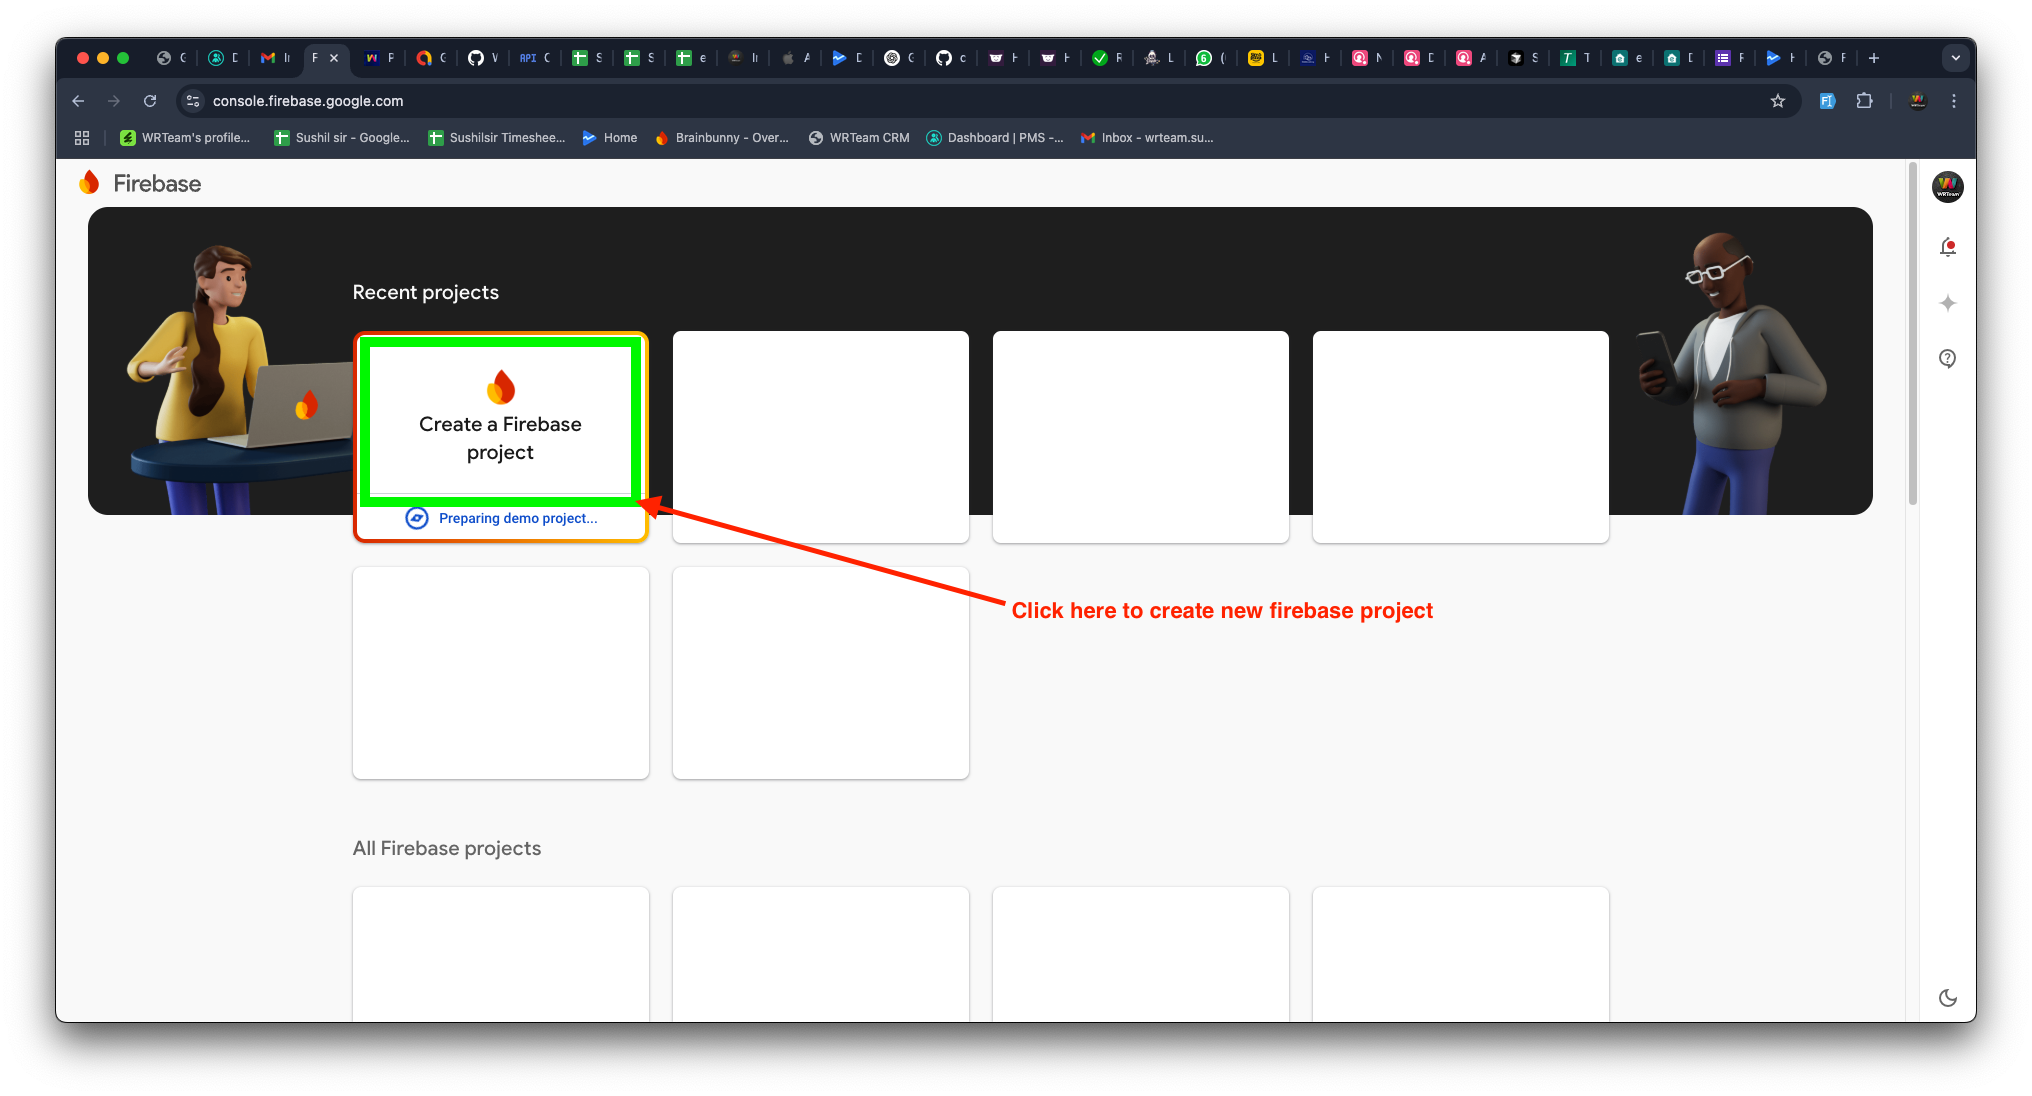
🏗️ Step 2: Create a Firebase Project
1️⃣ Open Firebase Console and click Create a Project.
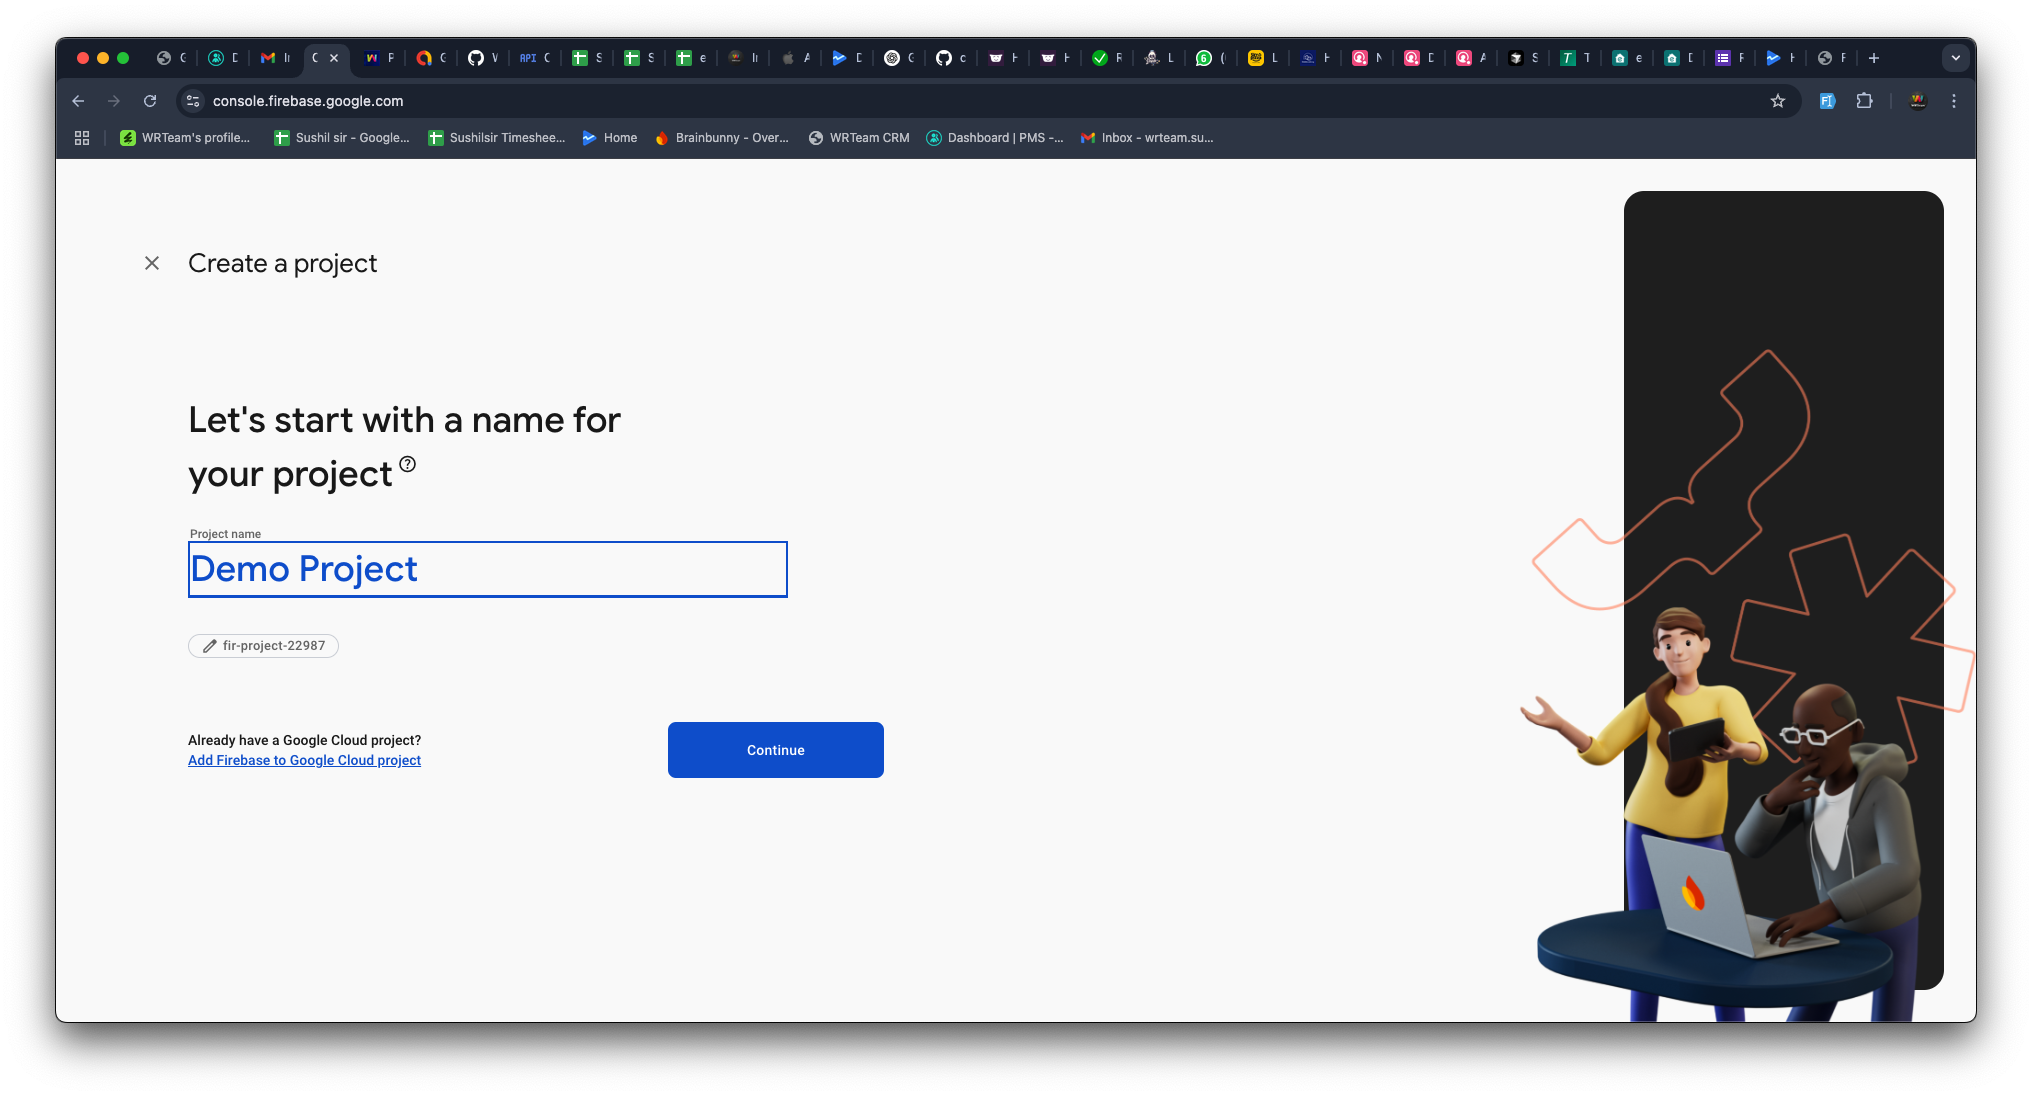
2️⃣ Enter your project name and press Continue.
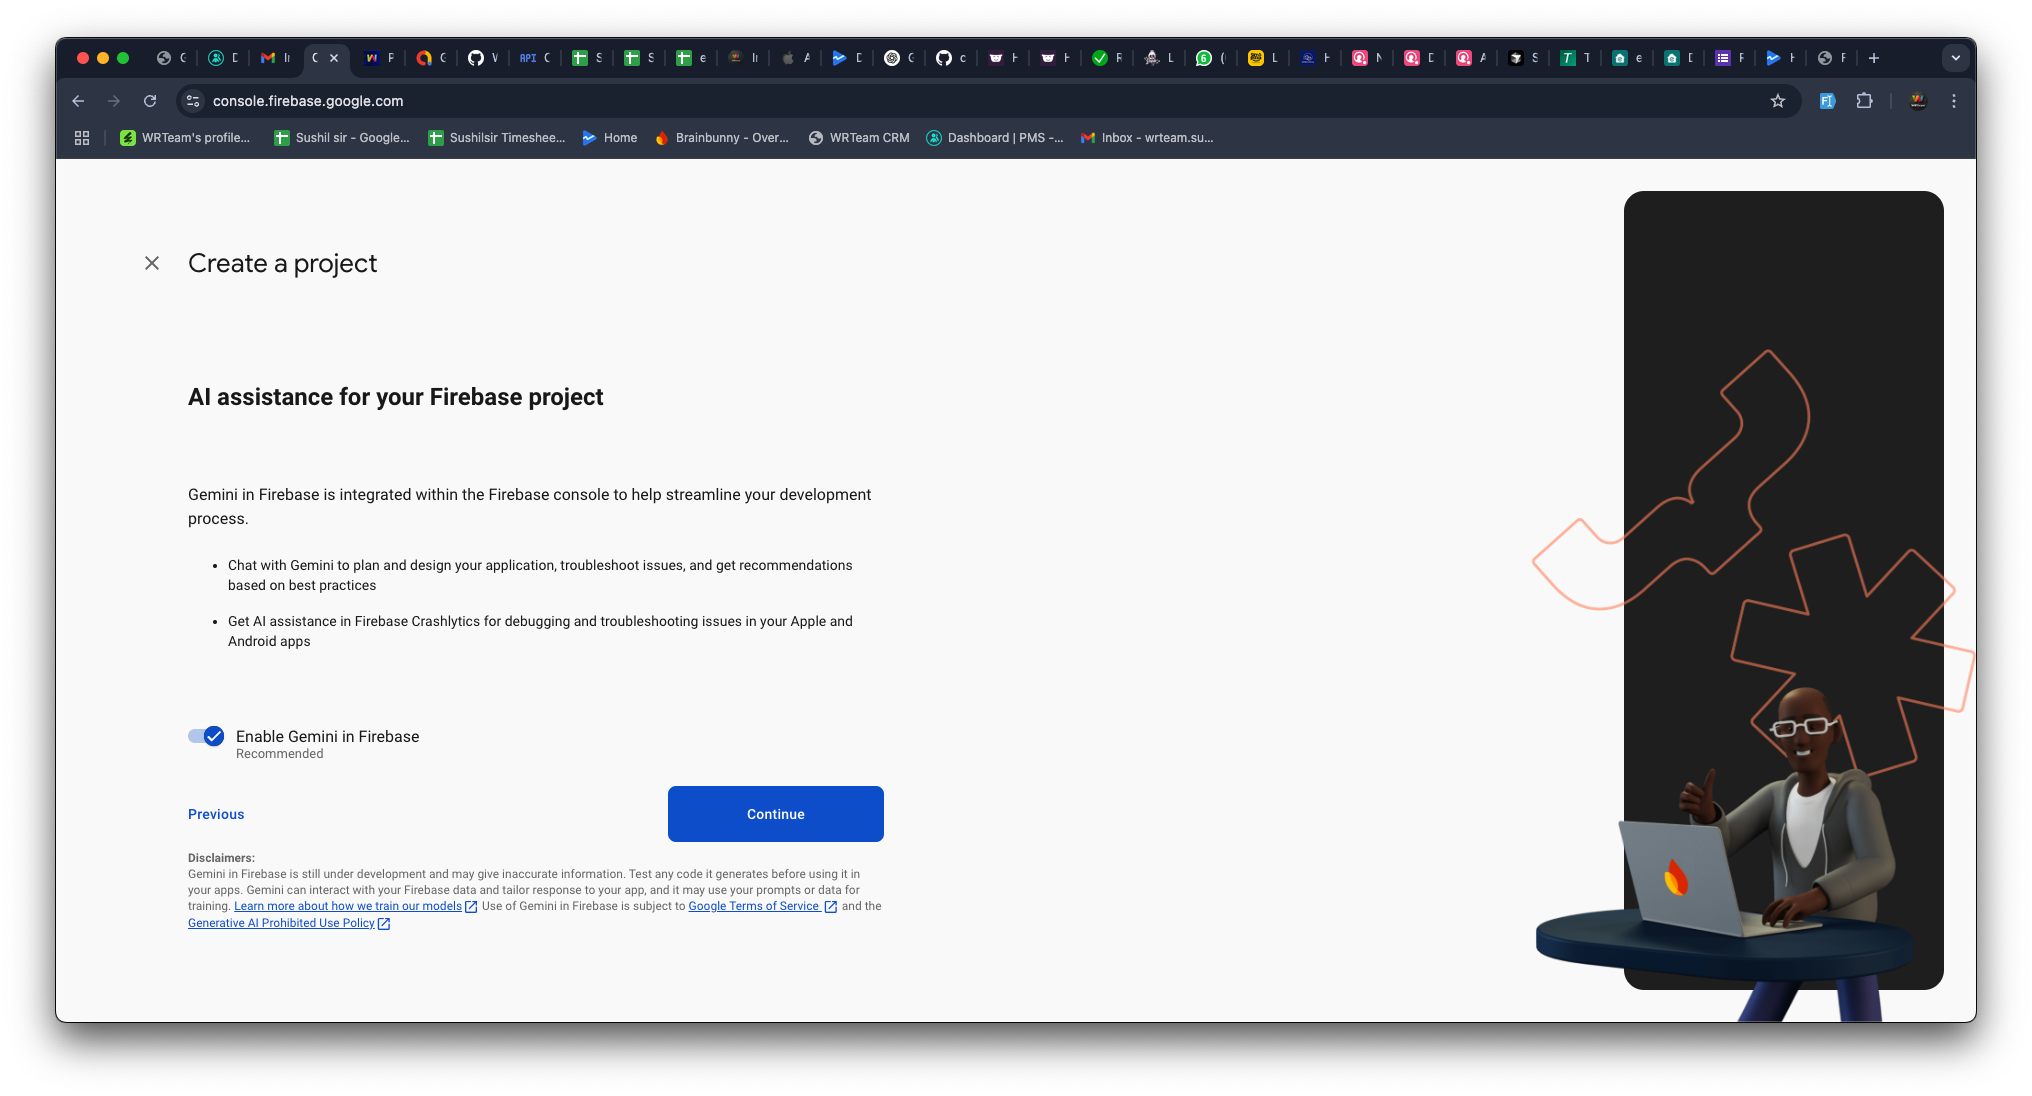
3️⃣ Press Continue on the next screen.
4️⃣ Click Create Project and wait for the setup to complete.
5️⃣ Once done, press Continue.
🔥 Firebase Authentication
This document provides step-by-step instructions to enable Firebase Authentication in your Flutter app.
🔑 Enable Firebase Authentication
1️⃣ Open Firebase Console
- Go to Firebase Console
- Select your project
2️⃣ Enable Authentication Methods
-
Go to Authentication > Sign-in method
-
Click Add New Provider
-
Enable the required sign-in methods (e.g., Apple, Phone, Google)
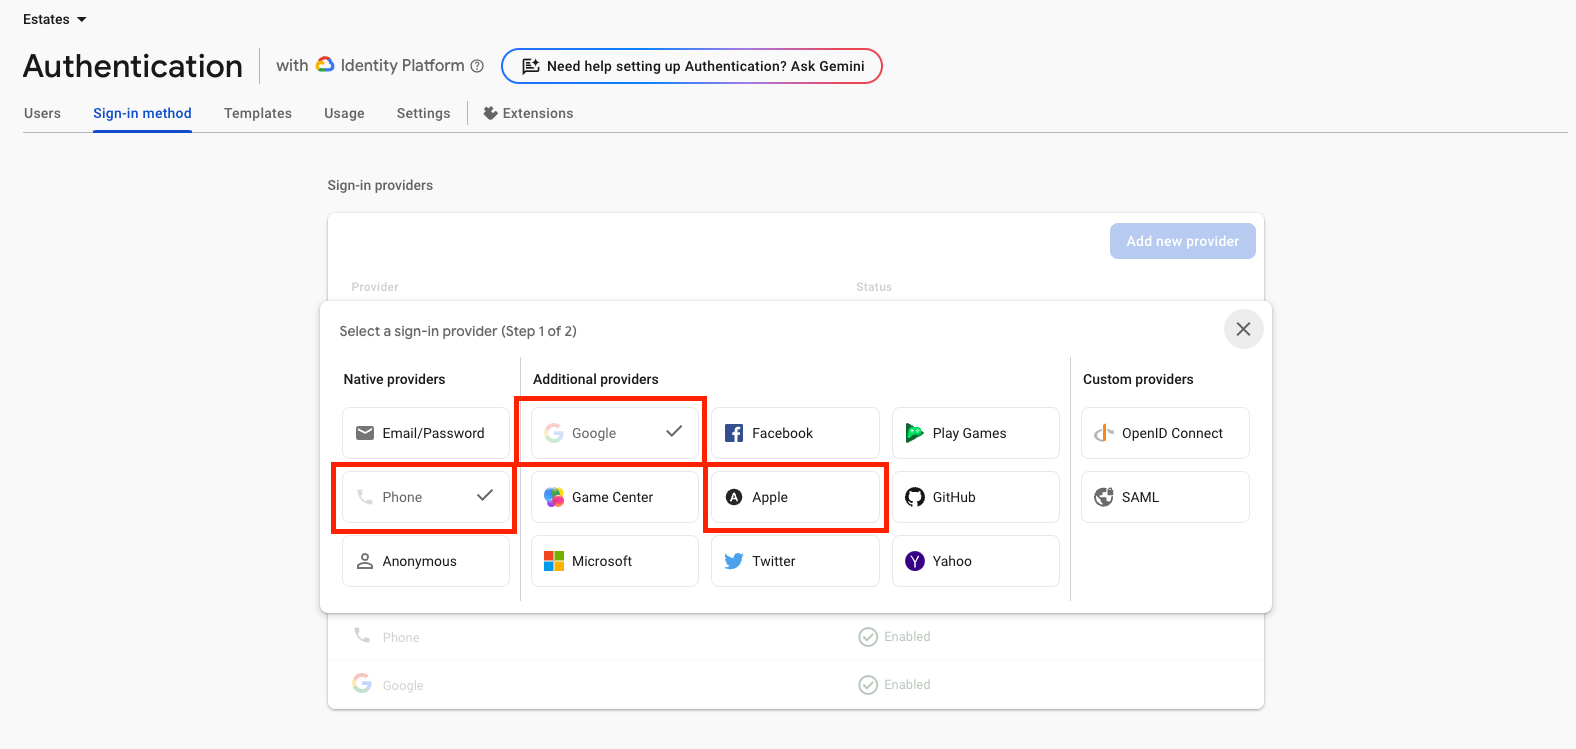
To enable mobile authentication, please upgrade your Firebase plan from Spark to Blaze.
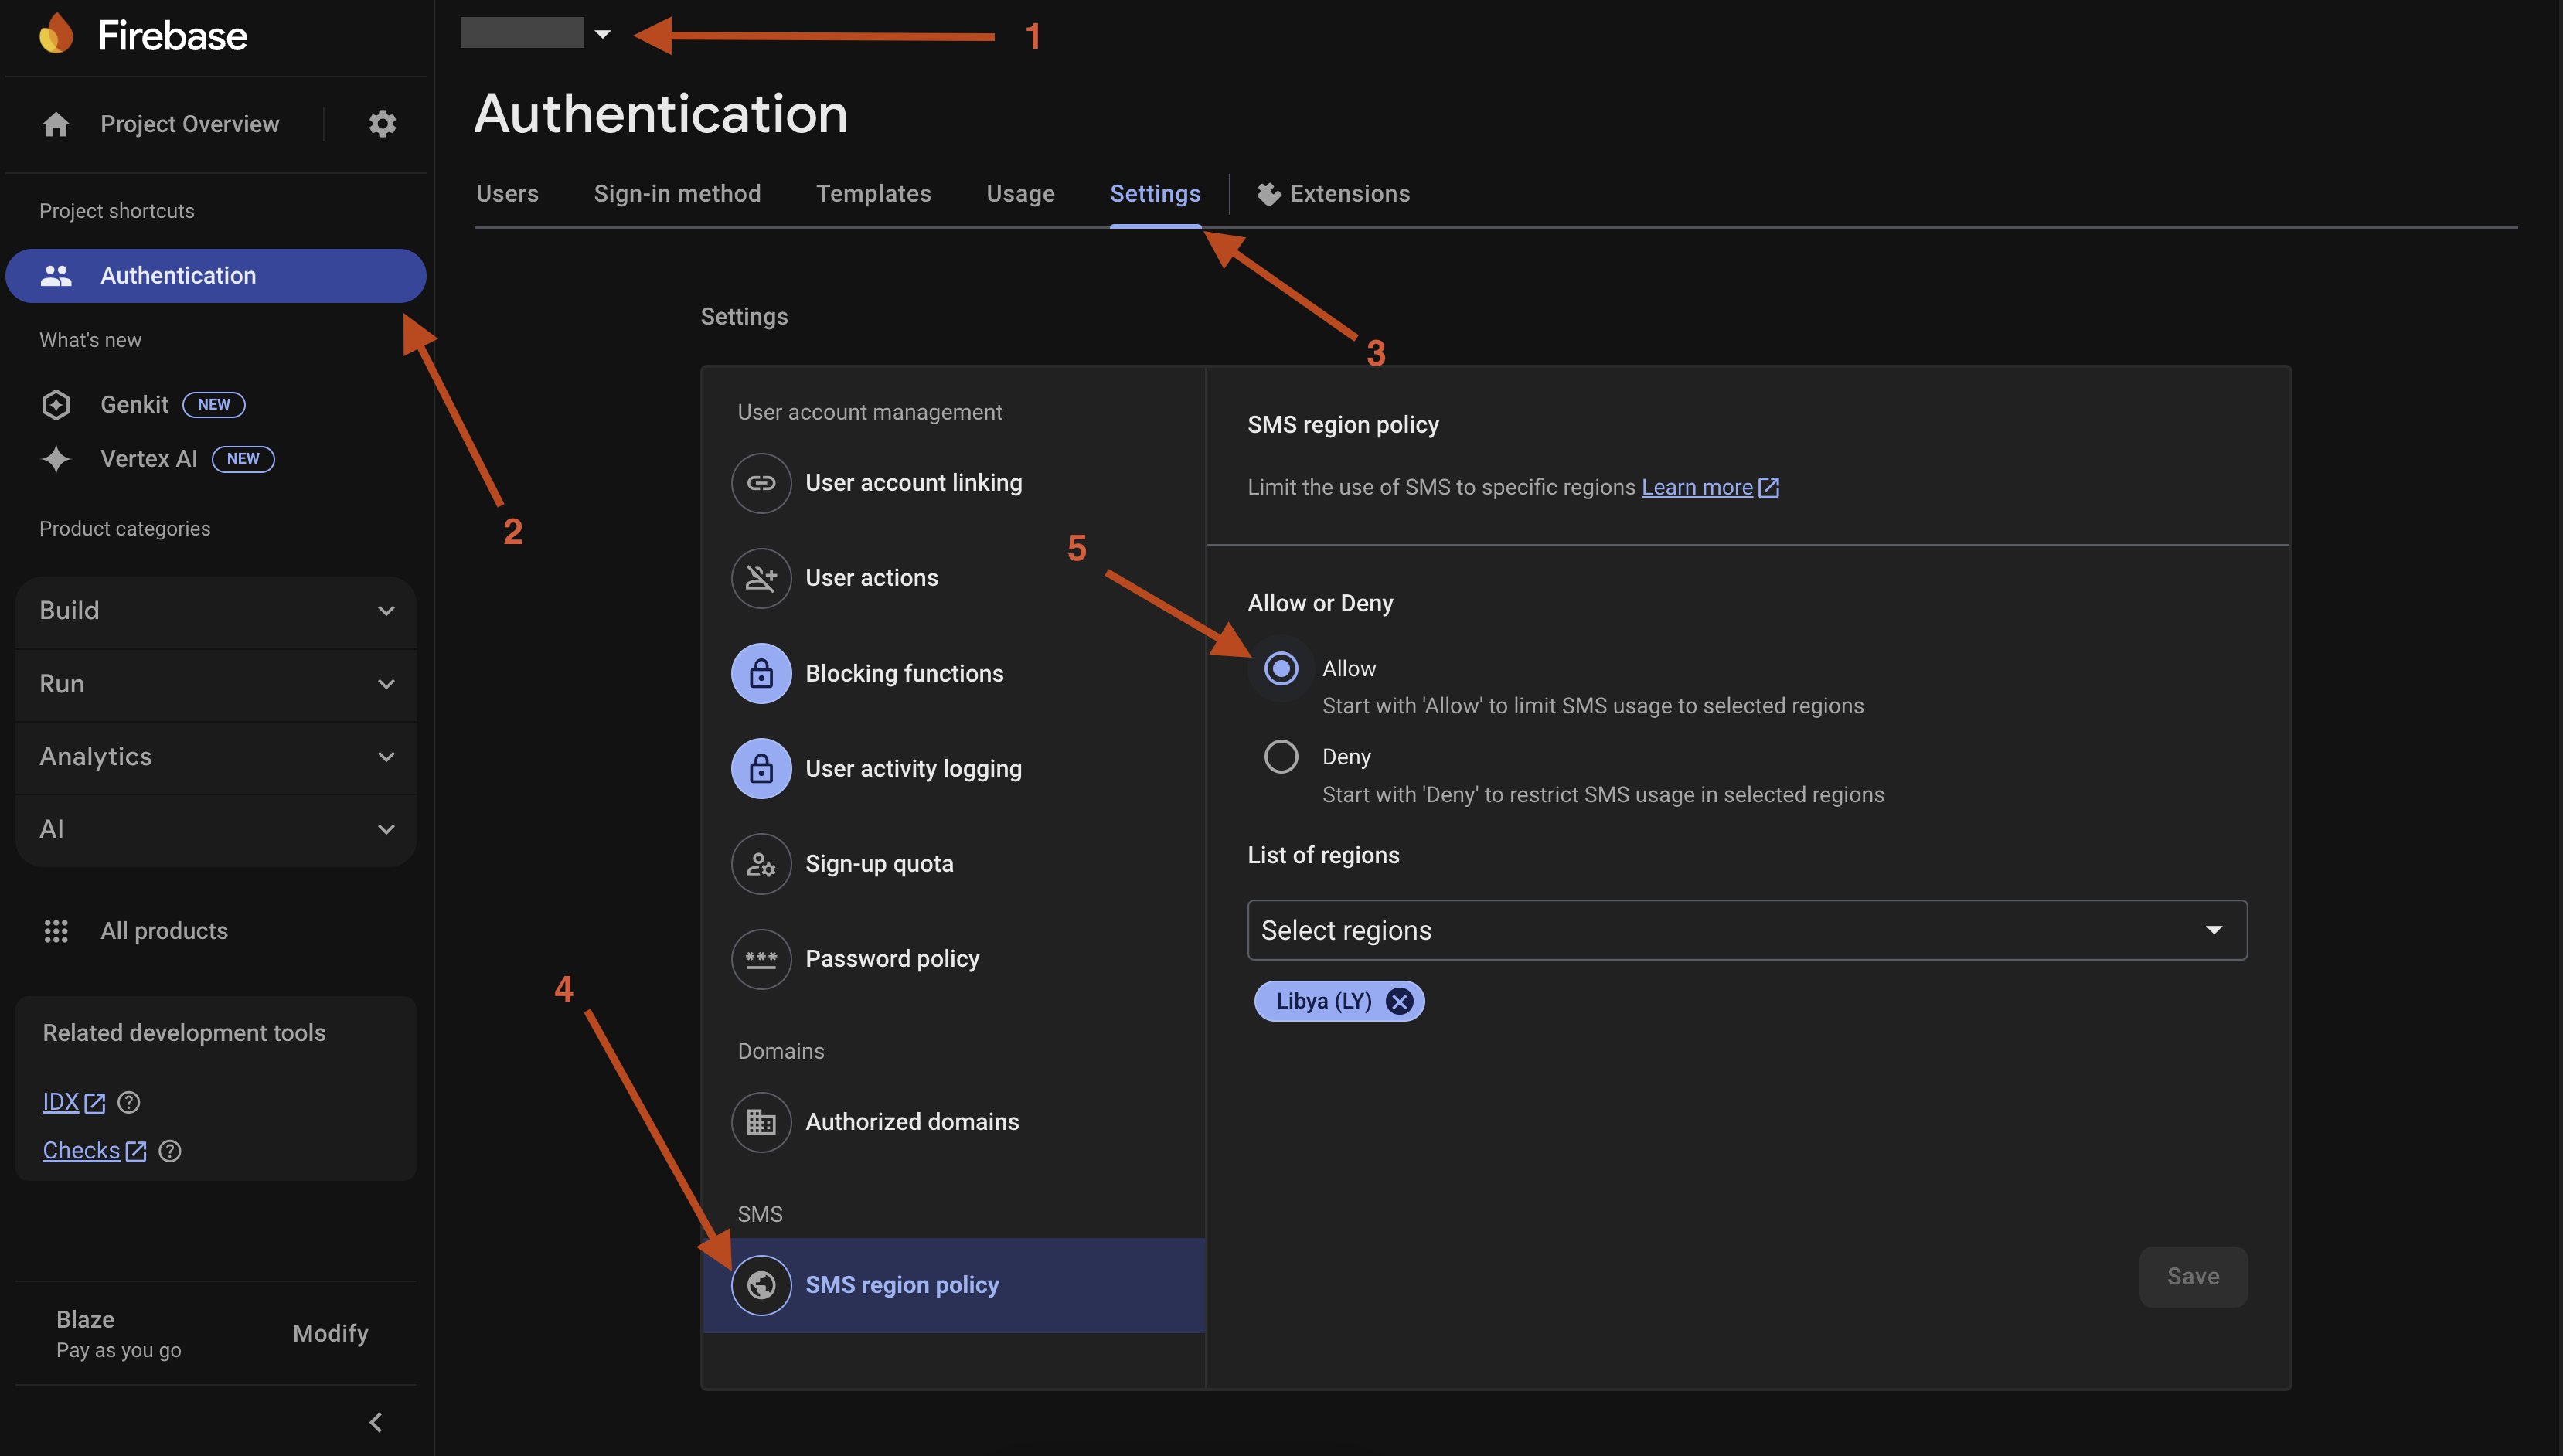
3️⃣ Enable SMS Authentication for specific regions
-
Go to Authentication > Settings
-
Go to SMS region policy in SMS section
-
Click on allow
-
Add the regions where you want to enable SMS authentication for OTP log-in.
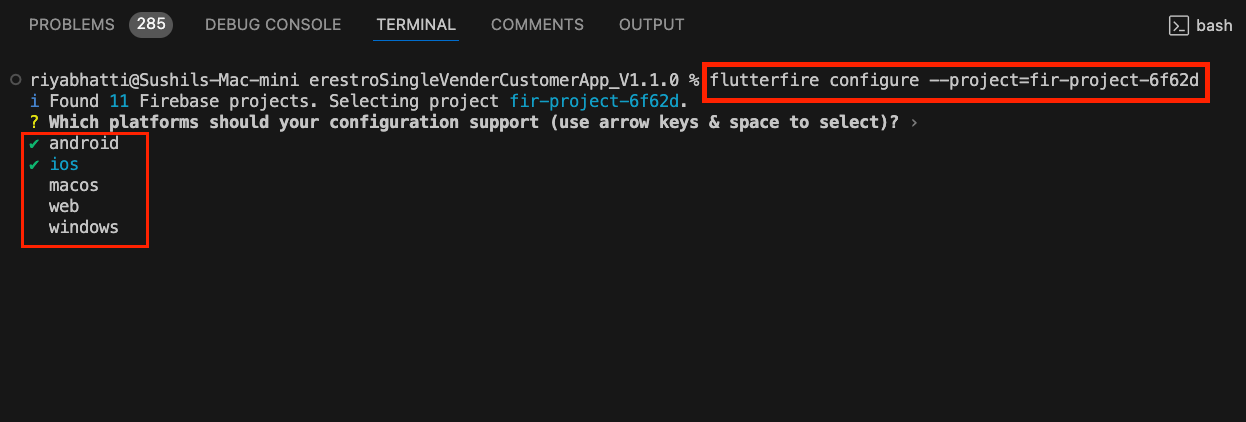
📱 Step 3: Create a Firebase App for Flutter
1️⃣ Select Flutter as the app type (refer to the image below).
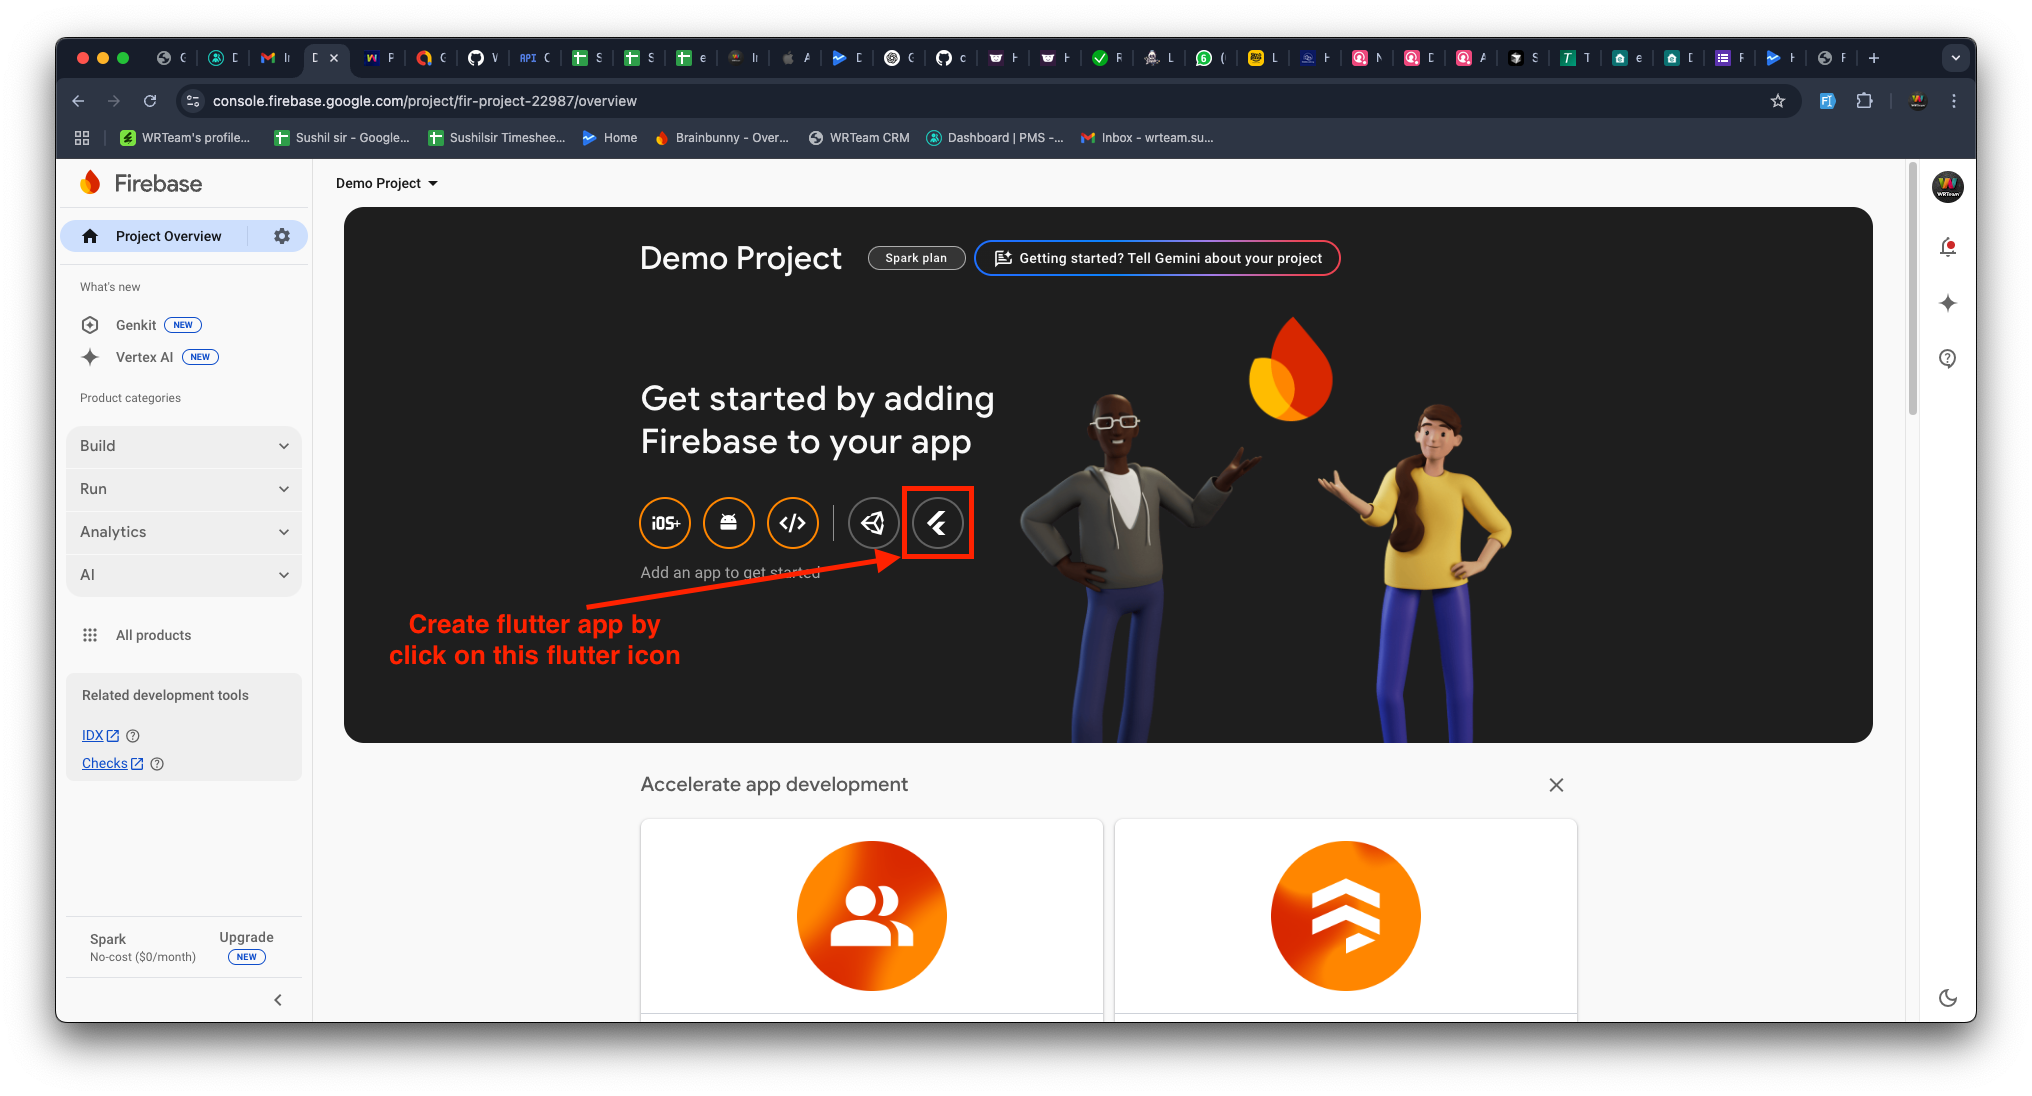
2️⃣ Press Next to continue.
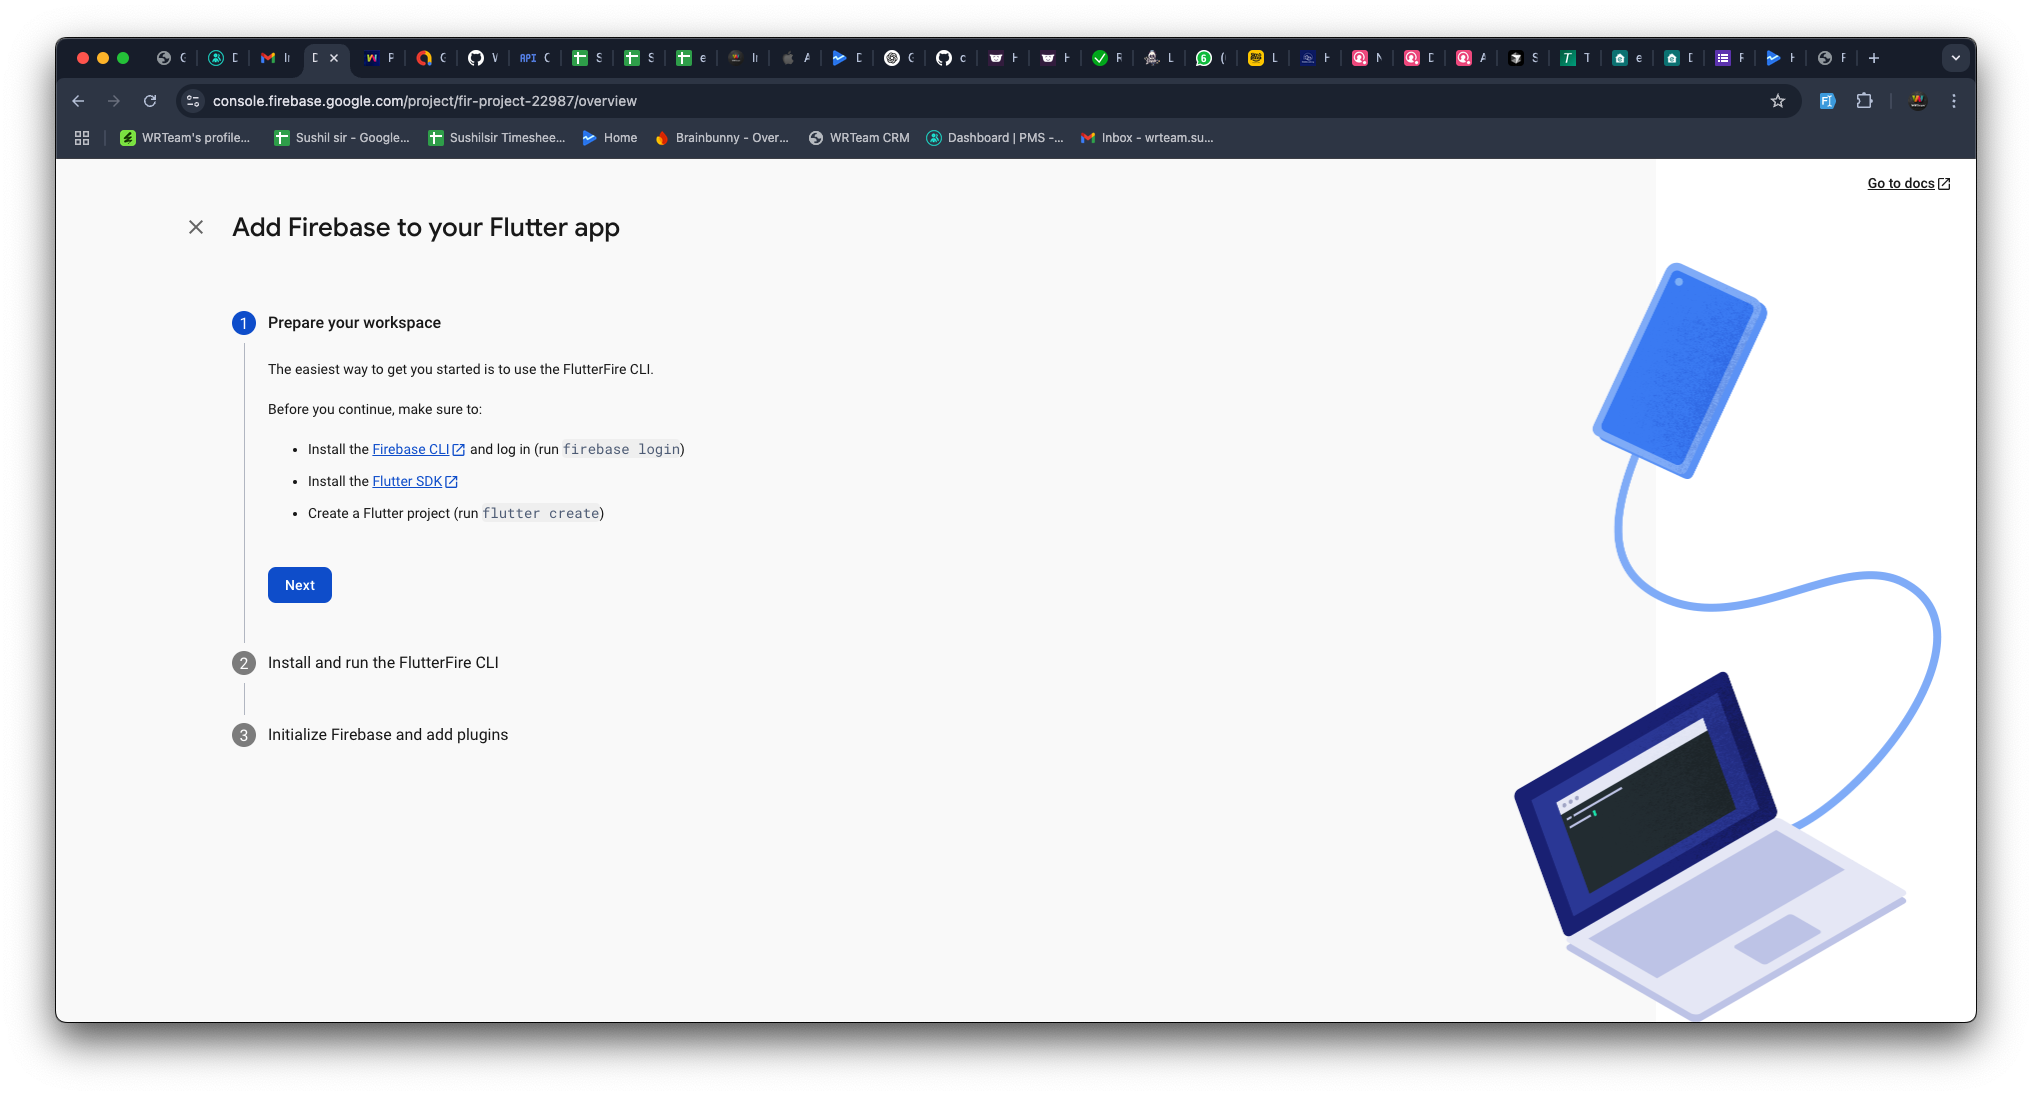
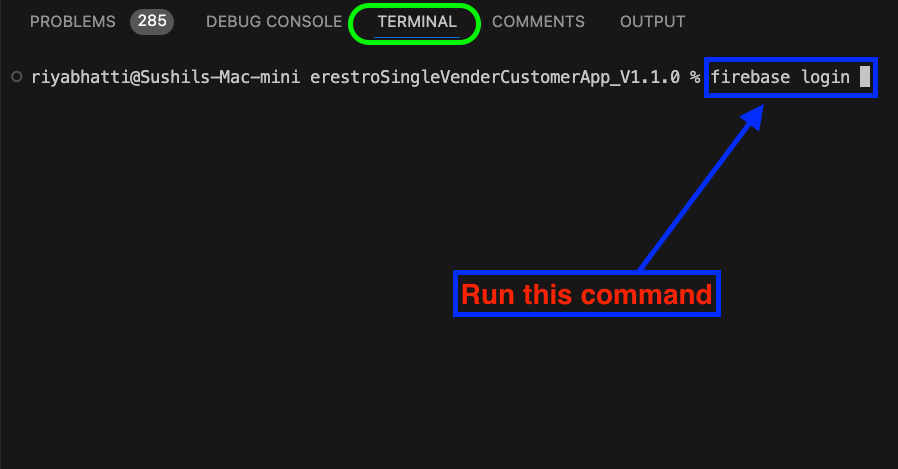
🖥️ Step 4: Log in to Firebase via Terminal
1️⃣ Open CLI Terminal (e.g., Visual Studio Code, Android Studio).
2️⃣ Run the following command to log in (if you are already logged in, then you can move to the step 5):
firebase login
3️⃣ A browser window will open—log in to your Firebase account.
4️⃣ When prompted, allow Firebase to collect CLI usage data by entering YES and pressing Enter.
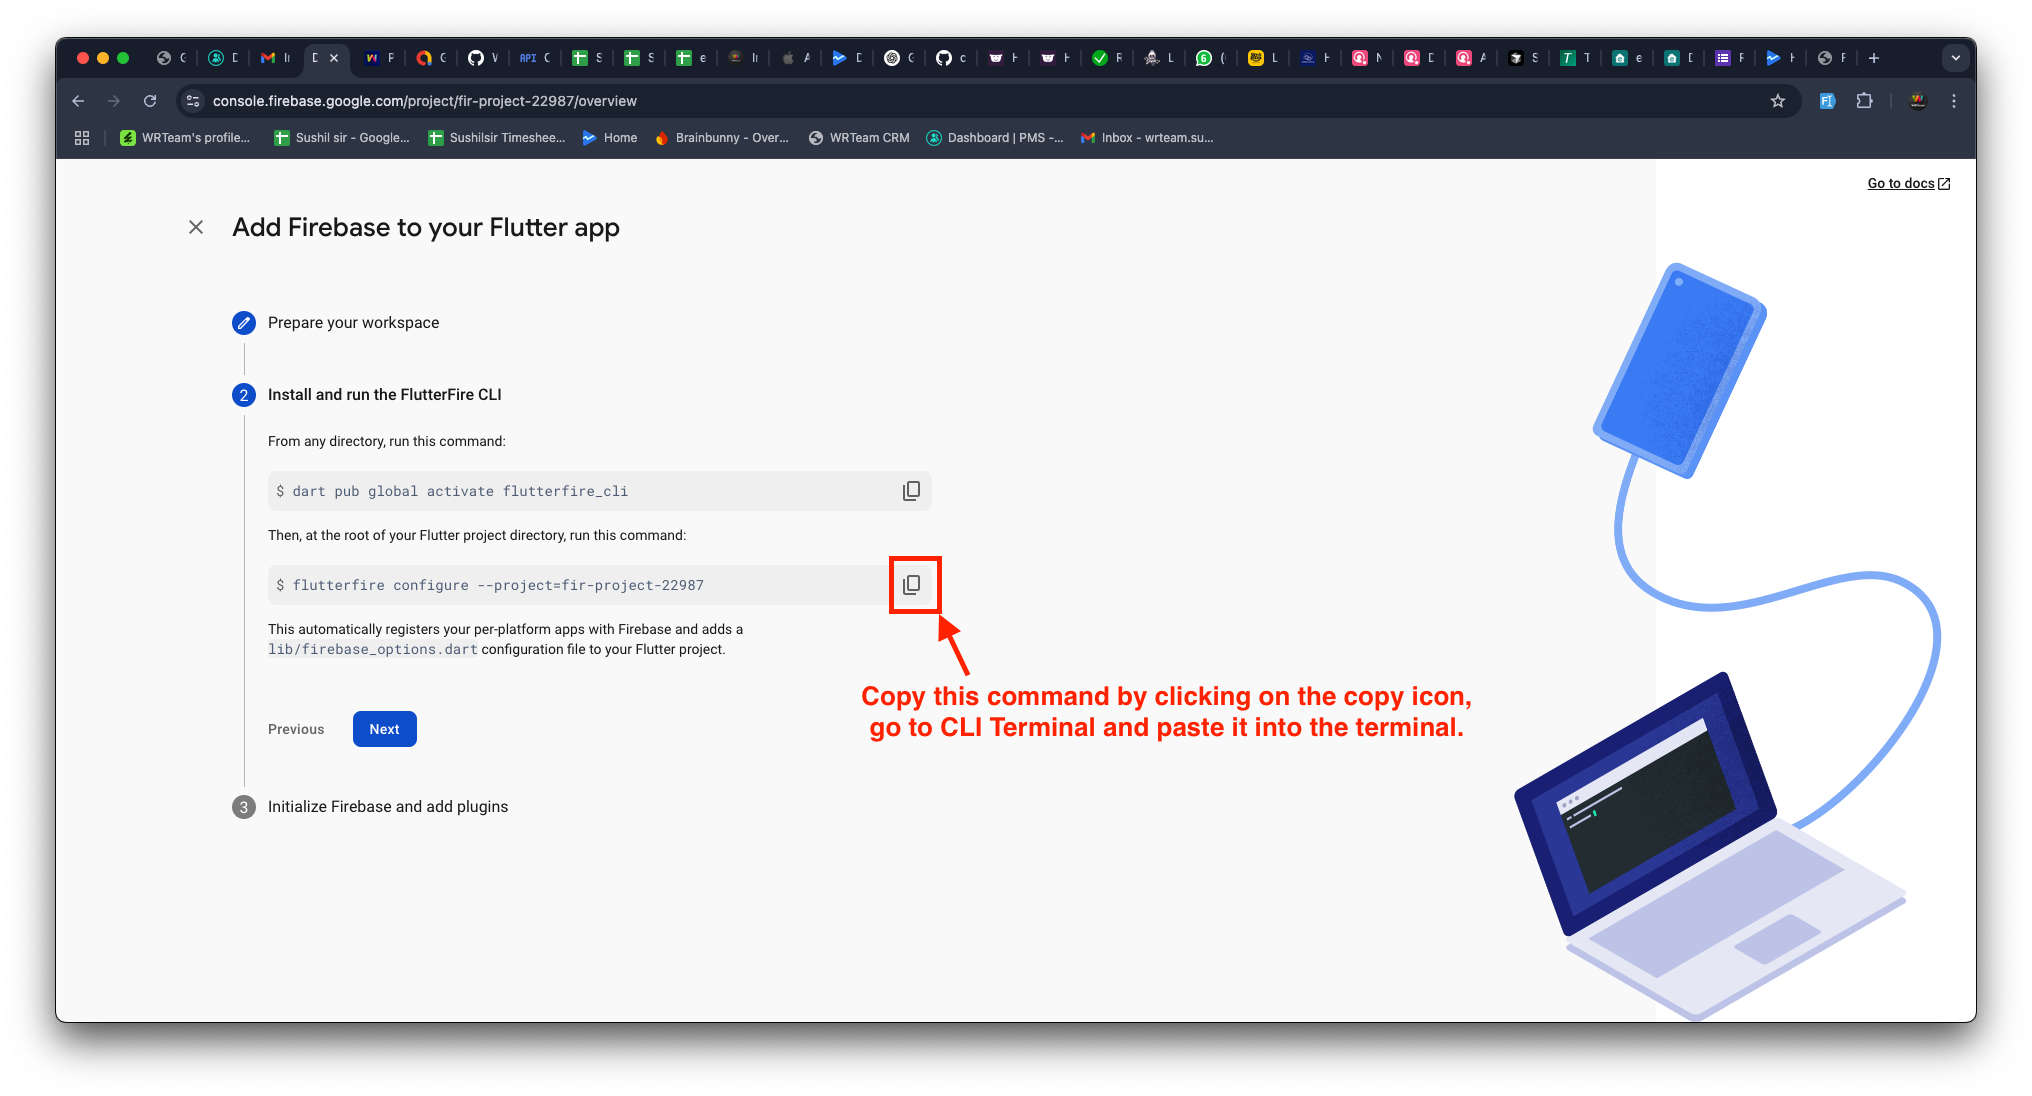
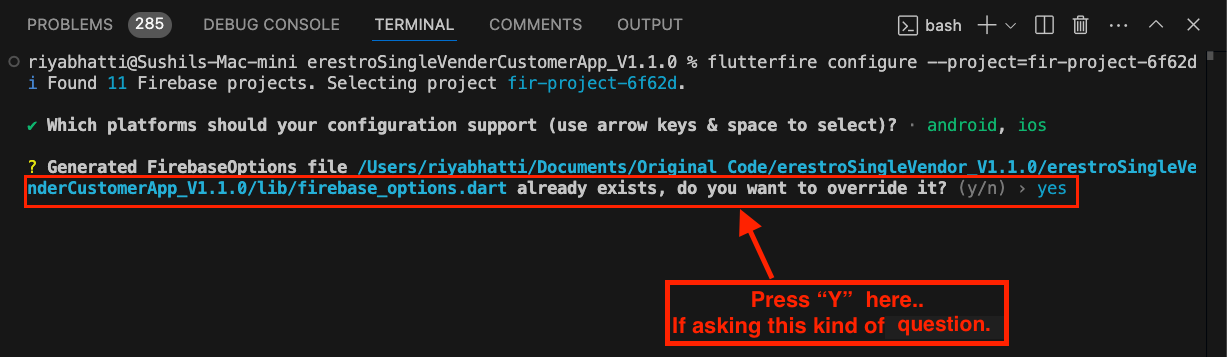
🛠️ Step 5: Run Firebase Initialization Commands
1️⃣ In CLI Terminal (e.g., Visual Studio Code, Android Studio), run the first Firebase setup command (as per the provided image).
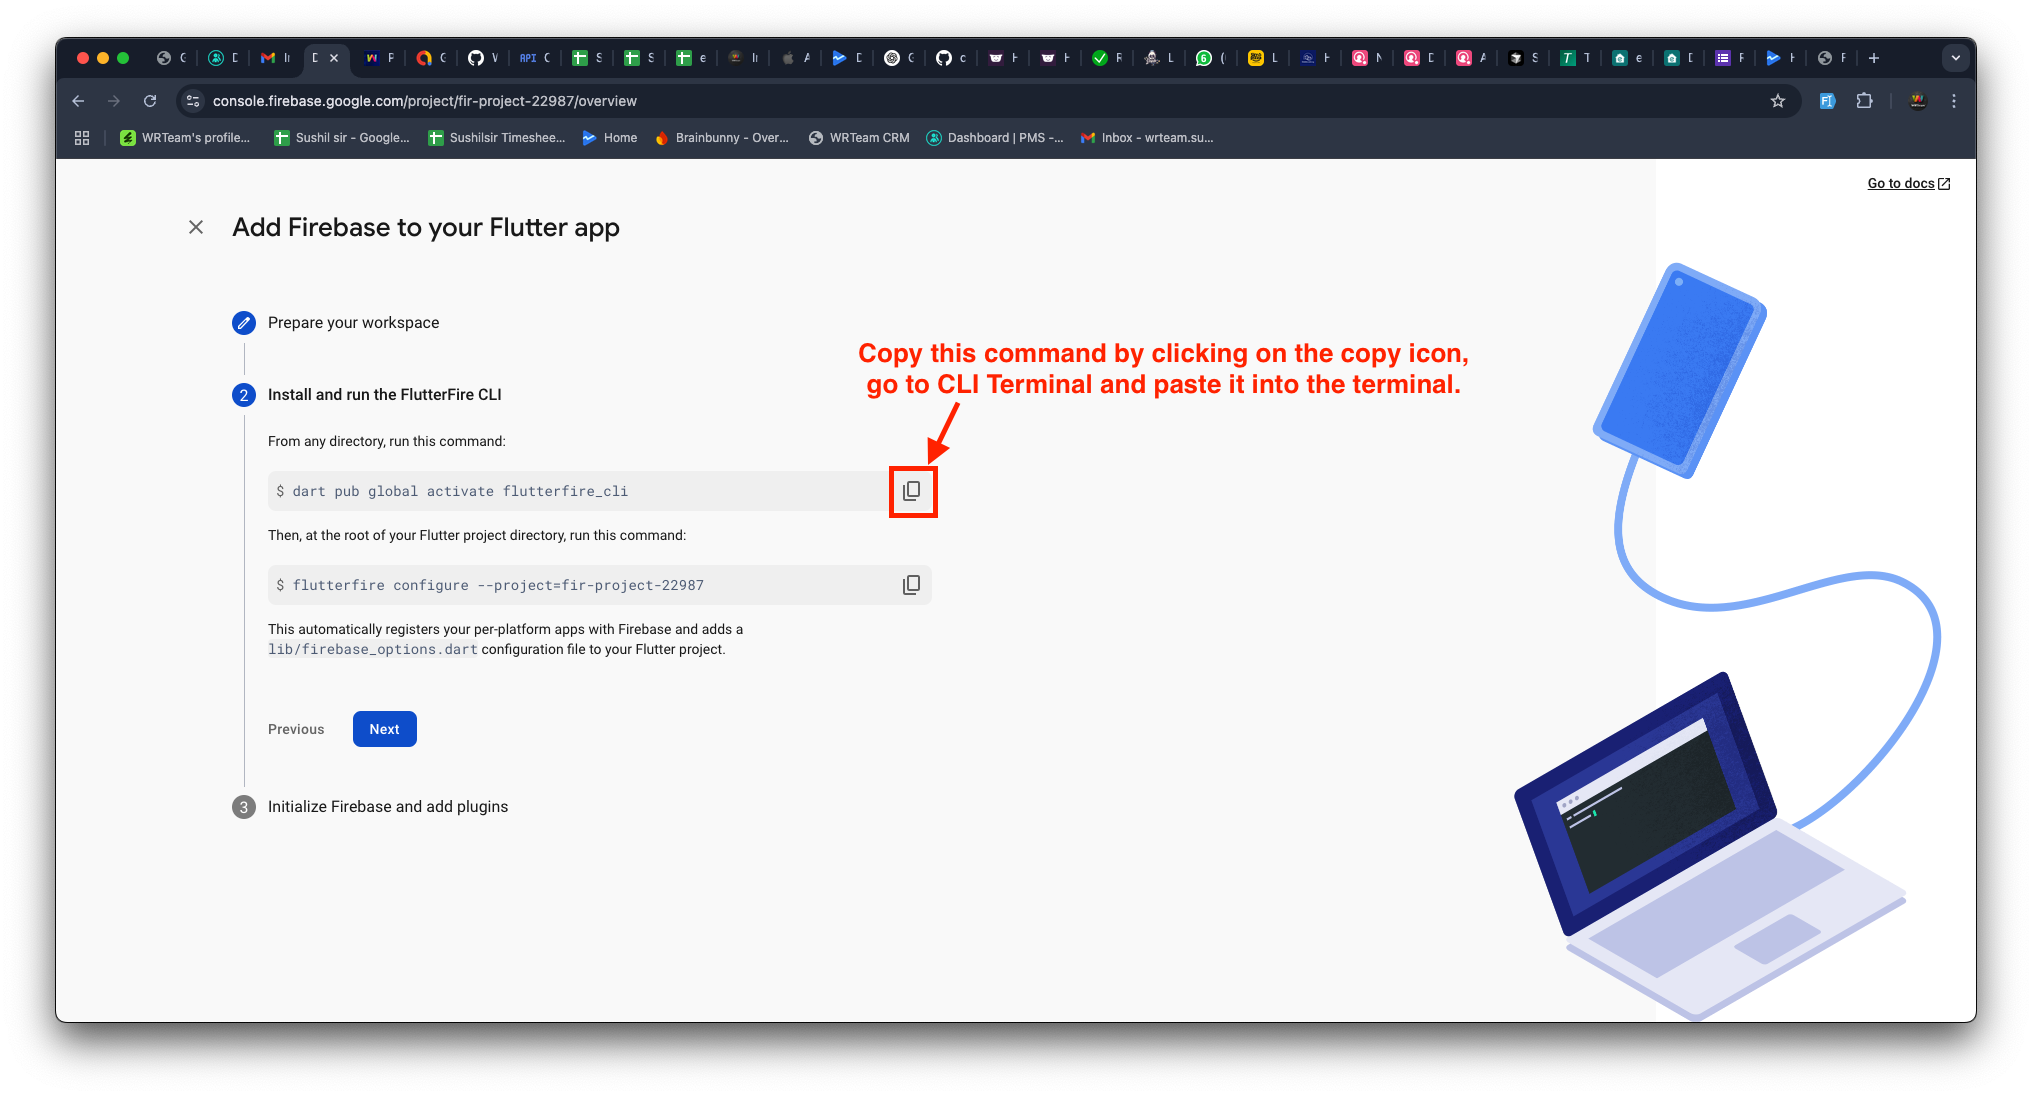
2️⃣ Run the second Firebase setup command in the terminal.
3️⃣ When the terminal asks for confirmation, press Enter.
4️⃣ If prompted again, press Y to confirm.
🎉 Step 6: Finalizing Firebase Setup
1️⃣ Press Next to continue.
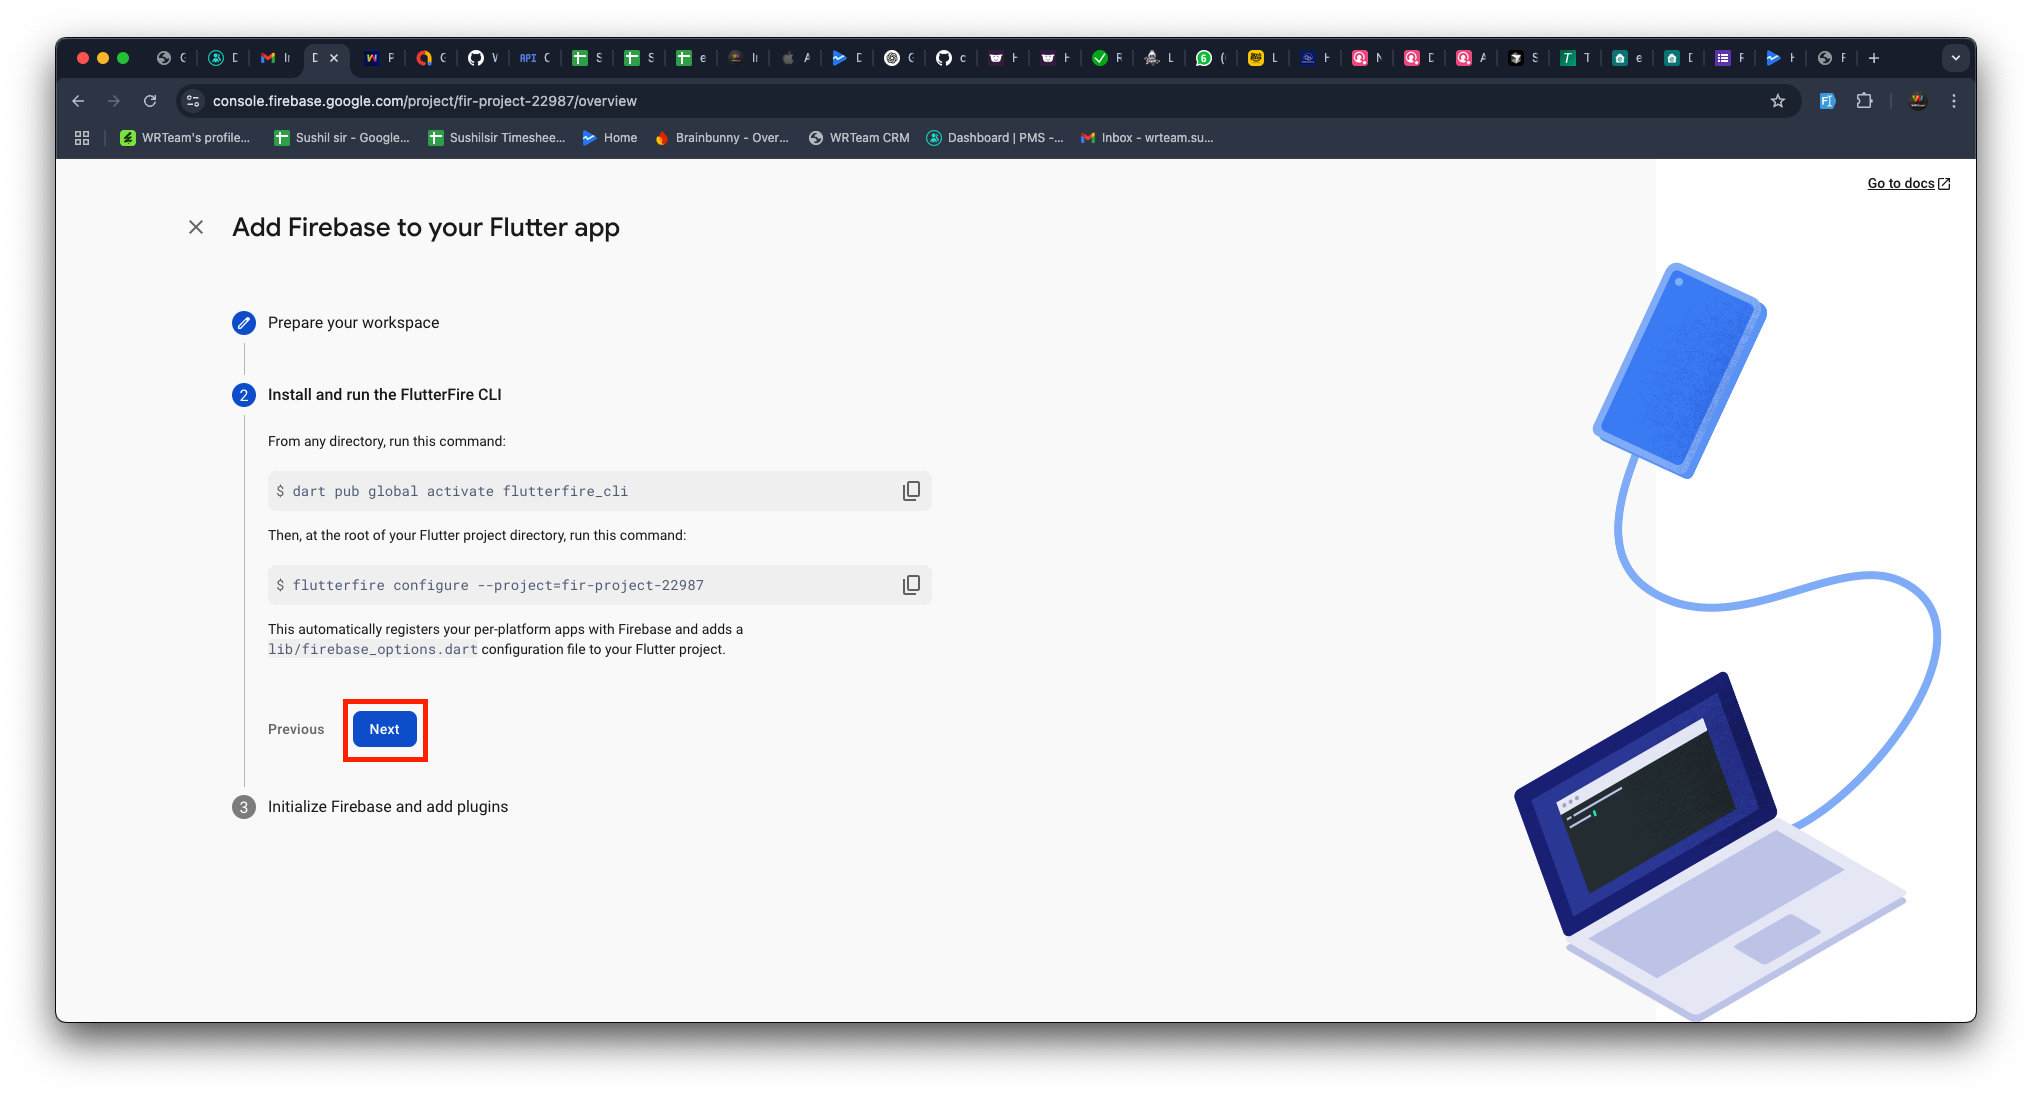
2️⃣ Click Continue to Console.

🔒 Add SHA1 & SHA256 Keys in Firebase
🔹 For Android
For Android, you need to add a total of three pairs of SHA-1 and SHA-256 keys to the Firebase CLI by following the steps below.
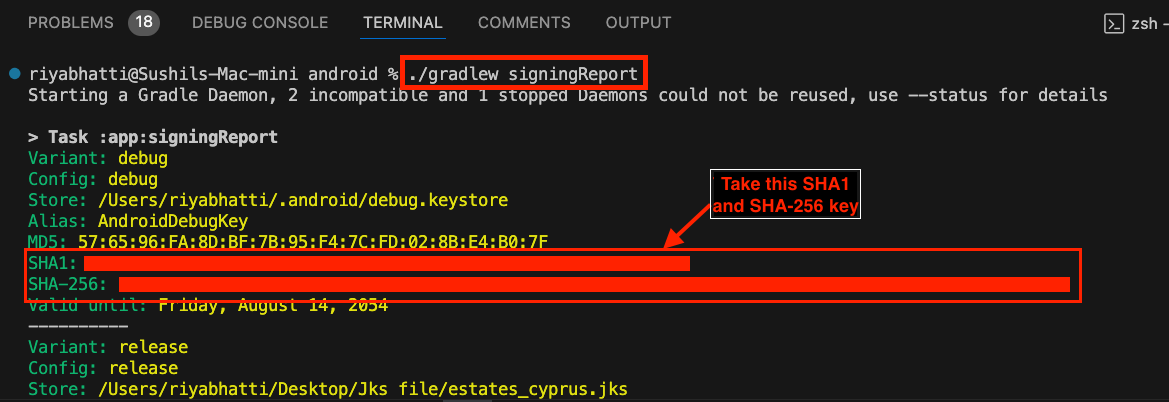
🔸 For Debug Build
1️⃣ Open your project code in CLI Terminal (e.g., Visual Studio Code, Android Studio)
2️⃣ Run the following command in your project's root folder:
For Mac/Linux
cd android
./gradlew signingReport
For Windows
cd android
gradlew signingReport
3️⃣ Copy the SHA1 and SHA256 keys from the output
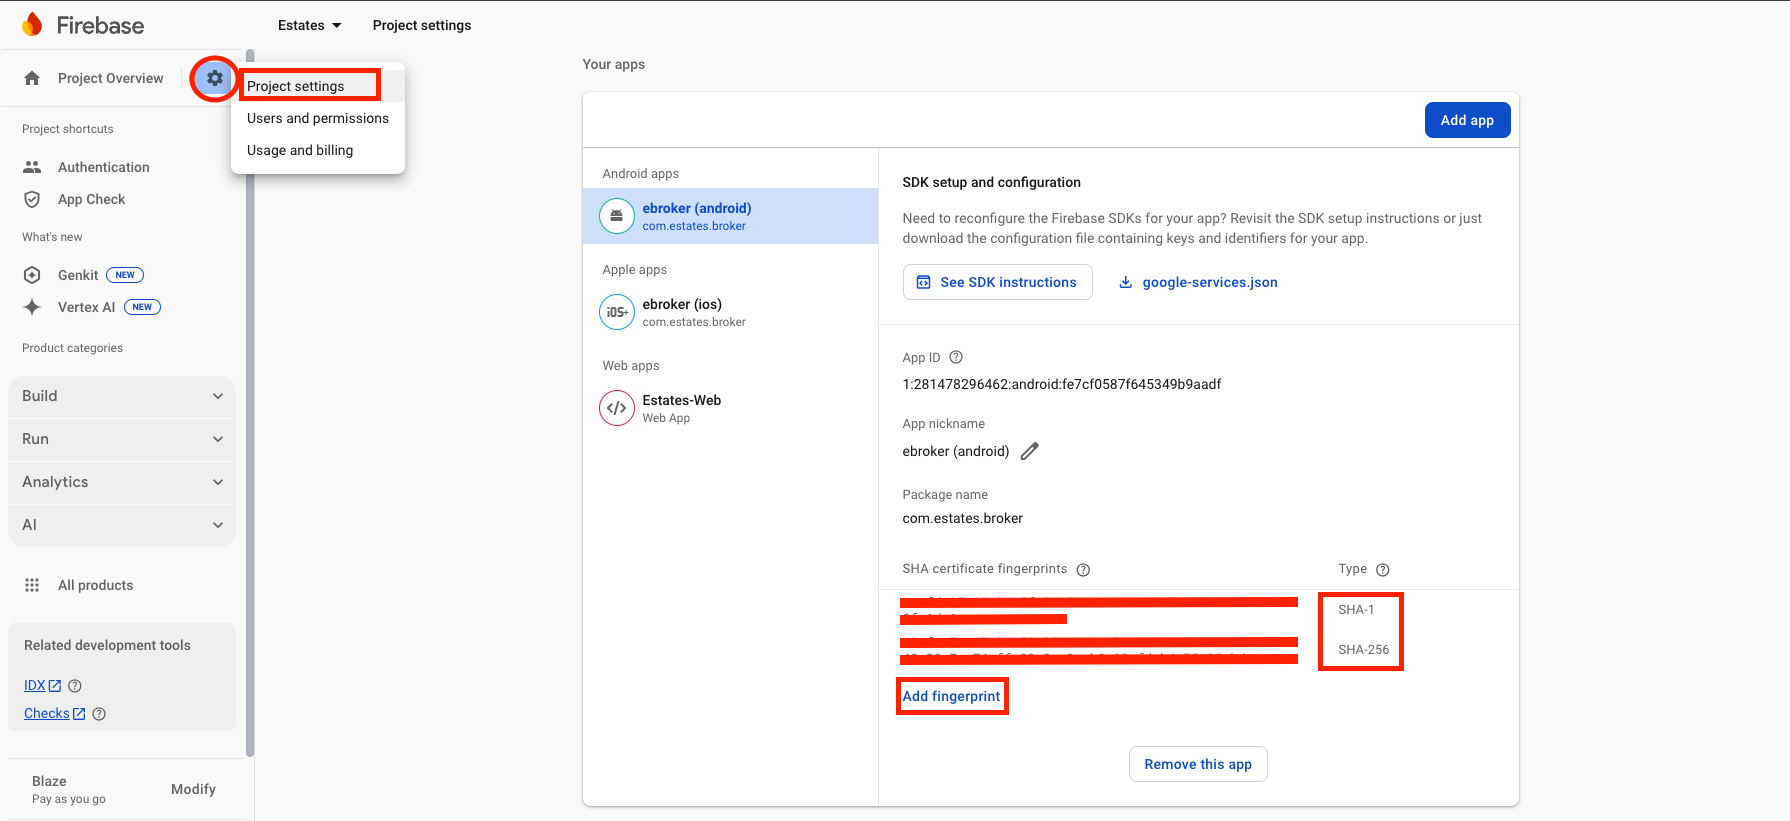
4️⃣ Open Firebase Console
5️⃣ Go to Project Settings > General > Android App
6️⃣ Add the copied SHA1 and SHA256 keys
🔸 For Release Build
1️⃣ To generate a keystore file, run the following command in your project's terminal:
For Mac/Linux
keytool -genkey -v -keystore YOUR-KEYSTORE-FILE.jks -keyalg RSA -keysize 2048 -validity 10000 -alias YOUR-ALIAS
For Windows
keytool -genkey -v -keystore YOUR-KEYSTORE-FILE.jks -storetype JKS -keyalg RSA -keysize 2048 -validity 10000 -alias YOUR-ALIAS
-
You can replace "YOUR-KEYSTORE-FILE.jks" with your preferred filename, but ensure you keep the ".jks" extension. Similarly, you can change "YOUR-ALIAS" as needed, but make sure to remember it.
-
During this process, you will be prompted to set a password; please note that the password characters won't be visible on the screen.
-
Additional information may be requested, but you can simply press Enter to skip those as they are optional fields.
2️⃣ Create a file named key.properties in your project's android folder.
3️⃣ Add the following details, which correspond to the information you used in the previous step:
storePassword=[your-password-from-previous-step]
keyPassword=[your-password-from-previous-step]
keyAlias=[your-alias-from-previous-step]
storeFile=[your-keystore-file-location]
Replace the placeholders ("[]" brackets) with the actual details you used.
4️⃣ You need to add the release SHA keys to Firebase
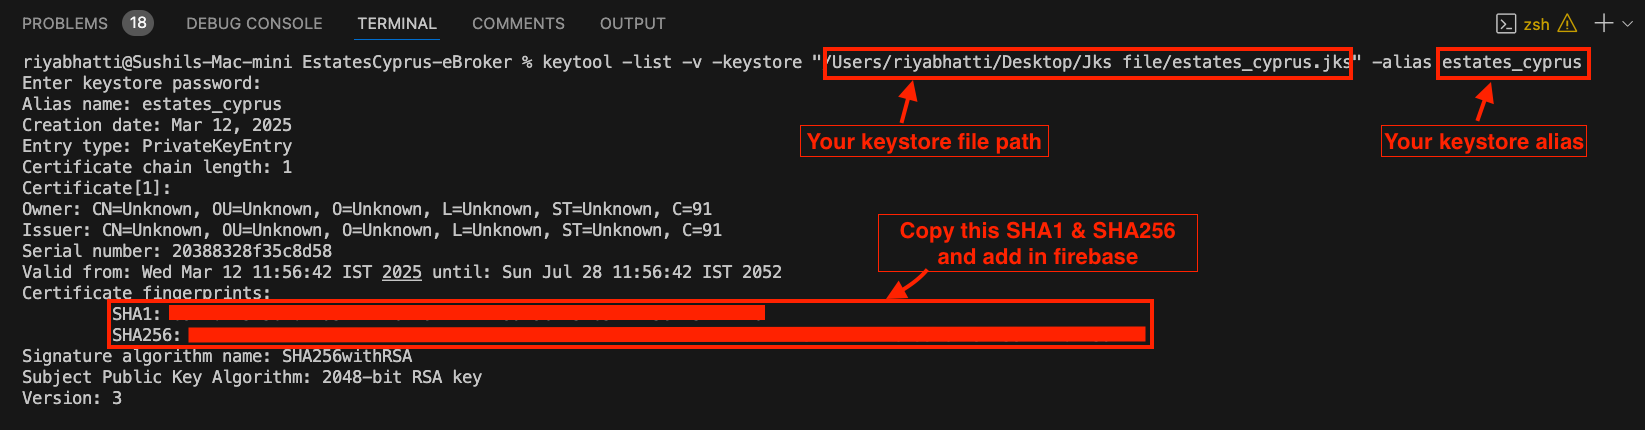
5️⃣ Get the release SHA keys by running the following command:
keytool -list -v -keystore "YOUR_KETSTORE_FILE_PATH" -alias YOUR_ALIAS_NAME
Replace YOUR_KETSTORE_FILE_PATH with your own keystore file path and also replace YOUR_ALIAS_NAME with your own keystore alias.
6️⃣ Enter the keystore password when prompted.
7️⃣ Copy and paste the SHA keys into Firebase Console.
Please do not forget to add the following keys to the Firebase Console. Without these, authentication will not be allowed for your app when it's in production.
🔸 For App Signing
8️⃣ After Create the app on the Google Play Console, Go to View app->
9️⃣ Go to Test and release > Setup > App Signing
-
Copy the SHA1 and SHA256 keys from
App signing key certificateand paste into Firebase Console.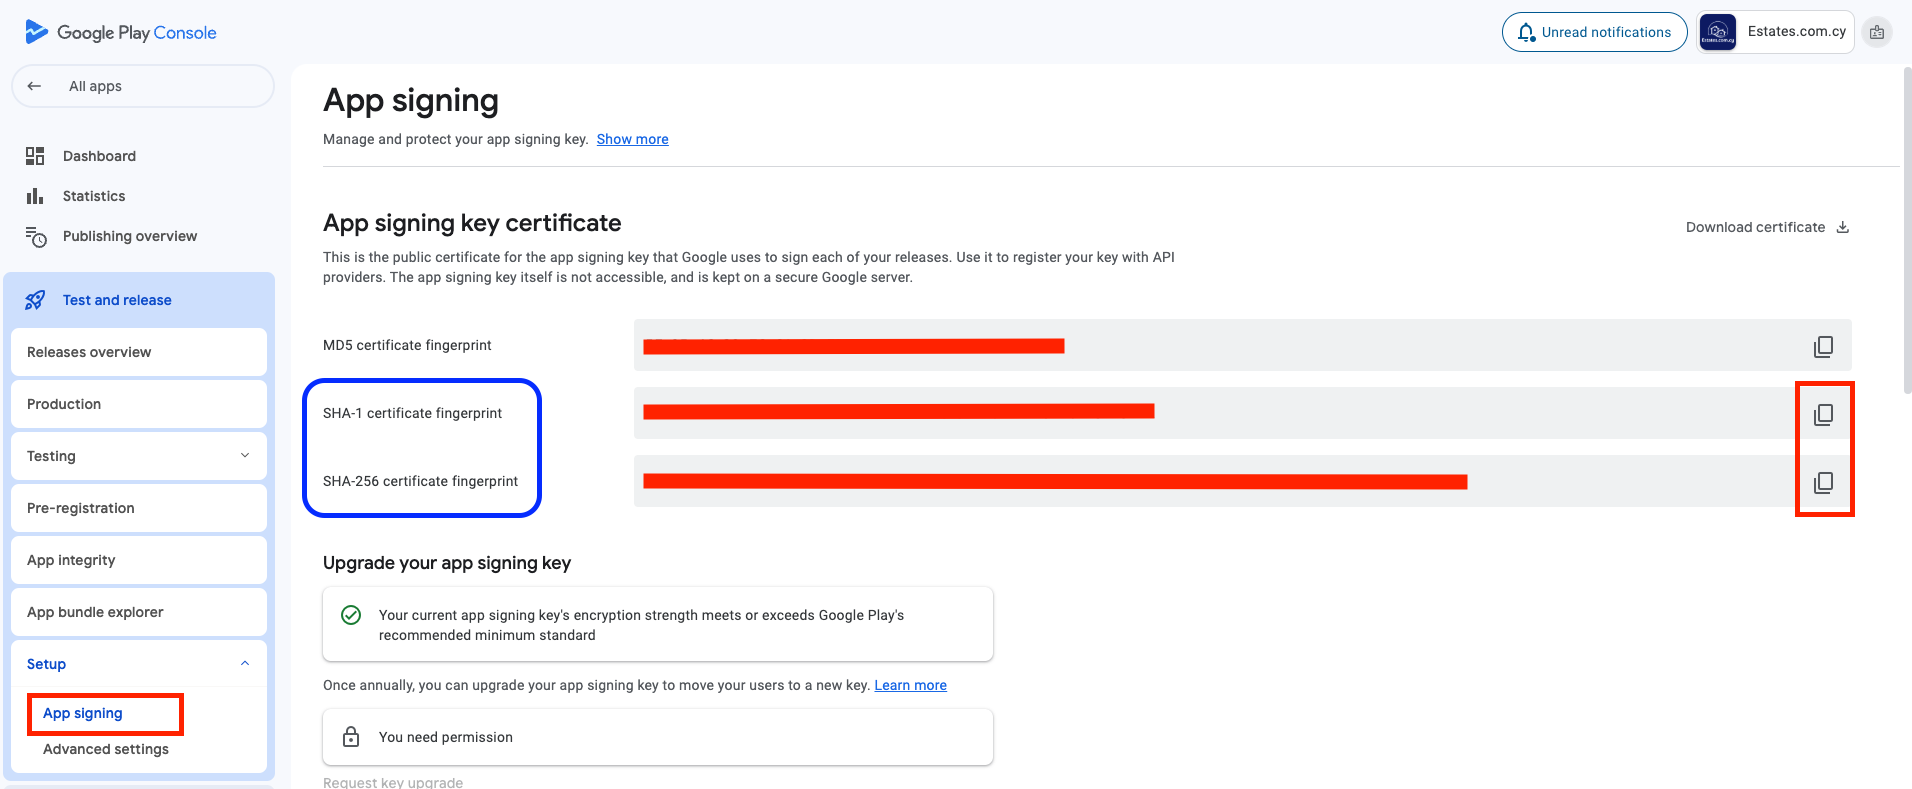
🍎 For iOS Authentication Setup
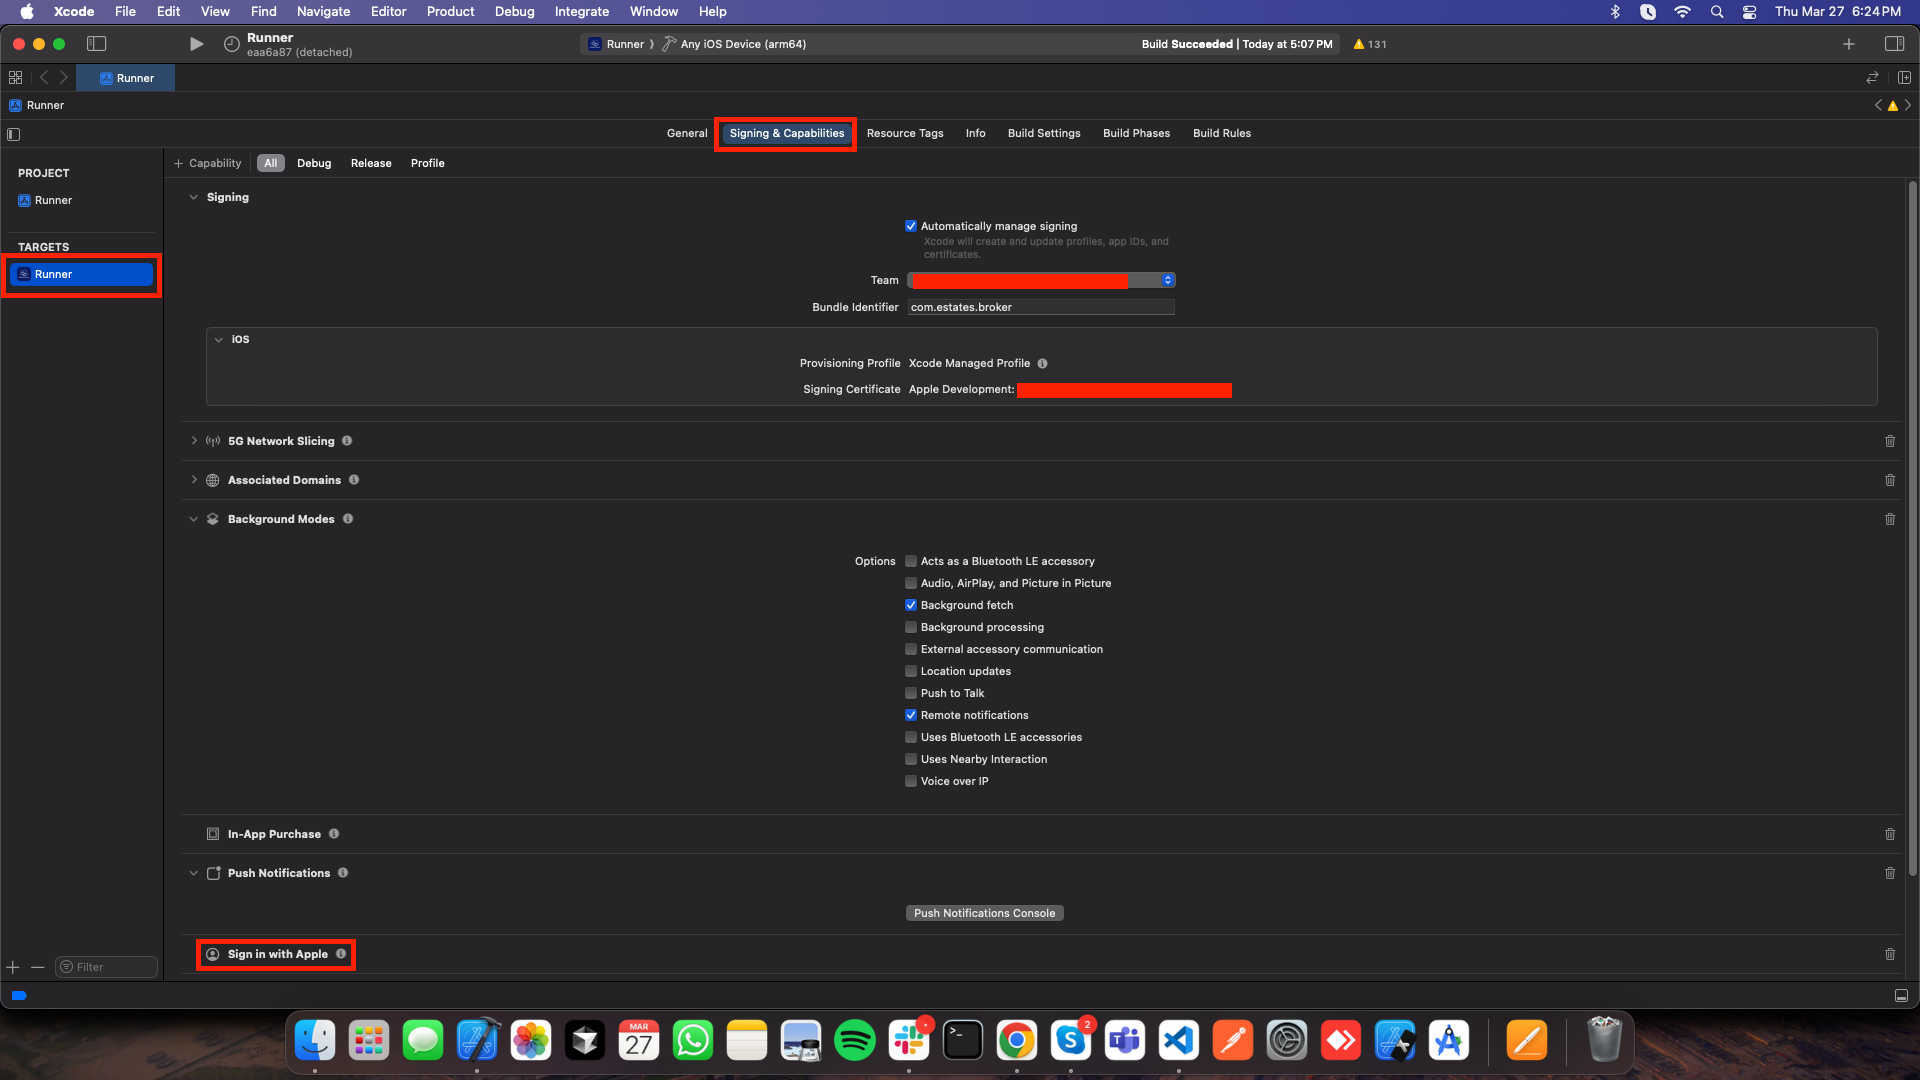
1️⃣ Open Xcode > Open Your Project's ios folder
2️⃣ Go to Signing & Capabilities tab
3️⃣ Add Sign In With Apple capability
4️⃣ Select a Team in the Code Signing section
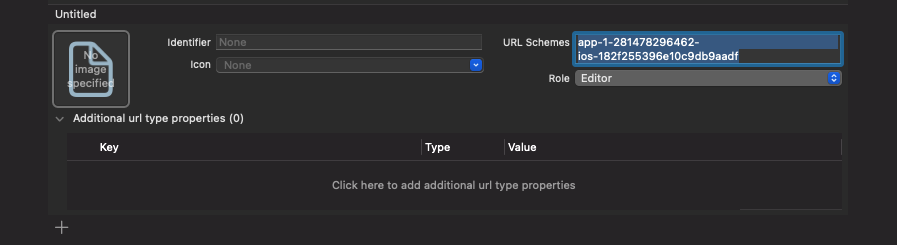
🔹 Configure URL Schemes for Firebase Authentication
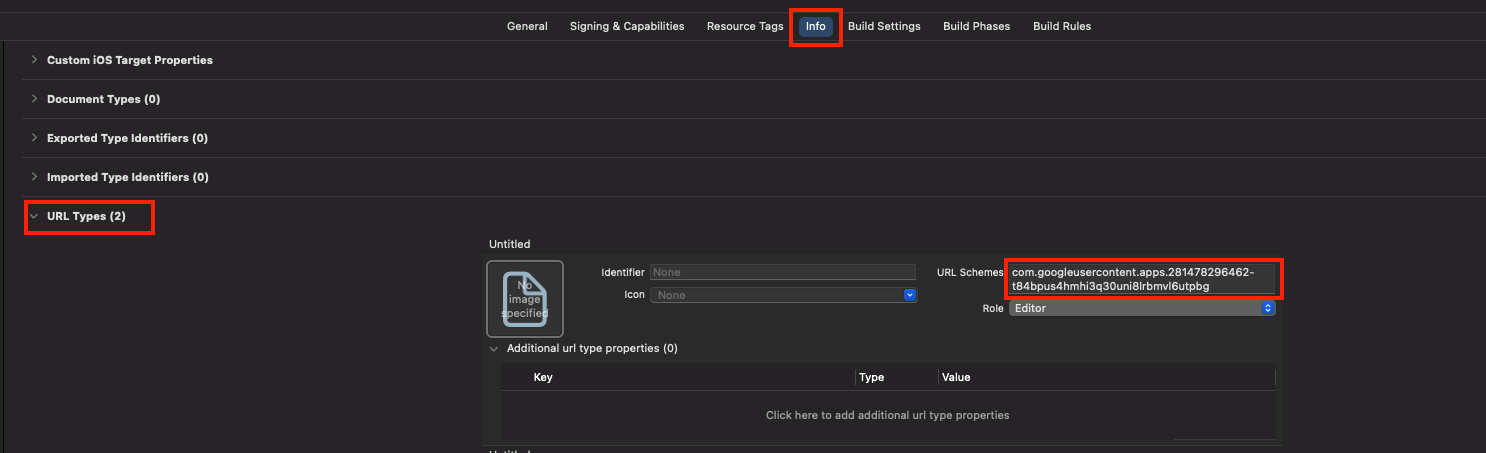
1️⃣ Select the Info tab under your project
2️⃣ Expand URL Types
3️⃣ Click + and add a new URL scheme
4️⃣ Find REVERSED_CLIENT_ID inside GoogleService-Info.plist
5️⃣ Copy and paste it into the URL Schemes field
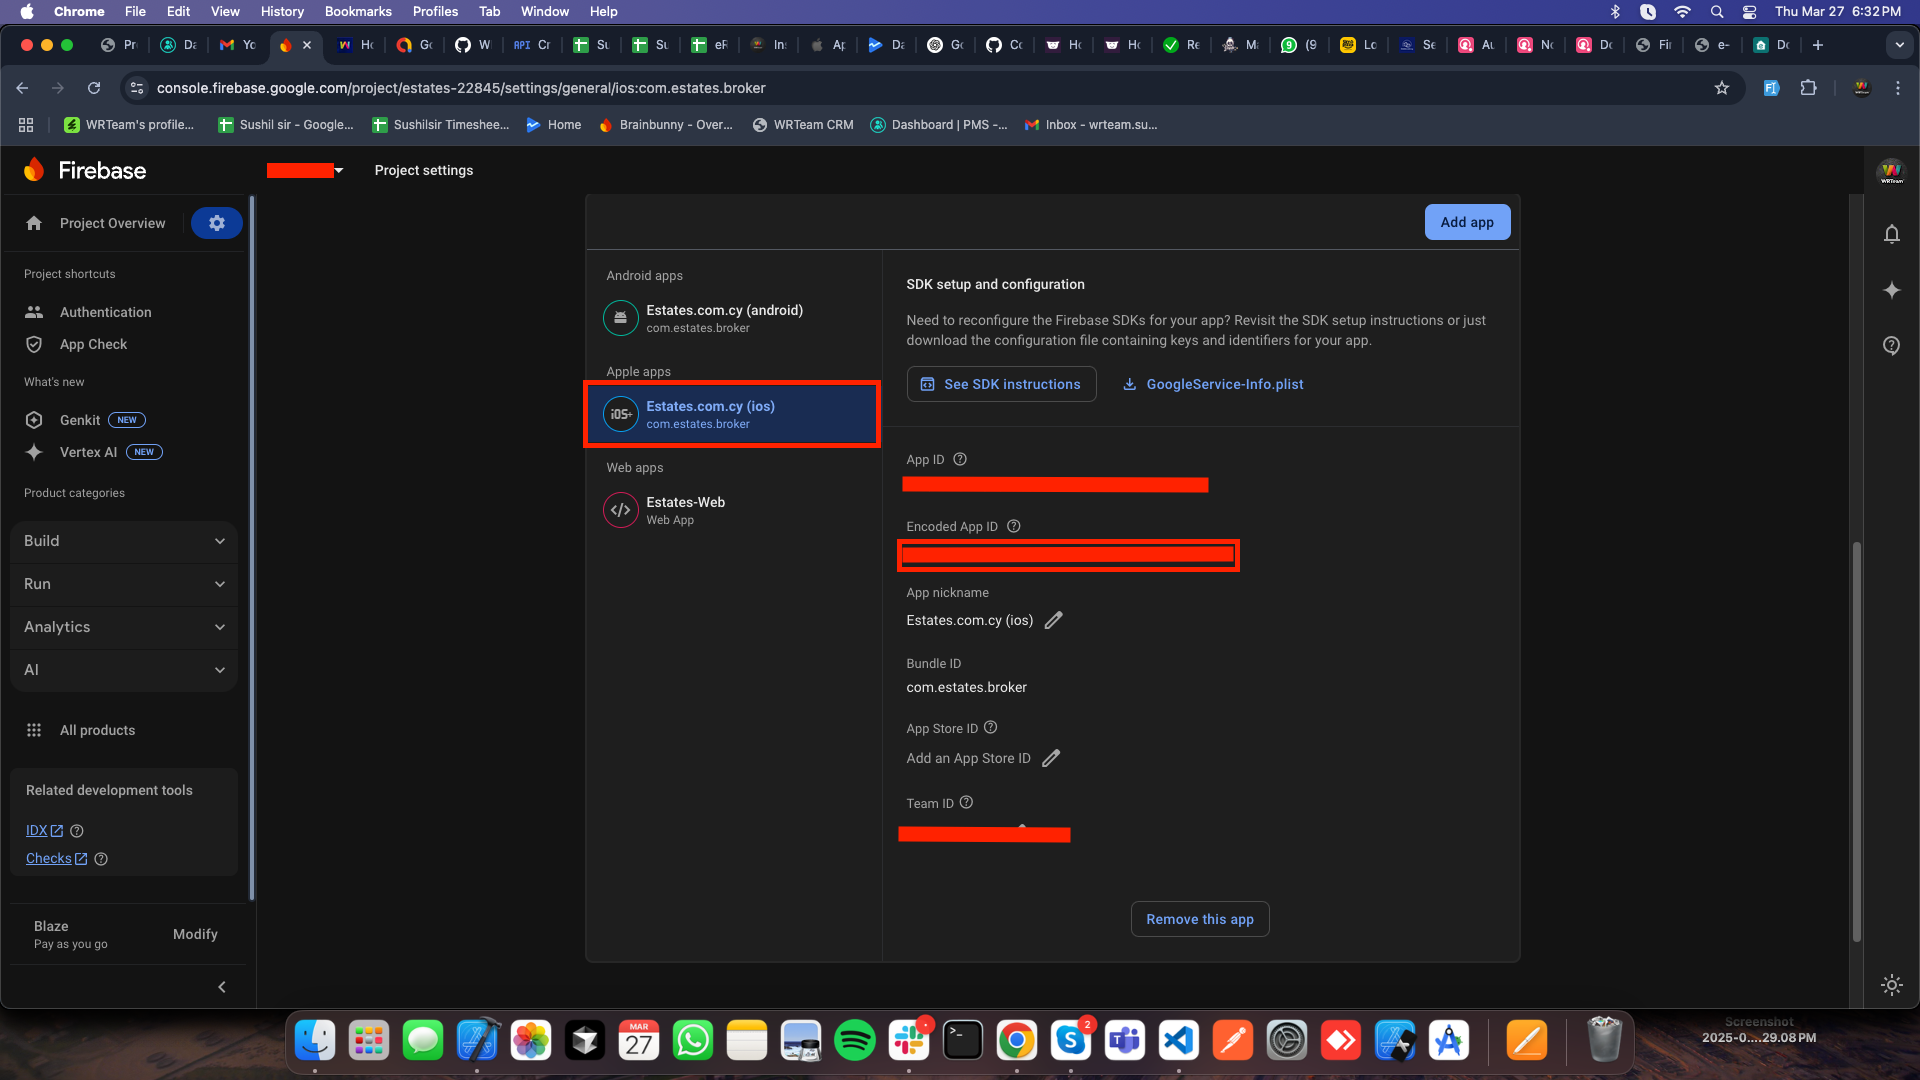
6️⃣ Go to the Firebase Console > Project Settings > Apple apps
7️⃣ Copy Encoded App ID
8️⃣ Click + and add a new URL scheme (in Xcode)
9️⃣ Paste the Encoded App ID into the URL Schemes field