Installation Steps
This guide will walk you through the process of installing and setting up the Student Web Portal for production deployment.
Prerequisites
Before you begin, ensure you have the following:
Required Tools
-
VS Code Editor - Download from https://code.visualstudio.com/
- Free, lightweight code editor from Microsoft
- Recommended for editing the project files
-
Node.js (Version 20) - Download from https://nodejs.org/en/download/prebuilt-installer
- Required to build the project
- Choose the LTS (Long Term Support) version 20
- Includes npm (Node Package Manager) automatically
-
Firebase Account - Create account at https://console.firebase.google.com/
- Required for push notifications
- Free tier is sufficient for most use cases
-
Web Hosting Server
- Domain or subdomain for the Student Web Portal
- Access to upload files (cPanel, FTP, or similar)
Required Files
- Student Web Portal source code (purchased from CodeCanyon)
- Admin Panel URL (must be running and accessible)
Installation Process
Follow these steps carefully to set up the Student Web Portal:
Step 1: Extract the Source Code
Extract the ZIP file of the Student Web code that you received from CodeCanyon.
- Locate the downloaded ZIP file
- Right-click and select "Extract All" (Windows) or double-click (macOS)
- Extract to a location you can easily access (e.g., Desktop or Documents folder)
Step 2: Open Project in VS Code
Open the extracted project folder in VS Code editor.
- Launch VS Code
- Click File → Open Folder
- Navigate to the extracted
eschool-sass-webfolder - Click Select Folder to open the project
Step 3: Install Node.js
Download and install Node.js version 20 if not already installed.
Download Link: https://nodejs.org/en/download/prebuilt-installer
- Select Node.js 20 LTS version
- Choose your operating system (Windows/macOS/Linux)
- Download and run the installer
- Follow the installation wizard (use default settings)
- Verify installation by opening Terminal/Command Prompt and typing:
node --version
npm --version
Note: If Node.js is already installed, skip this step.
Step 4: Configure Environment Variables
The Student Web Portal uses environment variables to configure API connections and branding details. These variables are stored in a .env.local file in the project root.
- In VS Code, locate the
.env.localfile in the root folder. - If it doesn't exist, create a new file named
.env.local. - Open the file for editing and configure your Admin Panel URL:
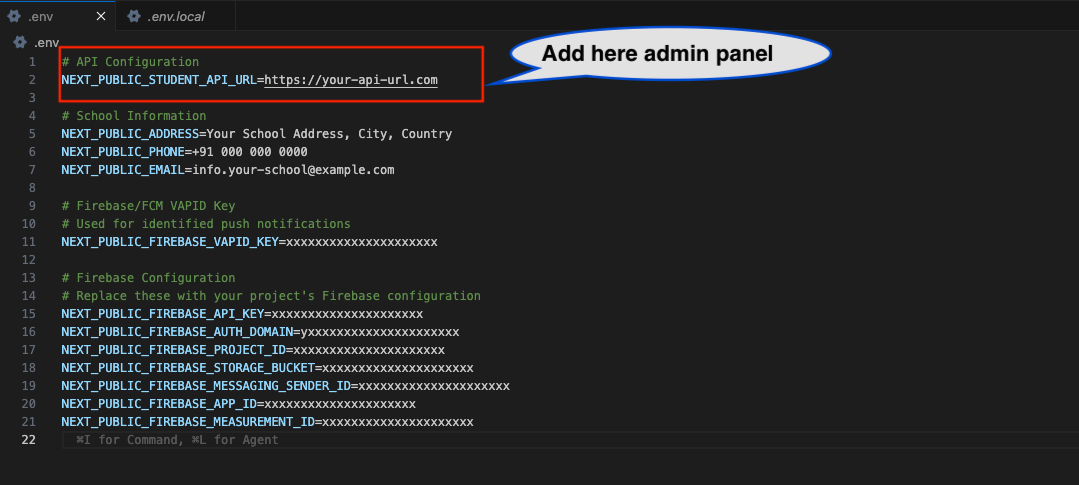
# Admin Panel API URL
NEXT_PUBLIC_STUDENT_API_URL=https://your-admin-panel-domain.com
- Add your school's Contact Information (this appears in the portal footer):
# Contact Information
NEXT_PUBLIC_ADDRESS=123 Learning Avenue, Greenfield District
NEXT_PUBLIC_PHONE=+91 12345 67890
NEXT_PUBLIC_EMAIL=info@yourschool.com
Important Notes:
- Ensure the API URL does not end with
/api/v1. - Contact information changes will be reflected immediately in the portal.
- All variables must be prefixed with
NEXT_PUBLIC_.
Step 6: Open Firebase Console
Open Firebase Console to set up push notifications.
Firebase Console: https://console.firebase.google.com/
- Sign in with your Google account
- Click Add Project (or select existing project)
- Follow the setup wizard to create a new Firebase project
Step 7: Configure Firebase
Follow the Firebase setup documentation to get your configuration details.
Refer to the Firebase Setup section for detailed, step-by-step instructions on:
- Creating a Firebase project
- Enabling Firebase Cloud Messaging (FCM)
- Getting your Firebase configuration keys
- Setting up VAPID key for web push notifications
Step 8: Add Firebase Details to Environment File
Add all Firebase configuration details to the .env.local file. This is crucial for enabling push notifications.
For a detailed setup guide, refer to the Firebase Setup section.
- Locate your VAPID Key in the Firebase Console and add it to
.env.local:
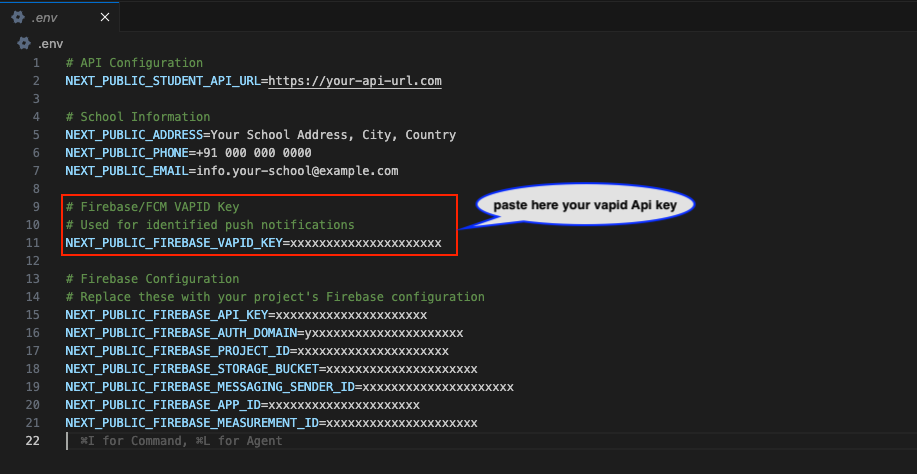
# Firebase VAPID Key (for push notifications)
NEXT_PUBLIC_FIREBASE_VAPID_KEY=your-vapid-key
- Add your Firebase Project Configuration keys:
# Firebase Configuration
NEXT_PUBLIC_FIREBASE_API_KEY=your-firebase-api-key
NEXT_PUBLIC_FIREBASE_AUTH_DOMAIN=your-project-id.firebaseapp.com
NEXT_PUBLIC_FIREBASE_PROJECT_ID=your-project-id
NEXT_PUBLIC_FIREBASE_STORAGE_BUCKET=your-project-id.firebasestorage.app
NEXT_PUBLIC_FIREBASE_MESSAGING_SENDER_ID=your-sender-id
NEXT_PUBLIC_FIREBASE_APP_ID=your-app-id
NEXT_PUBLIC_FIREBASE_MEASUREMENT_ID=your-measurement-id
Where to find these values:
- Firebase Configuration Keys: Go to Firebase Console → Project Settings → General → Your apps → Web app.
- VAPID Key: Go to Firebase Console → Project Settings → Cloud Messaging → Web Push certificates.
Complete .env.local File Structure:
Your final .env.local file should look like this:
# Admin Panel API URL
NEXT_PUBLIC_STUDENT_API_URL=https://your-admin-panel.com

# Contact Information
NEXT_PUBLIC_ADDRESS=123 Learning Avenue, Greenfield District
NEXT_PUBLIC_PHONE=+91 12345 67890
NEXT_PUBLIC_EMAIL=info@yourschool.com

# Vapid key
NEXT_PUBLIC_FIREBASE_VAPID_KEY=your-vapid-key

# Firebase Config
NEXT_PUBLIC_FIREBASE_API_KEY=your-firebase-api-key
NEXT_PUBLIC_FIREBASE_AUTH_DOMAIN=your-project.firebaseapp.com
NEXT_PUBLIC_FIREBASE_PROJECT_ID=your-project-id
NEXT_PUBLIC_FIREBASE_STORAGE_BUCKET=your-project.firebasestorage.app
NEXT_PUBLIC_FIREBASE_MESSAGING_SENDER_ID=your-sender-id
NEXT_PUBLIC_FIREBASE_APP_ID=your-app-id
NEXT_PUBLIC_FIREBASE_MEASUREMENT_ID=your-measurement-id
Step 8.1: Configure Firebase Service Worker
Update the Firebase configuration in the service worker file for push notifications.
- Locate the file: In VS Code, navigate to
public/firebase-messaging-sw.js - Find the Firebase config section (around line 30)
- Update the configuration with your Firebase credentials
File Location: public/firebase-messaging-sw.js
Find this section in the file:
// Firebase configuration
const firebaseConfig = {
  apiKey: "XXXXXXXXXXXXXXXXXXXXXX",
  authDomain: "XXXXXXXXXXXXXXXXXXXXXX",
  projectId: "XXXXXXXXXXXXXXXXXXXXXX",
  storageBucket: "XXXXXXXXXXXXXXXXXXXXXX",
  messagingSenderId: "XXXXXXXXXXXXXXXXXXXXXX",
  appId: "XXXXXXXXXXXXXXXXXXXXXX",
  measurementId: "XXXXXXXXXXXXXXXXXXXXXX",
};
Update it with your Firebase credentials:
// Firebase configuration
const firebaseConfig = {
  apiKey: "your-firebase-api-key",
  authDomain: "your-project-id.firebaseapp.com",
  projectId: "your-project-id",
  storageBucket: "your-project-id.firebasestorage.app",
  messagingSenderId: "your-sender-id",
  appId: "your-app-id",
  measurementId: "your-measurement-id",
};
Important Notes:
- The values in
firebase-messaging-sw.jsmust match the values in your.env.localfile - This file handles background push notifications when the browser is open but the app is not active
- Do not use
NEXT_PUBLIC_prefix in this file (it's a service worker, not environment variables) - Use regular JavaScript object format without quotes around keys
What this file does:
- Handles push notifications when the app is in the background
- Manages notification clicks and redirects to appropriate pages
- Coordinates with the foreground notification handler
- Supports all notification types (assignments, messages, exams, results, etc.)
Step 9: Install Dependencies
Install all required npm packages by running the install command.
- In VS Code, open the Terminal (View → Terminal or
Ctrl+`) - Make sure you're in the project root directory
- Run the following command:
npm i
or
npm install
This will install all dependencies listed in package.json. This process may take a few minutes.
Expected Output:
- Progress bar showing package installation
- No error messages
- "added XXX packages" message at the end
Step 10: Build for Production
Create an optimized production build of the application.
Run the build command:
npm run build
This command will:
- Compile TypeScript to JavaScript
- Optimize and minify the code
- Generate static files in the
buildfolder - Create production-ready files
Build Time: This process typically takes 2-5 minutes depending on your system.
Expected Output:
- Build progress messages
- "Compiled successfully" message
- A new
buildfolder created in the project root
Step 11: Upload to Server
Upload the build folder contents to your web hosting server.
- Locate the build folder in your project directory
- Create a ZIP file of the contents inside the build folder (not the folder itself)
- Upload to your server:
- Login to your hosting control panel (cPanel/Plesk)
- Navigate to File Manager
- Go to your domain/subdomain directory (e.g.,
public_html/student) - Upload the ZIP file
- Extract the ZIP file in that directory
- Verify files are in the correct location
Important: Upload only the contents inside the build folder, not the build folder itself.
File Structure on Server:
public_html/student/
├── _next/
├── assets/
├── index.html
├── favicon.ico
└── [other build files]
Verification
After completing the installation, verify that everything is working correctly:
- Open your browser and navigate to your Student Web Portal URL
- Check the login page loads without errors
- Test login with student credentials from your Admin Panel
- Verify features:
- Dashboard loads correctly
- Student information displays properly
- API connection is working
- Firebase notifications are functional
Common Installation Issues
Issue 1: Node.js Not Installed or Wrong Version
Error: node: command not found or version mismatch
Solution:
- Install Node.js version 20 from https://nodejs.org/en/download/prebuilt-installer
- Close and reopen Terminal/Command Prompt
- Verify with:
node --version
Issue 2: npm install Fails
Error: npm ERR! during installation
Solution:
- Delete
node_modulesfolder andpackage-lock.jsonfile - Clear npm cache:
npm cache clean --force - Run
npm installagain
Issue 3: Build Command Fails
Error: Build fails with errors
Solution:
- Check that
.env.localfile has all required variables - Ensure all environment variables start with
NEXT_PUBLIC_ - Verify Firebase configuration is correct
- Check for any syntax errors in the terminal output
- Try running:
npm install
npm run build
Issue 4: Environment Variables Not Working
Error: Configuration values not loading
Solution:
- Verify
.env.localfile is in the root directory of the project - Check that all variable names start with
NEXT_PUBLIC_ - Remove any quotes around values (unless they contain spaces)
- Make sure there are no spaces before or after the
=sign
Correct format:
NEXT_PUBLIC_STUDENT_API_URL=https://example.com
NEXT_PUBLIC_FIREBASE_API_KEY=XXXXXXXXXXXXXXXXXXXXXX
Incorrect format:
NEXT_PUBLIC_STUDENT_API_URL = "https://example.com"
NEXT_PUBLIC_FIREBASE_API_KEY = XXXXXXXXXXXXXXXXXXXXXX
Issue 5: Build Folder Not Created
Error: Build folder doesn't exist after running build command
Solution:
- Check the terminal for error messages
- Ensure the build command completed successfully
- Look for "Compiled successfully" message
- The build folder should be in the project root directory
Issue 6: White Screen After Deployment
Error: Blank white page on the deployed website
Solution:
- Check browser console for errors (F12 → Console tab)
- Verify all files from build folder were uploaded correctly
- Check
NEXT_PUBLIC_STUDENT_API_URLin.env.localis accessible from the internet - Ensure CORS is configured on Admin Panel for your web domain
- Clear browser cache and reload
Issue 7: API Connection Error
Error: "Network Error" or "Failed to fetch"
Solution:
- Verify
NEXT_PUBLIC_STUDENT_API_URLin.env.localis correct - Ensure Admin Panel API is running and accessible
- Check CORS settings on Admin Panel allow your Student Web domain
- Test API URL directly in browser to confirm it's reachable
- Check SSL certificate is valid if using HTTPS
Testing API URL:
Open your browser and visit: https://your-admin-panel.com/api/v1/settings
If the API is working, you should see a JSON response.
Issue 8: Firebase Notifications Not Working
Error: Push notifications not received
Solution:
- Verify
.env.localconfiguration: Check all Firebase variables are correct - Check service worker file: Ensure
firebase-messaging-sw.jsexists in thepublicfolder - Verify Firebase config matches: The values in
firebase-messaging-sw.jsmust exactly match.env.local(withoutNEXT_PUBLIC_prefix) - Enable FCM: Go to Firebase Console → Project Settings → Cloud Messaging → Enable Firebase Cloud Messaging API
- VAPID Key: Verify VAPID key is correctly configured in
.env.local - HTTPS Required: Firebase notifications only work on HTTPS domains (not HTTP or localhost)
- Browser Permissions: Check that notification permissions are granted in browser settings
- Test Notification: Send a test notification from Firebase Console → Cloud Messaging → Send test message
Verify Service Worker Registration:
- Open your Student Web Portal in browser
- Press F12 to open Developer Tools
- Go to Application tab (Chrome) or Storage tab (Firefox)
- Click Service Workers
- Check if
firebase-messaging-sw.jsis registered and active - If not, check browser console for error messages
Common Service Worker Issues:
- Config Mismatch: Firebase config in
firebase-messaging-sw.jsdoesn't match.env.local - Syntax Error: Check for typos in the firebaseConfig object
- File Not Found: Service worker file must be in
publicfolder and copied to build folder - CORS Error: Make sure the service worker is served from the same origin as your app
Important Notes
Security
- Never commit
.env.localfile to version control (it's in.gitignore) - Keep your Firebase keys and API URLs secure
- Use HTTPS for production deployment
Performance
- The build process optimizes your code for production
- Build files are minified and compressed
- Images are optimized automatically
Updates
When you receive updates to the Student Web Portal:
- Extract the new ZIP file
- Replace old files with new ones
- Check if
.env.localneeds any new variables - Run
npm install(in case of new dependencies) - Run
npm run build - Upload the new build to your server
Next Steps
After successful installation:
- Configure Branding: Customize logo, colors, and theme
- Backup: Keep a backup of your
.env.localfile
For deployment configurations and advanced setups, proceed to the Deployment Guide.