Android App Signing: Keystores and SHA Keys
Before going further, it's very important to understand how your app works and how user login happens. Most login problems are due to setup mistakes, not issues with the app, website, or admin panel code. To help you avoid these common problems, we'll explain the key ideas and the overall login process.
Please read this section carefully, as it's essential for a smooth setup and successful logins.
Keystore Management and SHA Keys
Knowing about keystores, what kinds there are, how to check which one is being used, how to get SHA keys, and how to create a release keystore is very important for correct and safe Firebase authentication.
What is a Keystore?
A keystore is a file that safely stores private keys and their public certificates. These keys are needed to digitally sign your Android app, which proves it's real and hasn't been changed.
Types of Keystores
- Debug Keystore: Android Studio automatically makes this when you build your app for testing. It's only for development and testing.
- Release Keystore: This is a special keystore you make and manage yourself. You must use this to sign your app before putting it on the Google Play Store. Never lose your release keystore, because you'll need it for all future updates to your app.
Checking Which Keystore is Being Used
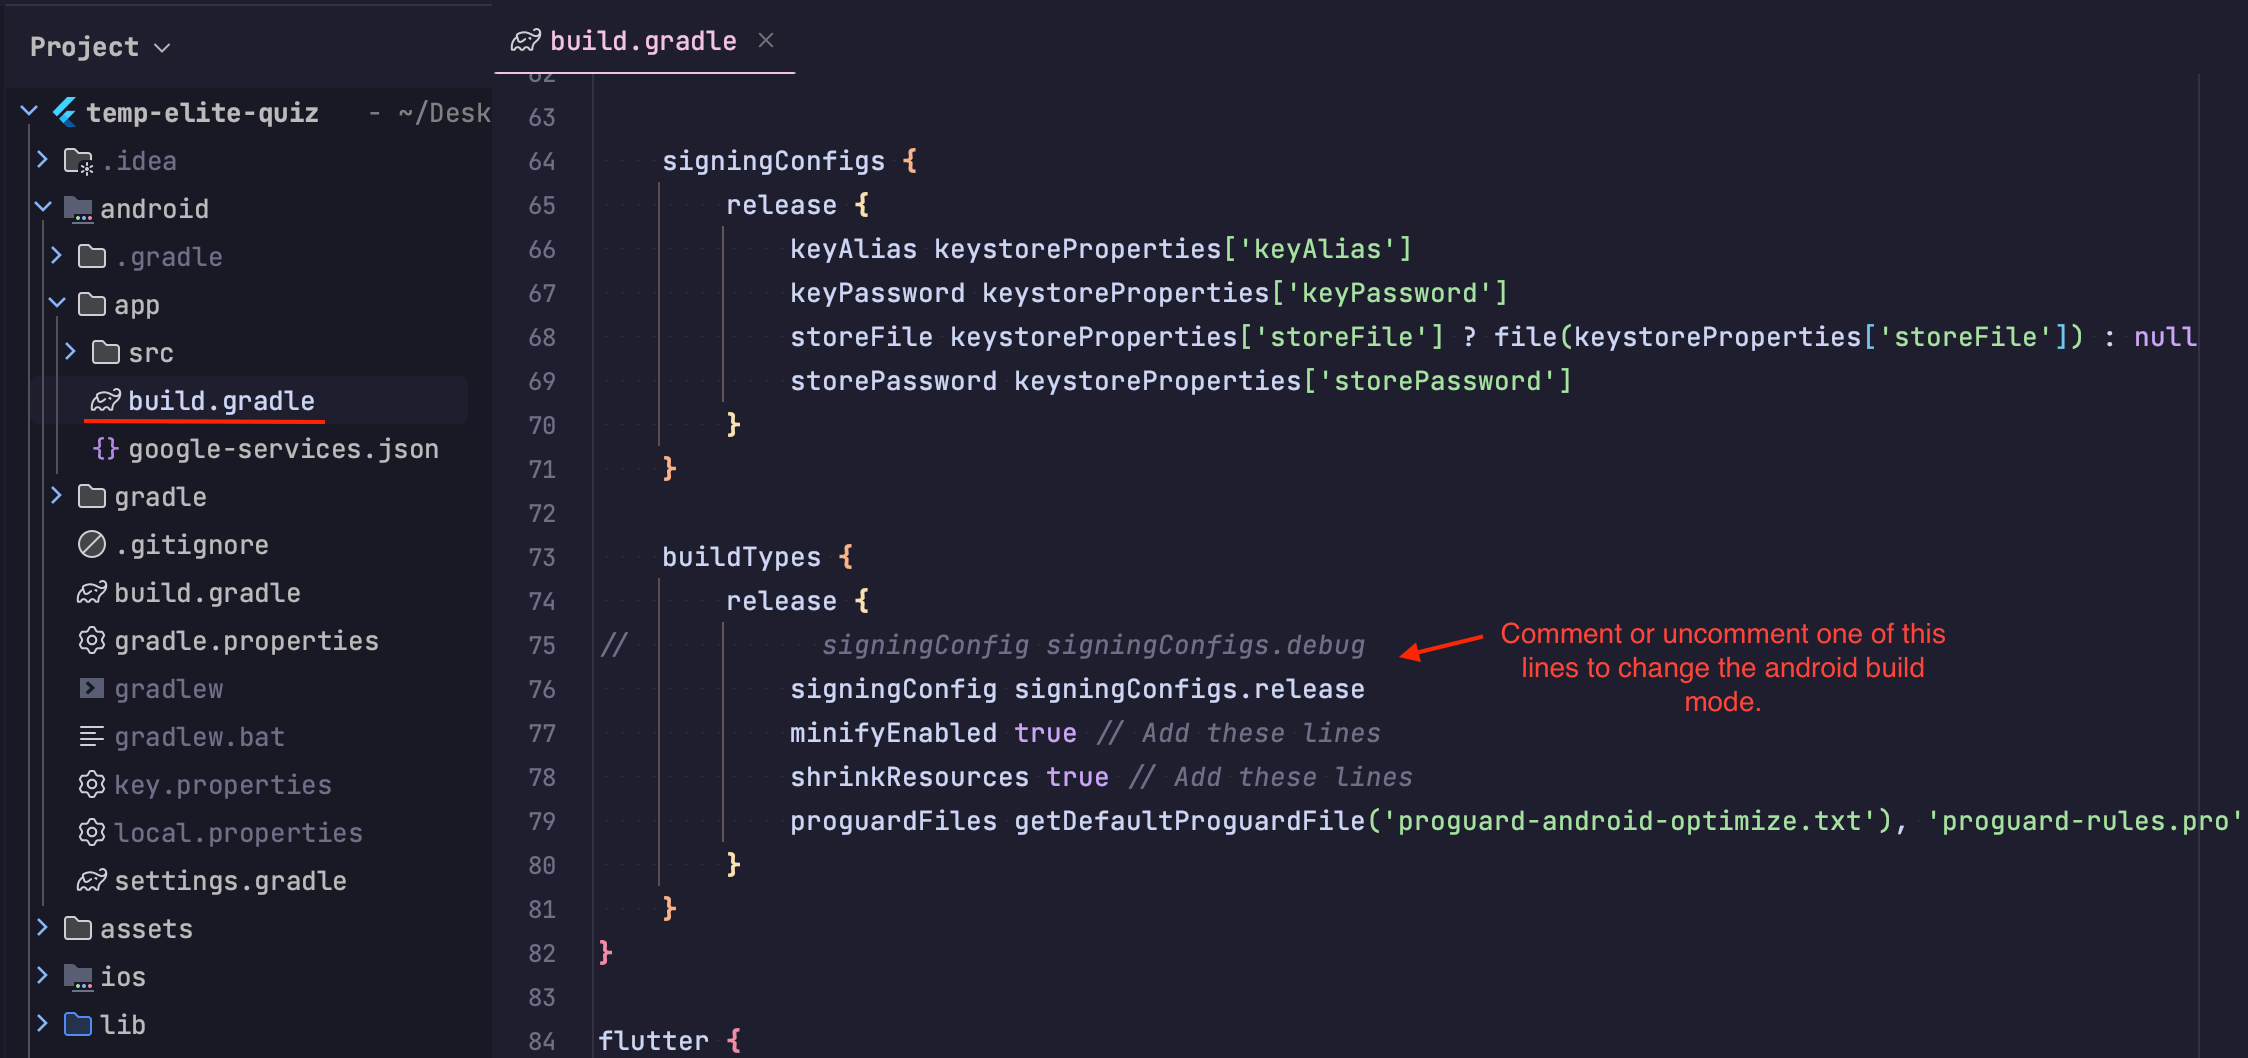
When you're developing, your app is usually signed with the debug keystore. For a public release, it must be signed with your own release keystore. The signing settings are usually in your android/app/build.gradle file.
You can check this by going to android/app/build.gradle and looking for signingConfig to see which one is uncommented (doesn't have // before the line).
Which Should I Use: Debug or Release?
- When you are just testing the app on your own device or emulator
- Use the debug build (Android Studio's default).
- Use the debug keystore and add its debug SHA-1 / SHA-256 keys to Firebase so login works while you test.
- When you are preparing the app for real users or the Play Store
- Create and configure your release keystore.
- Build the release build (signed with your release keystore).
- Add the release SHA-1 / SHA-256 keys to Firebase so authentication works in production.
- After you upload the app to Google Play
- Google Play will sign your app with its own key.
- Get the Play Store SHA-1 from the Play Console and also add it to Firebase.
In short: use debug for local testing, and use release for real users and Play Store builds.
How to Get SHA Keys
SHA (Secure Hash Algorithm) keys (like SHA-1 and SHA-256) are like unique fingerprints of your signing certificate. Firebase uses these fingerprints to make sure your app is real and hasn't been tampered with.
Note: Make sure you can use the keytool command in your terminal. If not, there might be an issue with your system's PATH configuration that you'll need to fix.
To get SHA-1 and SHA-256 keys for your debug keystore:
On macOS/Linux, open your terminal and type:
keytool -list -v -keystore ~/.android/debug.keystore -alias androiddebugkey -storepass android -keypass android
On Windows, open your command prompt and type:
keytool -list -v -keystore %USERPROFILE%\.android\debug.keystore -alias androiddebugkey -storepass android -keypass android
To get SHA-1 and SHA-256 keys for your release keystore:
Replace your_release_keystore.jks with the full path to your release keystore file and your_alias_name with your specific alias.
keytool -list -v -keystore /path/to/your_release_keystore.jks -alias your_alias_name
You will be asked to enter the keystore password.
You can also use a Gradle command to check. After running your app once, go to the android folder of your project in the terminal and run:
./gradlew :app:signingReport
When and Why You Need SHA Keys
- Google Sign-In: Requires your app’s SHA-1 key to be registered in Firebase.
- Phone Auth: Also depends on correct SHA keys.
- Play Store: After uploading your app, Google Play will sign it with its own key. You must add the Play Store’s SHA-1 to Firebase for authentication to work in production.
How to Create a Release Keystore
To make a new release keystore, use the keytool program. Open your terminal or command prompt and type:
keytool -genkeypair -v -keystore your_release_keystore.jks -alias your_alias_name -keyalg RSA -keysize 2048 -validity 10000
your_release_keystore.jks: This is the name you choose for your keystore file.your_alias_name: This is a name for the key pair you're creating.validity 10000: This sets how long the certificate is good for in days (like 10,000 days, which is about 27 years).
During this process, you'll be asked to set a password for the keystore and the key, along with other info like your name, organization, city, state, and country code.
It's very important to remember these passwords and keep your keystore file in a very safe place.
How to Use Your Release Keystore
After you've created your release keystore, you need to tell your Android project how to use it.
-
Create a new file named
key.propertiesin theandroiddirectory of your project. This file will store your keystore details securely. -
Add the following lines to your
key.propertiesfile, replacing the placeholder text with your specific information:
storePassword=<your-store-password>
keyPassword=<your-key-password>
keyAlias=<your-key-alias>
storeFile=<path-to-your-release-keystore.jks>
storePassword: The password you created for your keystore.keyPassword: The password you created for the key.keyAlias: The alias you gave your key.storeFile: The path to your keystore file. You can use a relative path from theandroid/appfolder (e.g.,../your_keystore_file.jks).
-
Next, you need to update your
android/app/build.gradlefile to use this new keystore. Open the file and find thesigningConfigsandbuildTypessections. -
Change the
signingConfigfor your release build to use your release keystore. A common Flutter-style setup looks like this:
android {
    ...

    buildTypes {
        release {
            signingConfig signingConfigs.release   // uses your release keystore
            minifyEnabled true
            shrinkResources true
            proguardFiles getDefaultProguardFile('proguard-android-optimize.txt'), 'proguard-rules.pro'
        }
    }
}
Now you can proceed to completing the authentication setup with Firebase for your app.