Configure In‑App Purchases
Overview
Elite Quiz supports:
- Purchasing virtual coins using in‑app purchases (IAP)
- A one‑time, lifetime "Remove Ads" purchase
Before proceeding with this guide, please read the WRTeam Common IAP Documentation to understand:
- How to create In-App Purchases in App Store and Play Console
- Different types of IAP (consumable, non-consumable)
- IAP testing procedures and requirements
- Platform-specific guidelines and restrictions
This foundational knowledge is essential because this page focuses only on Elite Quiz–specific configuration.
Subscriptions are not currently supported.
Quick Start Checklist (For Experienced Users)
- Create IAP products in Admin Panel (
Settings > Coin Store Settings) - Android: Add package name to Admin Panel
- Android: Add Firebase service account to Play Console with admin permissions
- Android: Enable Google Play Android Developer API
- iOS: Add App Store Connect shared secret to Admin Panel
- Create matching products in Play Console and App Store Connect with identical IDs
- Upload app to testing tracks and test purchases
How In-App Purchases Work
Understanding how IAP works helps you set up correctly and fix problems. Here's what happens when a user buys coins:
Key Security Features
- Server-Side Verification: All purchases are validated with the app stores before giving coins to users
- Secure Coin Crediting: Coins are added on the server side, so users cannot cheat the system
- Receipt Validation: Every purchase is verified with Google Play or Apple's servers before acceptance
Step 1: Create Products in Admin Panel
- Open the Admin Panel and go to
Settings > Coin Store Settings - Create your coin packs and remove-ads product
Product Types:
- Coin Packs: Consumable purchases (users can buy multiple times)
- Remove Ads: Non-consumable, lifetime purchase (users buy once, keep forever)
You will set the actual prices later in Google Play Console and App Store Connect, not in the Admin Panel. The Admin Panel only defines what users receive (coins or ad removal).
Example: 100 Coins Pack (Consumable)
- Name: 100 Coins
- Coins: 100
- Product ID:
elitequiz_consumable_100_coins- Replace
elitequizwith your app name - Must be exactly the same in Admin Panel, Play Console, and App Store Connect
- Use only lowercase letters, numbers, and underscores
- Replace
- Description: Buy 100 Coins
- Image: Upload an icon for this product
Example: Remove Ads (Non-Consumable)
- Type: Ads
- Product ID:
elitequiz_remove_ads- Replace
elitequizwith your app name - Must be exactly the same across all platforms
- Replace
- Description: Remove all advertisements
- Note: You can only create one Remove Ads product
Products you create in the Admin Panel will not appear in your app until you also create matching products in Google Play Console and App Store Connect with identical Product IDs.
Step 2: Platform-Specific Configuration
Before creating products in app stores, complete these platform-specific setup steps:
Android Configuration
Step 1: Add Your Android Package Name
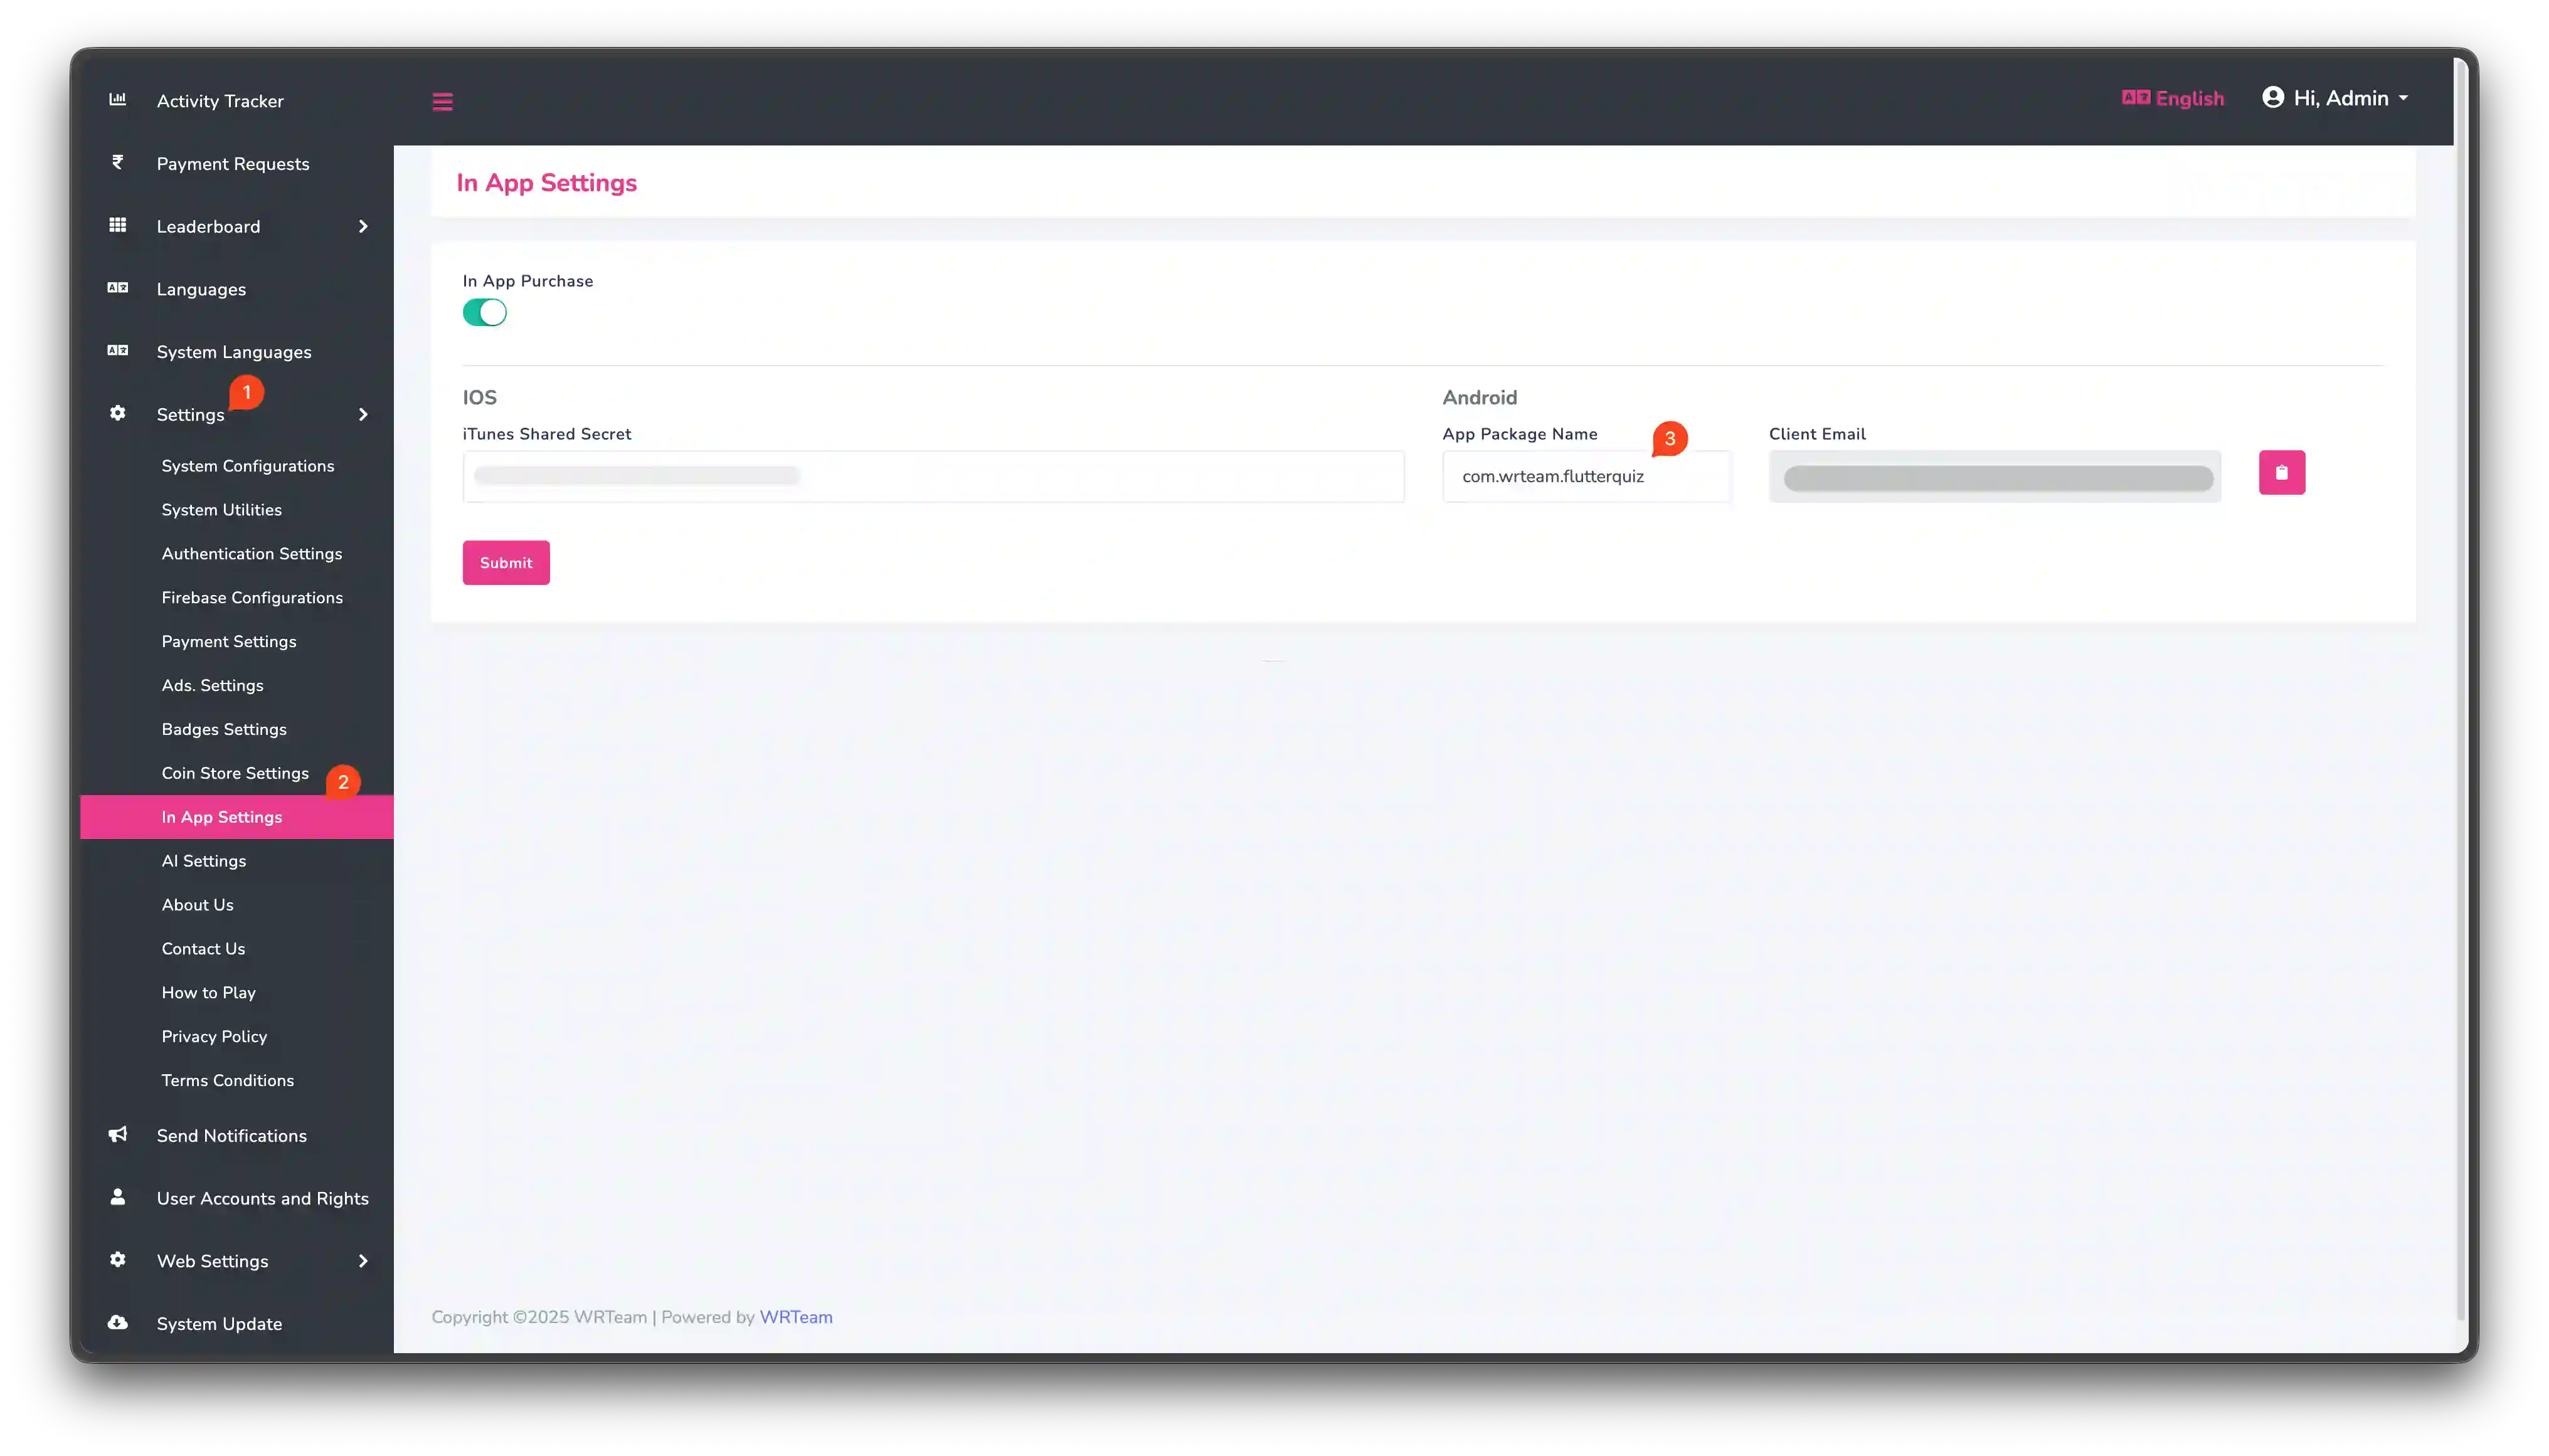
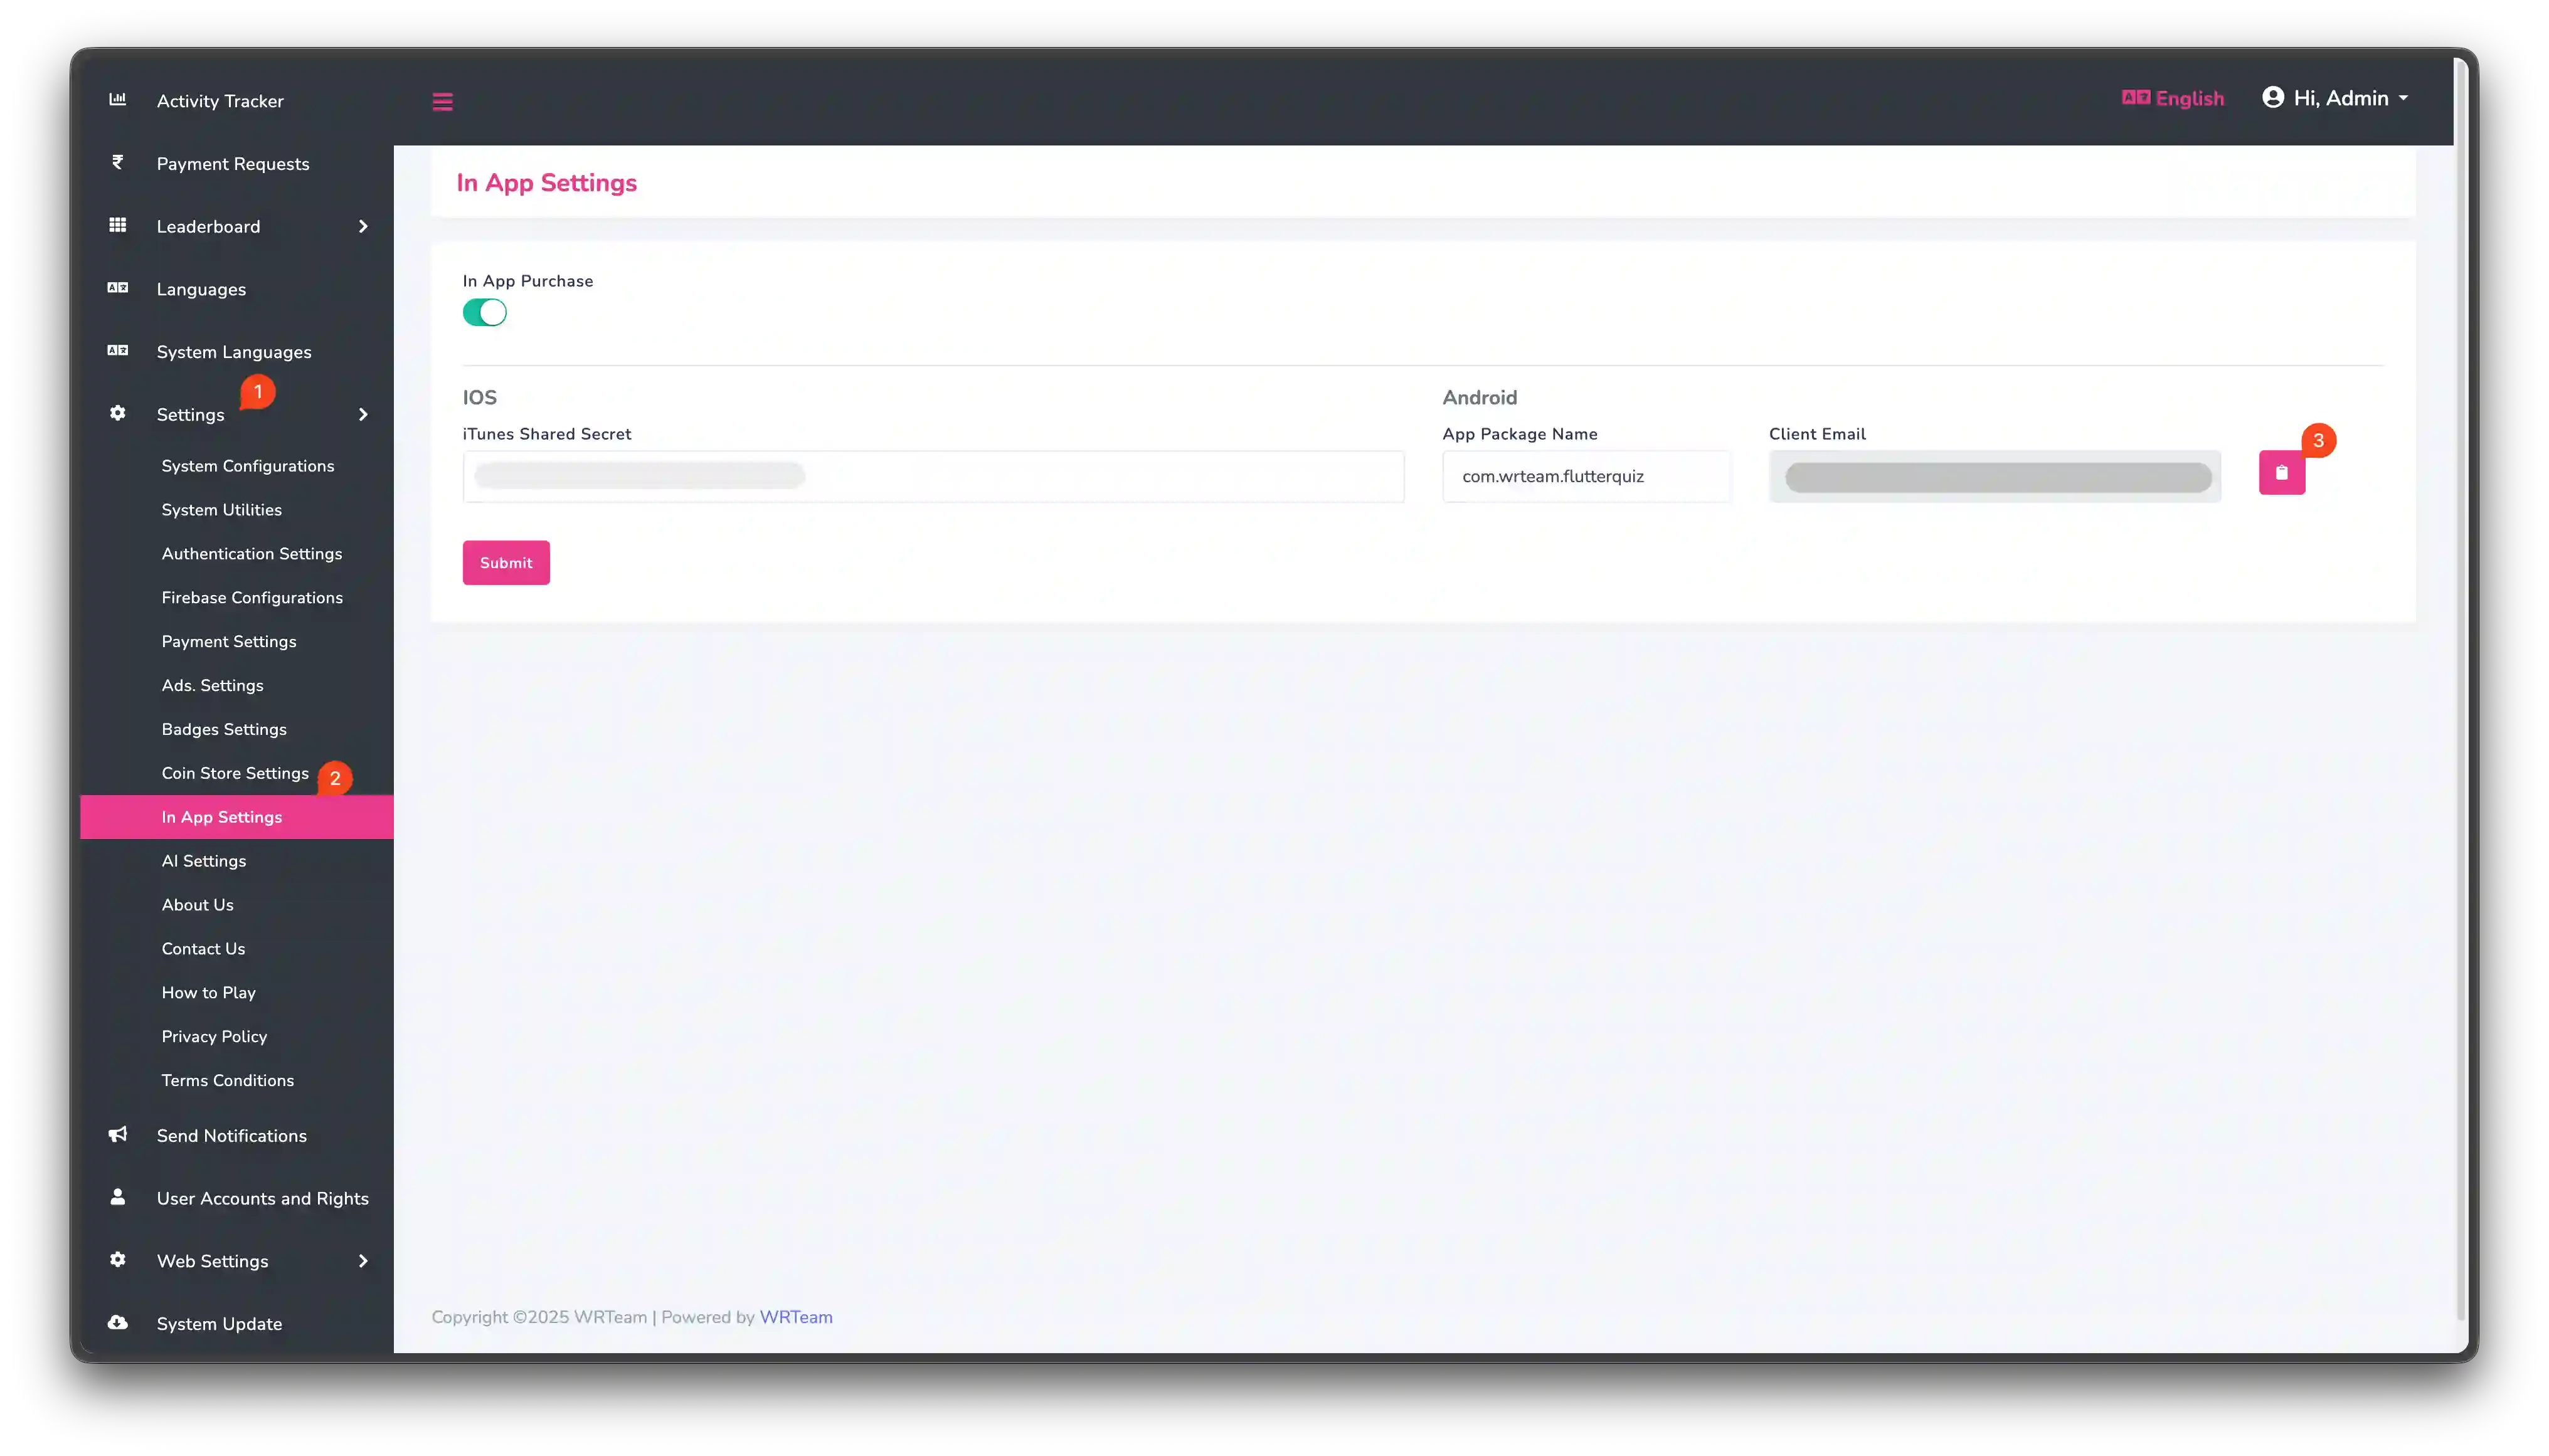
- Go to
Admin Panel > Settings > In-App Settings - Enter your Android app package name in the
App Package Namefield- Example:
com.yourcompany.elitequiz - This must match the package name in your Android app
- Example:
Step 2: Connect Firebase to Play Console
This allows the Admin Panel to verify purchases with Google Play.
- In Admin Panel, go to
Settings > In-App Settings - Copy the Firebase Client Email (shown in the settings)
- Open Google Play Console
- Go to
Users and permissions - Click
Invite new users - Paste the Firebase Client Email you copied
- In the
Permissionssection, clickAdd Appunder theApp permissionstab - Select your app and click
Apply - Select
Admin (all permissions)and clickApply - Click
Invite user
Watch the video guide:
⏱️ Important: Wait Time Required
Google Play needs time to process these permission changes. This is normal.
- Minimum wait: 2-4 hours
- Maximum wait: Up to 24 hours (in rare cases)
If IAP doesn't work immediately after setup:
- Wait 2-4 hours, then test again
- If still not working, wait up to 24 hours
- Clear your app cache and reinstall before testing
Most setups work within 4 hours.
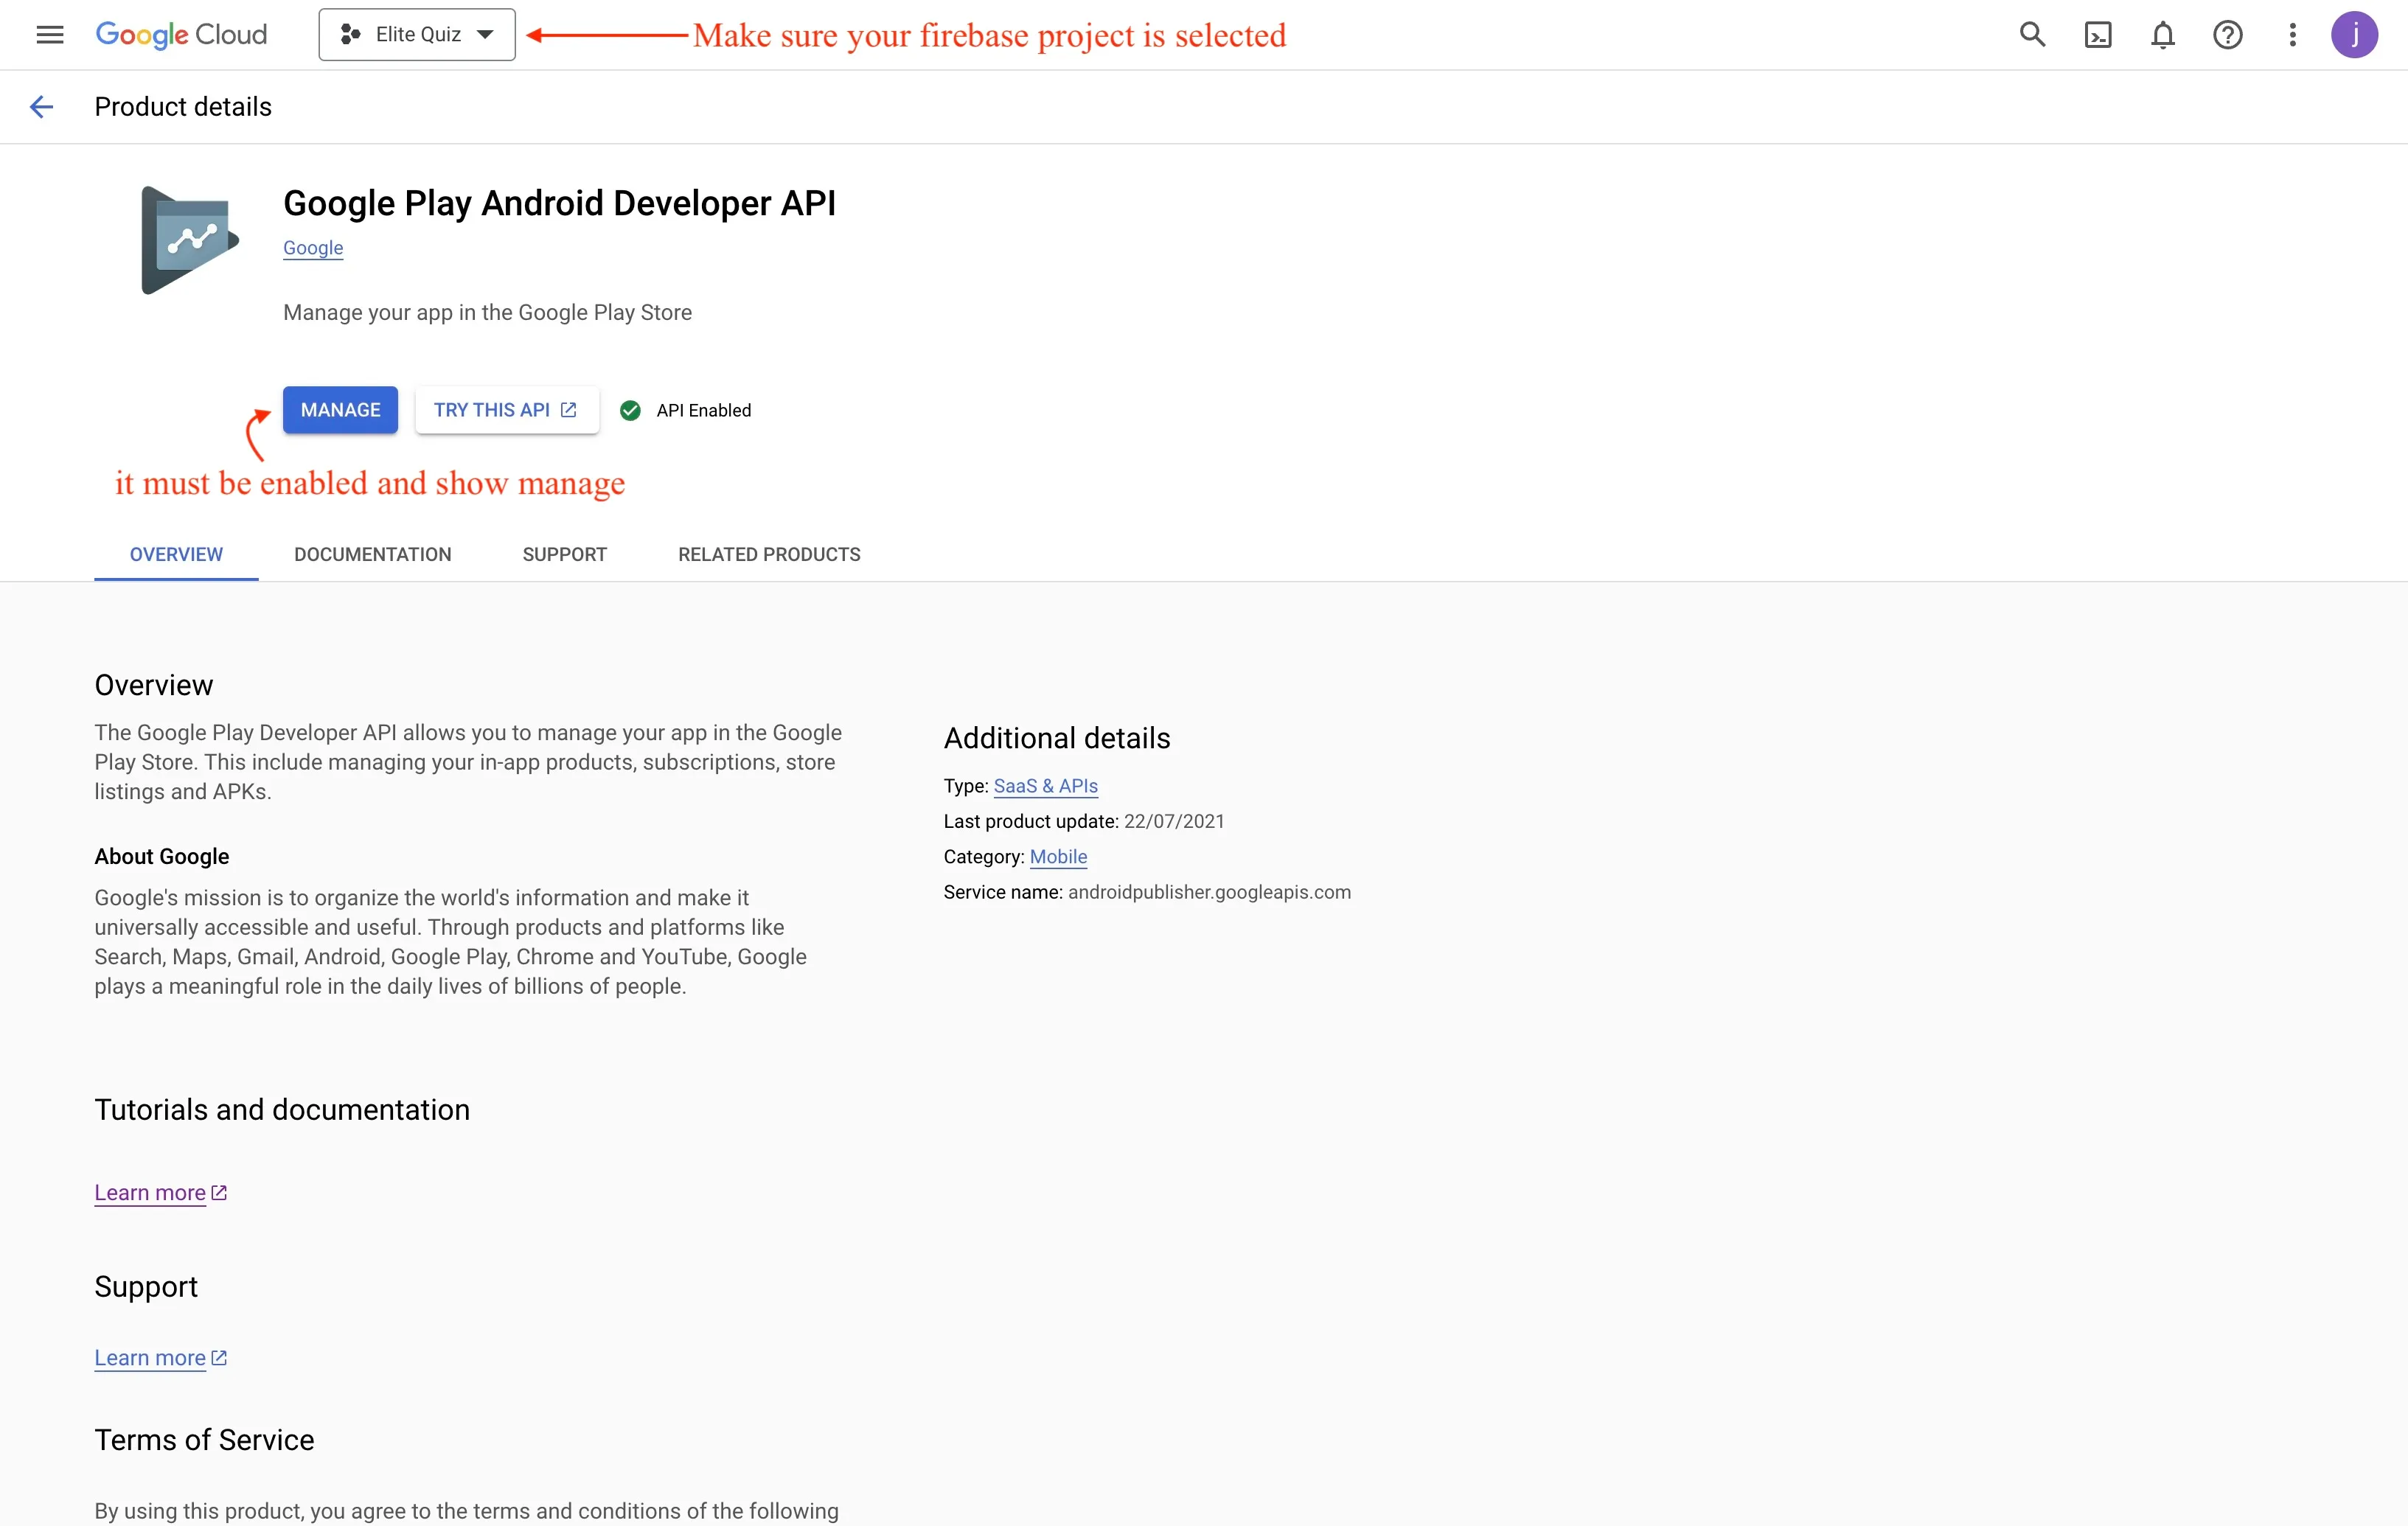
Step 3: Enable Google Play Android Developer API
- Go to Google Cloud Console
- Make sure the correct Firebase project is selected (check the top dropdown)
- Click this link to enable the API: Enable Google Play Android Developer API
- Click the
Enablebutton
Step 4: Upload App for Testing
- Upload your app to Google Play Console in any testing track (Internal, Closed, or Open Testing)
- Wait for Google to review your app (this usually takes a few hours)
- Once reviewed, add your email to
License Testingto test purchases without paying real money
iOS Configuration
Step 1: Get the Shared Secret from App Store Connect
The shared secret allows the Admin Panel to verify iOS purchases with Apple.
- Open App Store Connect
- Click on your app
- Go to
App Information(in the left sidebar underGeneral) - Scroll down to the
App-Specific Shared Secretsection - Click
ManageorGenerateif you don't have one yet - Copy the shared secret code
Make sure you copy the App-Specific Shared Secret, not the Master Shared Secret. The app-specific version is more secure.
Step 2: Add Shared Secret to Admin Panel
- Go to
Admin Panel > Settings > In-App Settings - Find the
iOS Shared Secretfield - Paste the shared secret you copied from App Store Connect
- Click
Save
Make sure there are no extra spaces at the beginning or end of the shared secret. Extra spaces will cause verification to fail.
Step 3: Upload App to TestFlight
- Build your iOS app in Xcode
- Upload to App Store Connect
- Submit to TestFlight
- Wait for Apple to process your build (usually 30-60 minutes)
- Add testers in TestFlight to test purchases
In-app purchase testing requires your app to be distributed through official channels:
- Android: App must be uploaded to Google Play Console in a testing track
- iOS: App must be distributed via TestFlight
You cannot test IAP in local development builds or emulators. You must use real devices with apps installed from the stores.
Step 3: Create Products in App Stores
Now create matching products in Google Play Console and App Store Connect.
The most important rule: Product IDs must be exactly identical across:
- Admin Panel
- Google Play Console
- App Store Connect
Product IDs are case-sensitive. elitequiz_100_coins is different from EliteQuiz_100_Coins.
Create Products in Google Play Console
- Open Google Play Console
- Select your app
- Go to
Monetize > In-app products - Click
Create product - Enter the exact same Product ID you used in Admin Panel
- Set your price (this is where you set the actual price users will pay)
- Add title, description, and save
- Click
Activateto make the product available
Create Products in App Store Connect
- Open App Store Connect
- Select your app
- Go to
Features > In-App Purchases - Click
+to create a new product - Choose type:
Consumable(for coins) orNon-Consumable(for remove ads) - Enter the exact same Product ID you used in Admin Panel
- Set your price tier (this is where you set the actual price users will pay)
- Add reference name, display name, and description
- Click
Save
Step 4: Test Your Setup
Android Testing
-
Add Test Account:
- In Play Console, go to
Setup > License testing - Add your Gmail address to the list of license testers
- In Play Console, go to
-
Install and Test:
- Install the app from the testing track on a real Android device
- Sign in with your test Gmail account
- Go to the coin store in the app
- Try purchasing a product
- You'll see "Test purchase" and won't be charged real money
iOS Testing
-
Create Sandbox Account:
- In App Store Connect, go to
Users and Access > Sandbox Testers - Click
+and create a test account with a unique email
- In App Store Connect, go to
-
Test on Device:
- On your iOS device, sign out of your regular Apple ID
- Install the app from TestFlight
- When you try to purchase, iOS will ask you to sign in
- Sign in with your sandbox tester account
- Complete the purchase (it's free in sandbox mode)
Always test on real devices (real Android phone or iPhone). IAP does not work on emulators or simulators.
Important Notes
- Product ID Consistency: All product IDs must be identical across Admin Panel, Google Play, and App Store
- Testing Timeline: Allow time for app store review processes during testing (2-4 hours for Android permissions, 30-60 minutes for iOS builds)
- Purchase Validation: Elite Quiz includes server-side purchase validation for security
- Data Propagation: New or updated products can take 1-2 hours to appear in apps; if a product doesn't appear, wait and try again
Frequently Asked Questions
General Setup
Why don't my IAP products appear in the app?
This is usually caused by one of these issues:
-
Product ID Mismatch: The Product IDs don't match exactly
- Solution: Check that Product IDs are identical (including capital/lowercase letters) in Admin Panel, Play Console, and App Store Connect
-
Products Not Approved: Store products are still in draft or pending review
- Solution: Make sure products are approved and active in both app stores
-
App Not Properly Signed: Using the wrong build or certificate
- Solution (Android): Use the same signing key as your Play Console app
- Solution (iOS): Make sure you're using the correct provisioning profile
-
Store Delay: Recent changes take time to update
- Solution: Wait 1-2 hours, then clear app data and reinstall
Do I need to create the same products three times?
Yes, you create products in three places, but each serves a different purpose:
- Admin Panel: Defines what users get (100 coins, remove ads, etc.)
- Google Play Console: Handles Android payments and sets Android prices
- App Store Connect: Handles iOS payments and sets iOS prices
The Product ID must be identical in all three places so the system knows they're the same product.
Testing
How do I test purchases without spending real money?
Android:
- Add your email to "License testing" in Play Console
- Install from a testing track (Internal/Closed/Open Testing)
- When you purchase, you'll see "Test purchase" and won't be charged
iOS:
- Create a sandbox tester account in App Store Connect
- Sign out of your real Apple ID on your device
- Install from TestFlight
- When purchasing, sign in with the sandbox account
- Sandbox purchases are free
IAP testing only works on real devices, not emulators or simulators. You need actual app store connectivity.
Can I test IAP locally during development?
No. IAP testing requires:
- App uploaded to app stores (even in testing tracks)
- Proper signing and certificates
- Test accounts configured in app store consoles
Local development builds cannot process purchases (real or test).
Troubleshooting Purchases
User completed payment but didn't receive coins. What happened?
This usually means the purchase verification failed. Check these in order:
-
Check Platform Configuration:
- Android: Is Firebase service account email added to Play Console with admin permissions?
- Android: Is "Google Play Android Developer API" enabled in Google Cloud?
- iOS: Is the shared secret correctly added to Admin Panel?
-
Check Network Connection:
- The Admin Panel must be able to connect to the internet to verify purchases
- Check Admin Panel server logs for errors
-
Check Receipt Validation:
- Look in Admin Panel logs for validation errors
- Make sure API credentials are correct
"Product not found" error when trying to purchase
Checklist:
- Product exists and is approved in the correct store (Play Console or App Store Connect)
- Product ID in Admin Panel exactly matches the Product ID in the store (check for typos)
- App package name (Android) or bundle ID (iOS) matches what's configured in stores
- For Android: App is signed with the correct signing key
- Recent product changes have had time to propagate (wait 1-2 hours)
Platform-Specific Issues
Android: "The item you requested is not available for purchase"
Common causes:
- App not uploaded to any testing track
- Your email not added to license testing list
- Product not activated in Play Console
- Wrong package name in app settings
How to fix:
- Make sure app is in at least Internal Testing track
- Add your email to Play Console license testing
- Check that product status is "Active" in Play Console
- Verify package name matches between app and Admin Panel
iOS: "Cannot connect to iTunes Store"
Common causes:
- Not using a sandbox tester account
- Signed in to regular App Store instead of sandbox
- Product not submitted or approved
- Not using TestFlight build
How to fix:
- Sign out of your regular Apple ID completely
- Use a TestFlight build, not a local development build
- When prompted during purchase, sign in with sandbox tester account
- Make sure products are "Ready to Submit" or approved in App Store Connect
iOS: Shared Secret errors
Symptoms: Purchases complete but verification fails
How to fix:
- Go to App Store Connect → Your App → App Information
- Copy the App-Specific Shared Secret (not Master Shared Secret)
- Add it to Admin Panel under
Settings > In-App Settings - Make sure there are no extra spaces at the beginning or end
Remove Ads Purchase
User purchased "Remove Ads" but still sees ads
Troubleshooting steps:
-
Check if purchase verified: Look in Admin Panel to see if the user has the remove-ads entitlement
-
App not checking status: The app might not be checking if ads should be hidden
- Make sure the app checks remove-ads status when it starts and before showing ads
-
User data not syncing: User account data might not be up to date
- Force sync user data from Admin Panel, or ask user to restore purchases
-
Cached data: Old settings might be cached
- Clear app cache/data and restart the app
Coins and Consumables
Can users request refunds for coin purchases?
Yes, users can request refunds through the app stores:
- Google Play: Users can request refund within 48 hours through the Play Store app
- Apple App Store: Users can request refund at reportaproblem.apple.com
When a store issues a refund:
- You may receive a notification from the store
- You should remove the refunded coins from the user's account to prevent abuse
How do I handle fraudulent purchases?
Prevention:
- Elite Quiz already uses server-side verification (this prevents most fraud)
- Watch for unusual patterns (same user making many purchases then getting refunds)
- Consider adding purchase rate limits
Detection:
- Check store refund notifications regularly
- Look for users with negative coin balances (happens after refunds)
- Review Admin Panel logs for verification failures
Response:
- Remove refunded coins from user accounts
- Consider banning accounts with multiple fraudulent attempts
- Report serious abuse to the app stores
Still Having Issues?
If you're experiencing IAP problems not covered here:
- Check Platform Documentation: Review the WRTeam Common IAP Documentation
- Review Server Logs: Check Admin Panel logs for verification errors
- Test Methodically: Isolate the issue (Android vs iOS? Specific products? All users or just some?)
- Contact Support: Provide detailed information including:
- Platform (Android or iOS)
- Product IDs
- Error messages
- Server logs