Fix Google Sign-In Popup Blocked on Production
On some production domains (commonly domains hosted on shared hosting providers like Hostinger), clicking Sign in with Google may fail silently or throw auth/popup-blocked / auth/cancelled-popup-request. This happens because the browser/OS blocks the Google OAuth popup when Firebase's default authDomain (your-project.firebaseapp.com) does not match your production domain.
eBroker Web already ships with a redirect fallback: if the popup is blocked, it automatically retries sign-in using signInWithRedirect instead of signInWithPopup. To make this work reliably (and to avoid the popup being blocked in the first place), you should point Firebase's authDomain to a custom subdomain of your own production domain instead of the default firebaseapp.com domain.
This guide walks you through creating that custom auth subdomain using Firebase Hosting and connecting it via a CNAME record in your domain's DNS settings.
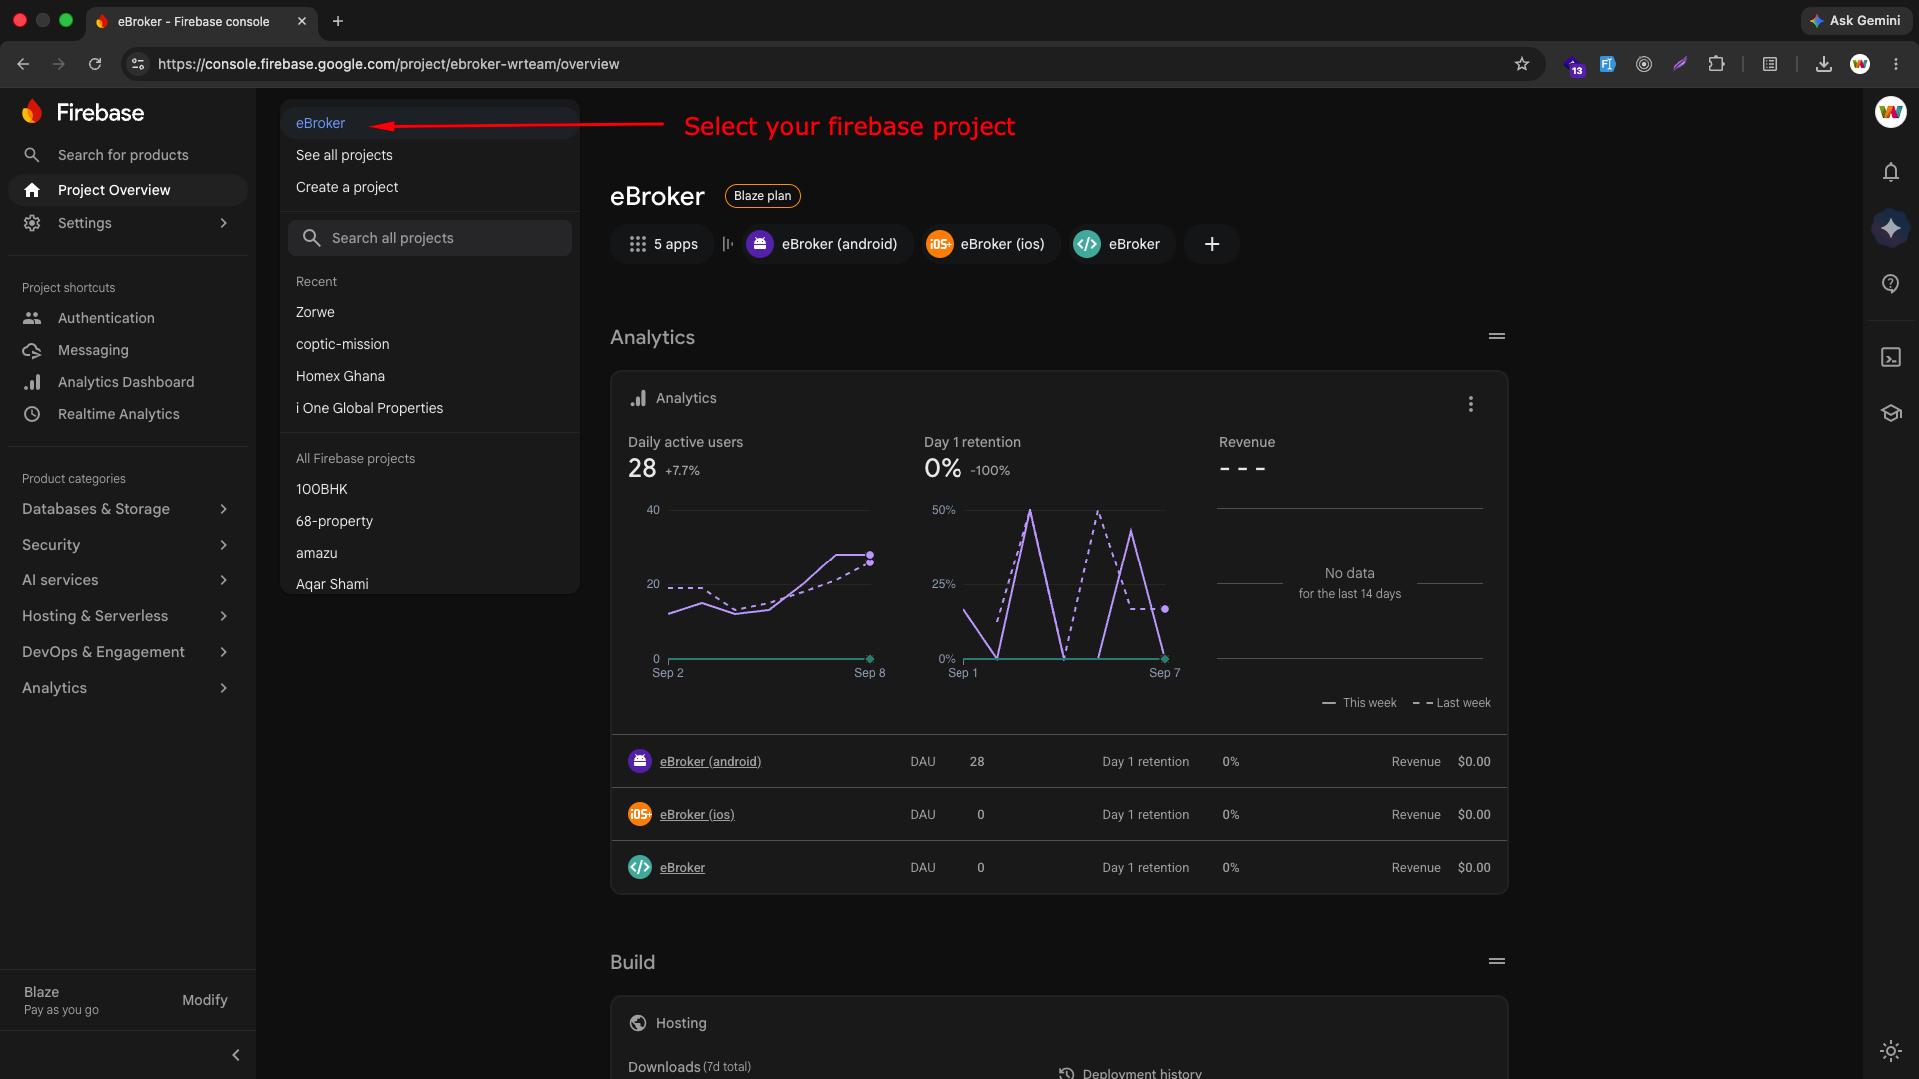
Step 1: Open Your Firebase Project
- Go to the Firebase Console
- Select your project
Step 2: Open Hosting
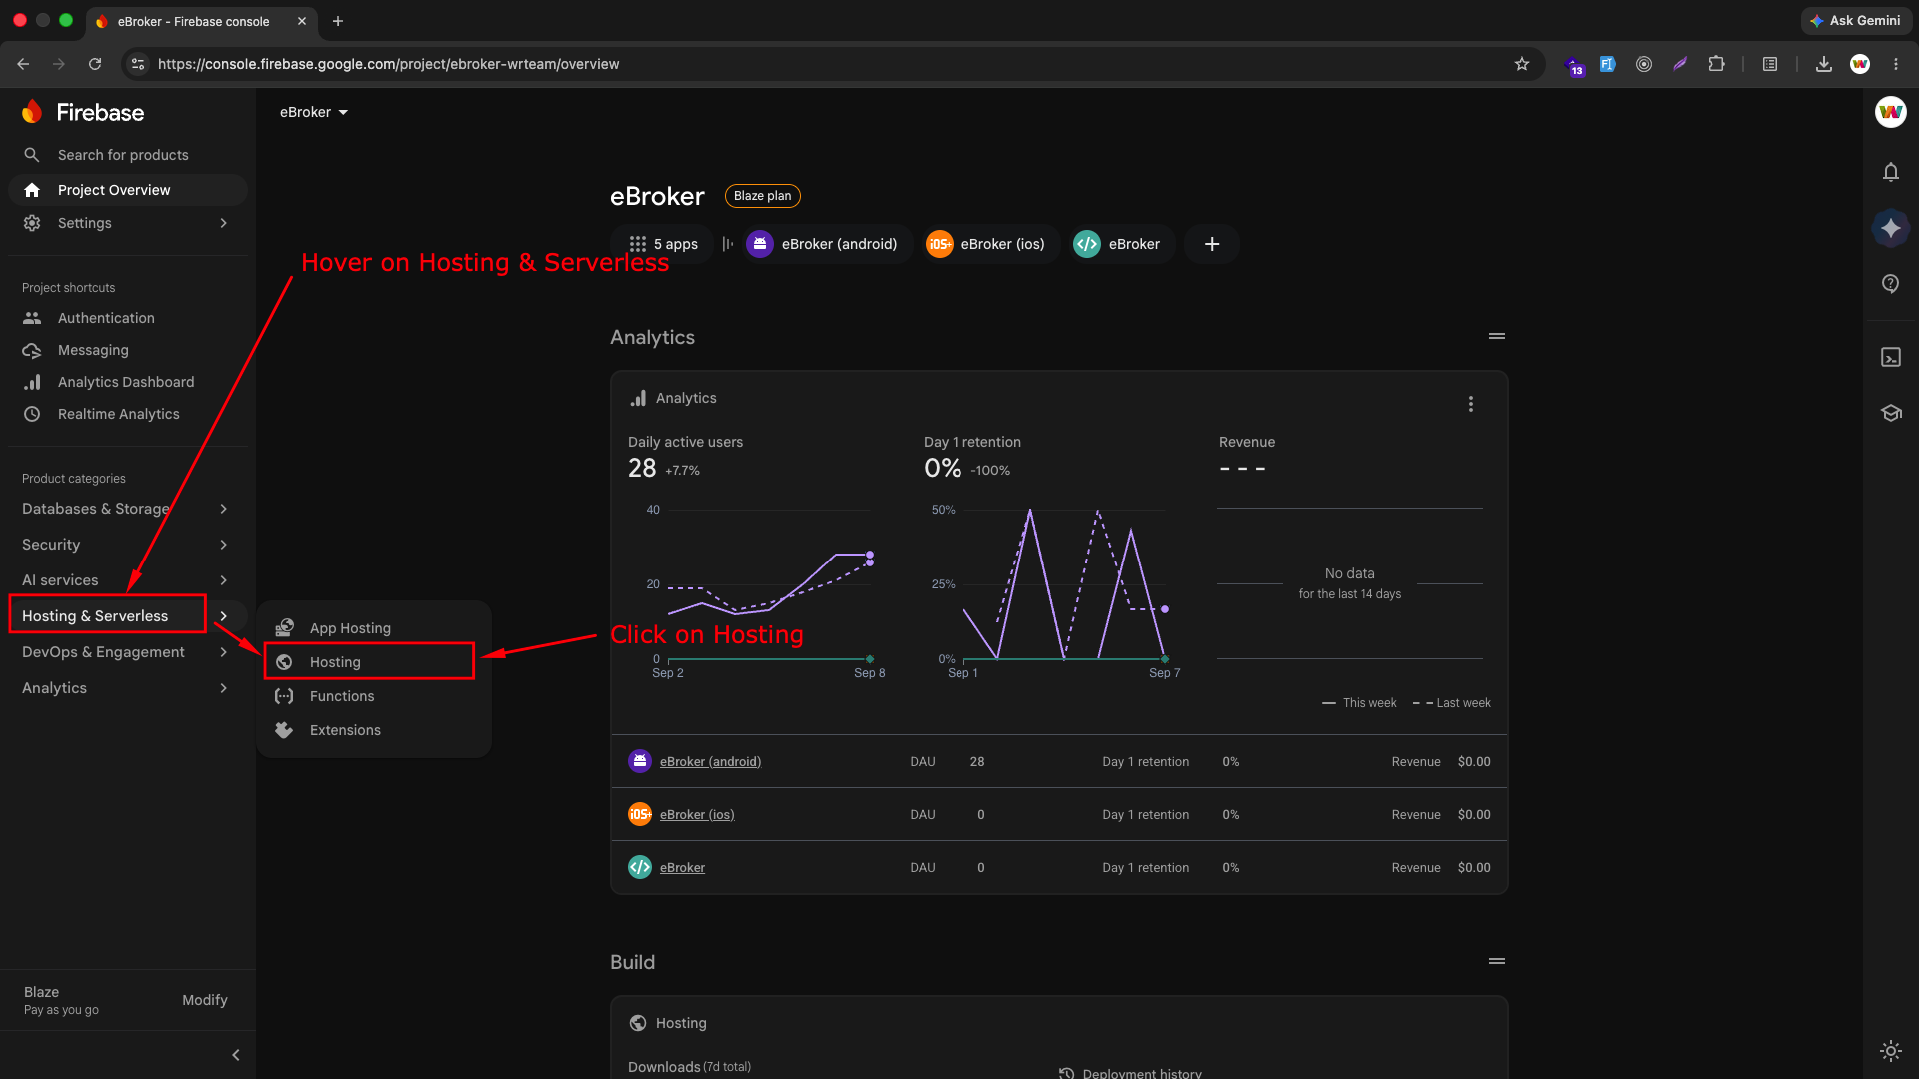
- Hover on Hosting & Serverless in the left sidebar
- Click Hosting
Step 3: Add a Custom Domain
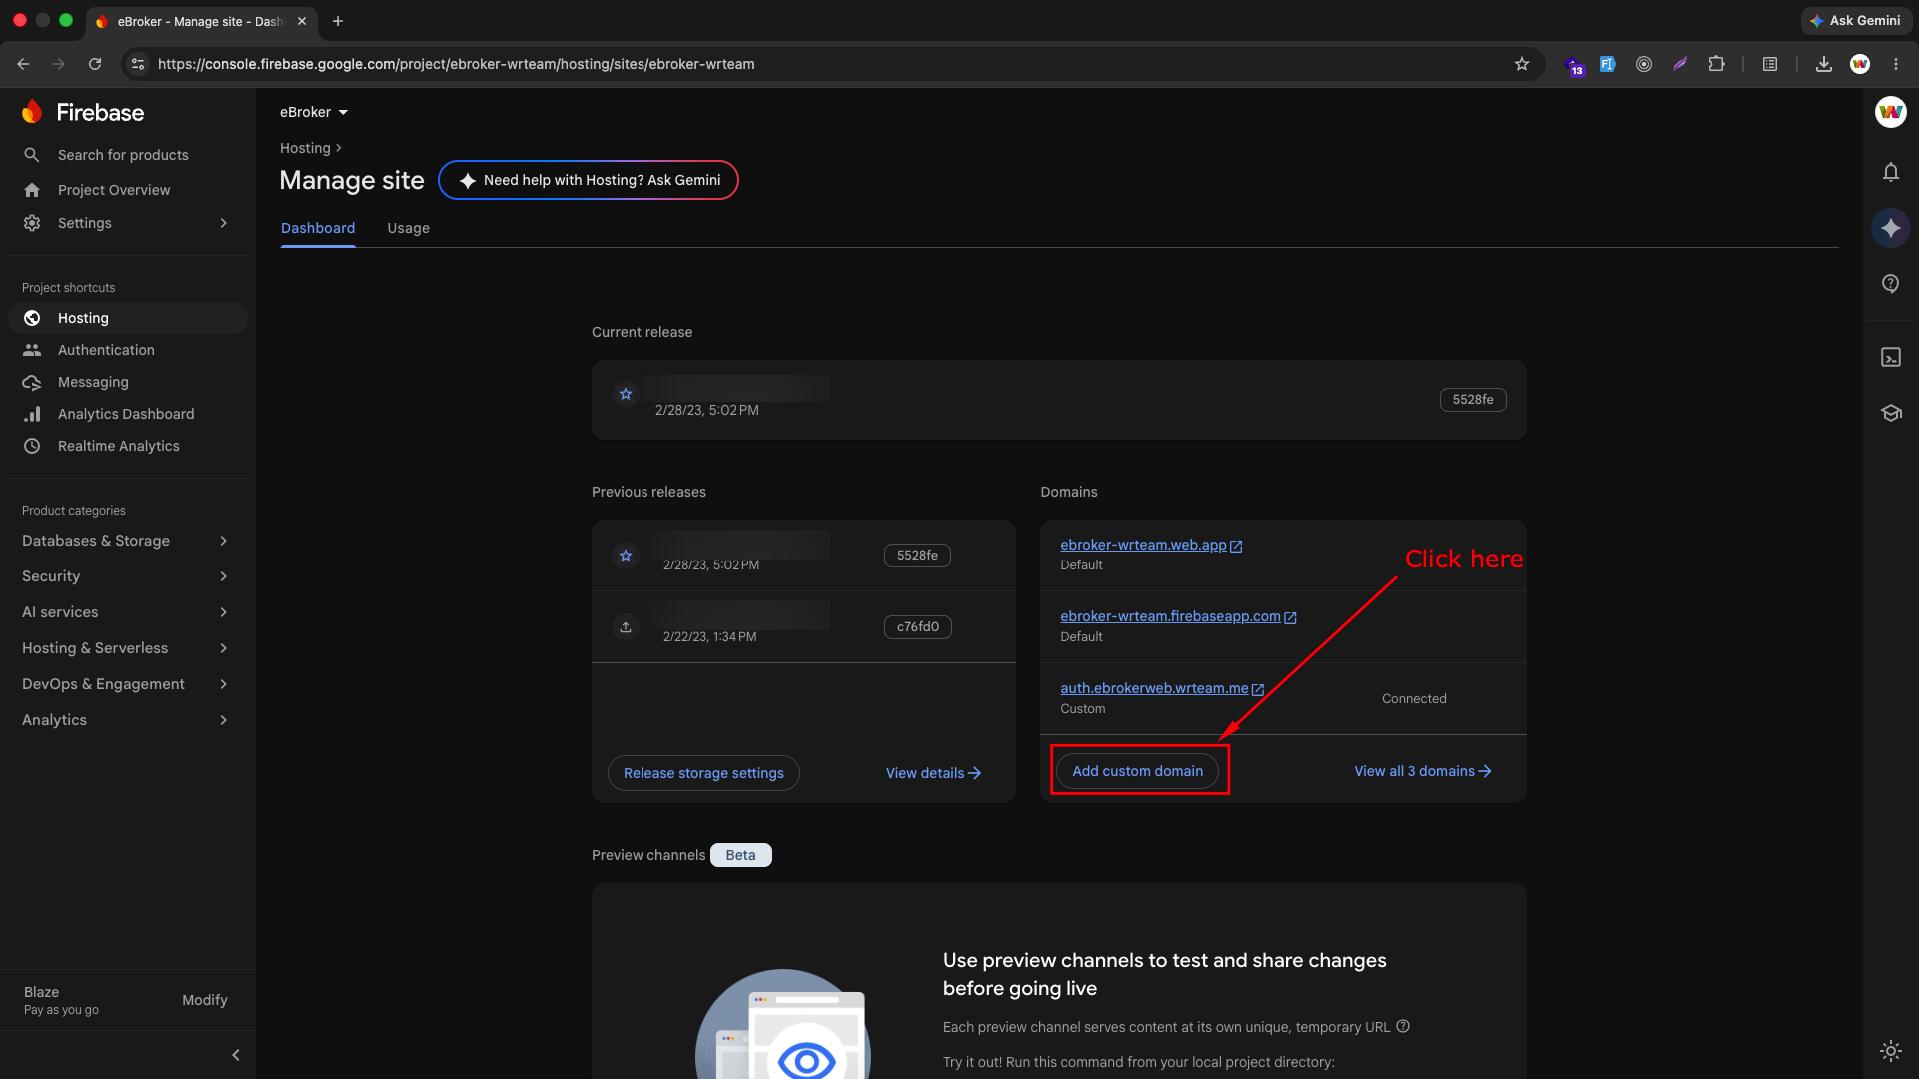
On the Manage site dashboard, click Add custom domain under the Domains section.
Step 4: Enter the Auth Subdomain
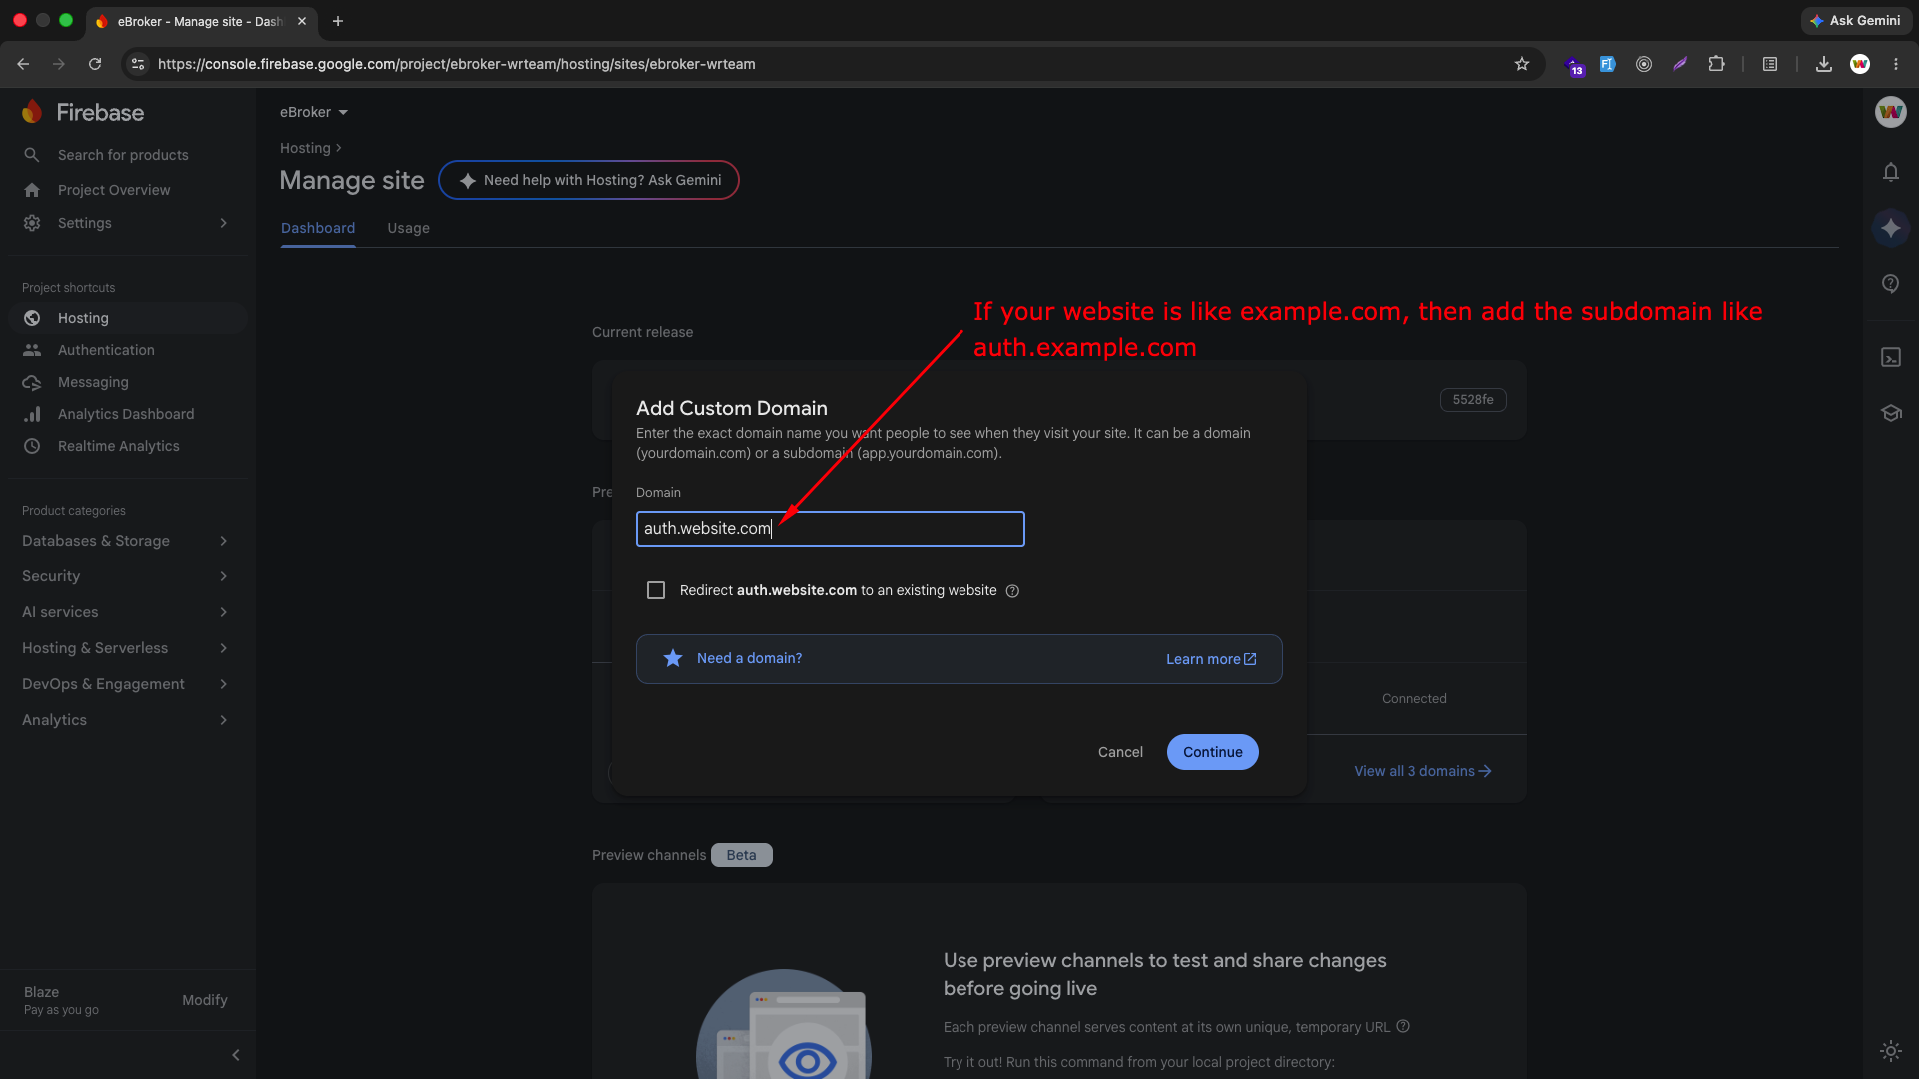
Enter a subdomain of your production domain, for example auth.yourdomain.com, then click Continue.
Use a dedicated subdomain like auth.yourdomain.com instead of your root domain — this keeps your Firebase Hosting setup isolated from your main website hosting.
Step 5: Copy the DNS Record
Firebase will show you a CNAME record (record type, domain name, and value) that you need to add in your domain's DNS settings to verify ownership.
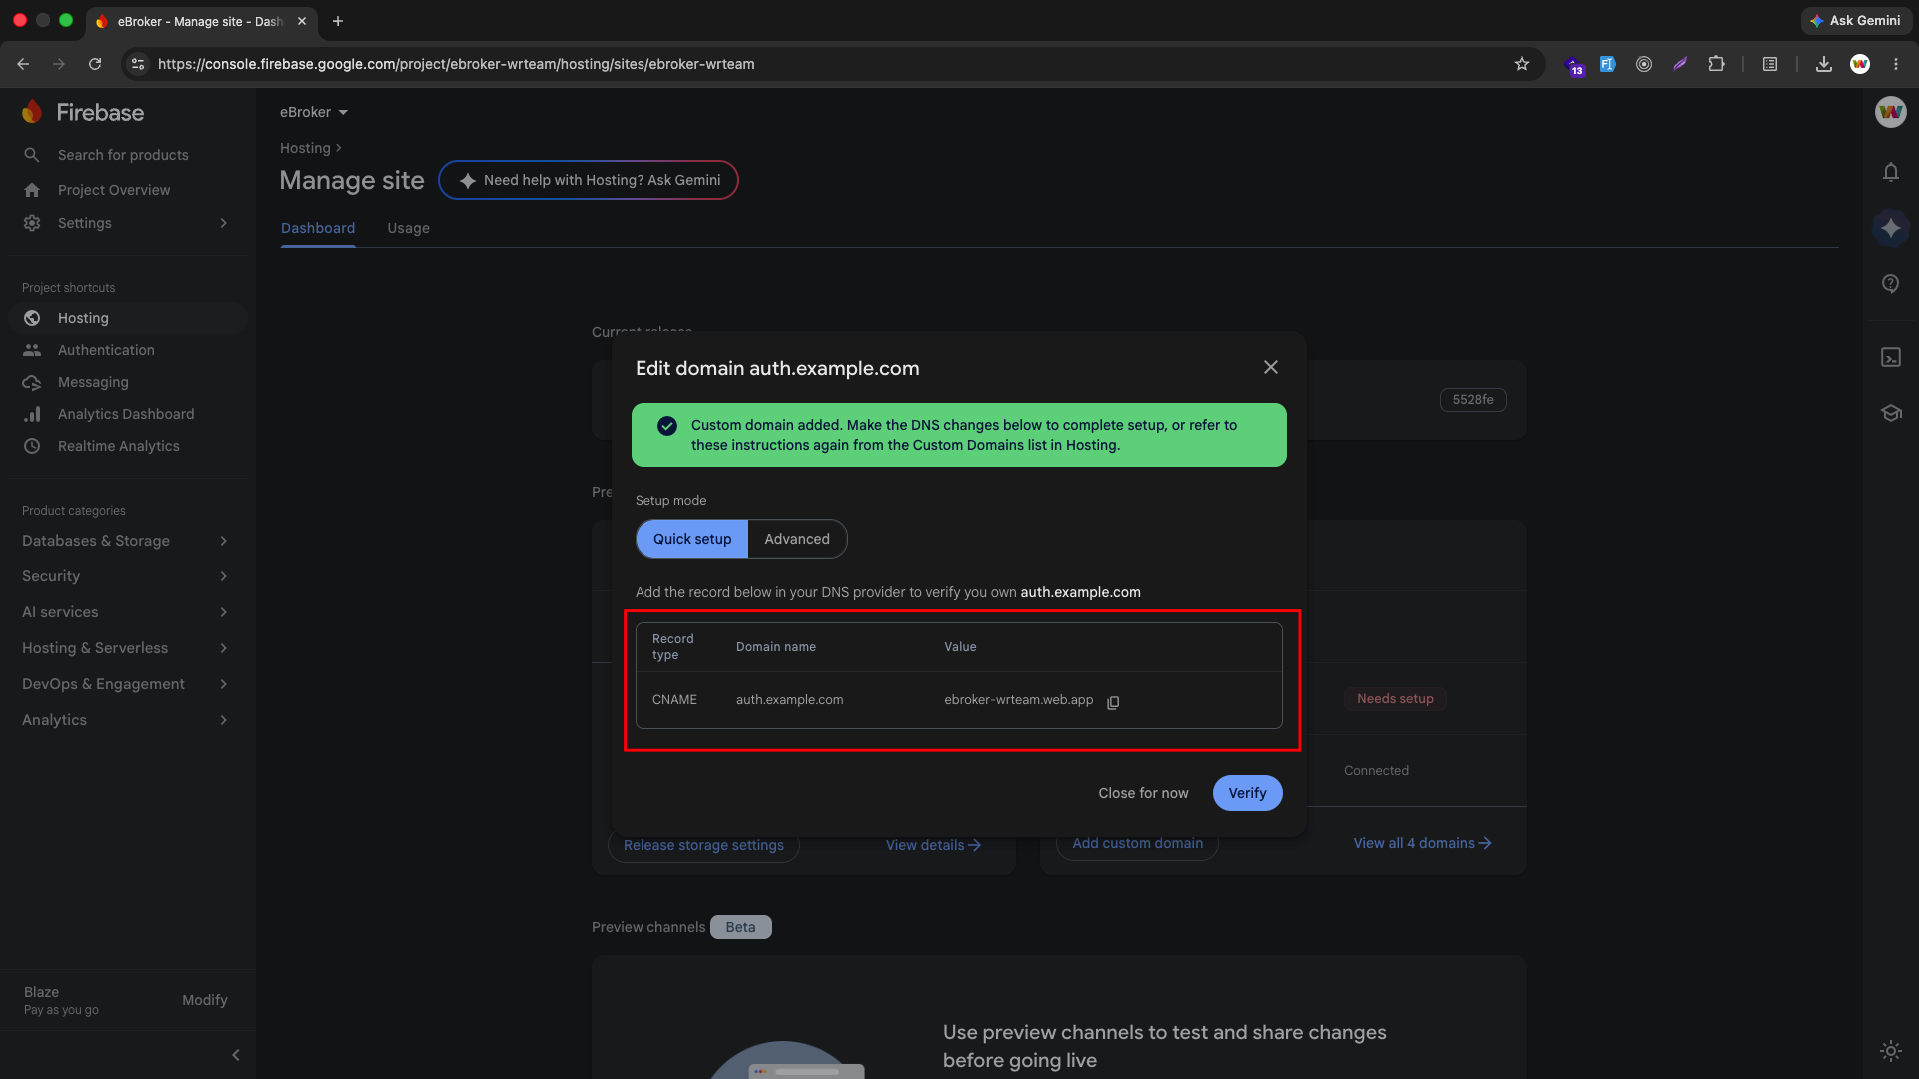
Keep this dialog open (or note down the values) — you'll need them in the next step.
Step 6: Add the CNAME Record in Your DNS Provider
Go to your domain's DNS management page (Hostinger, GoDaddy, Cloudflare, etc.). The steps below use Hostinger as an example — the fields (record type, name, target/value) are the same everywhere, only the UI differs.
- GoDaddy: Add a CNAME record
- Cloudflare: Manage DNS records
- Go to Domains > DNS for your domain
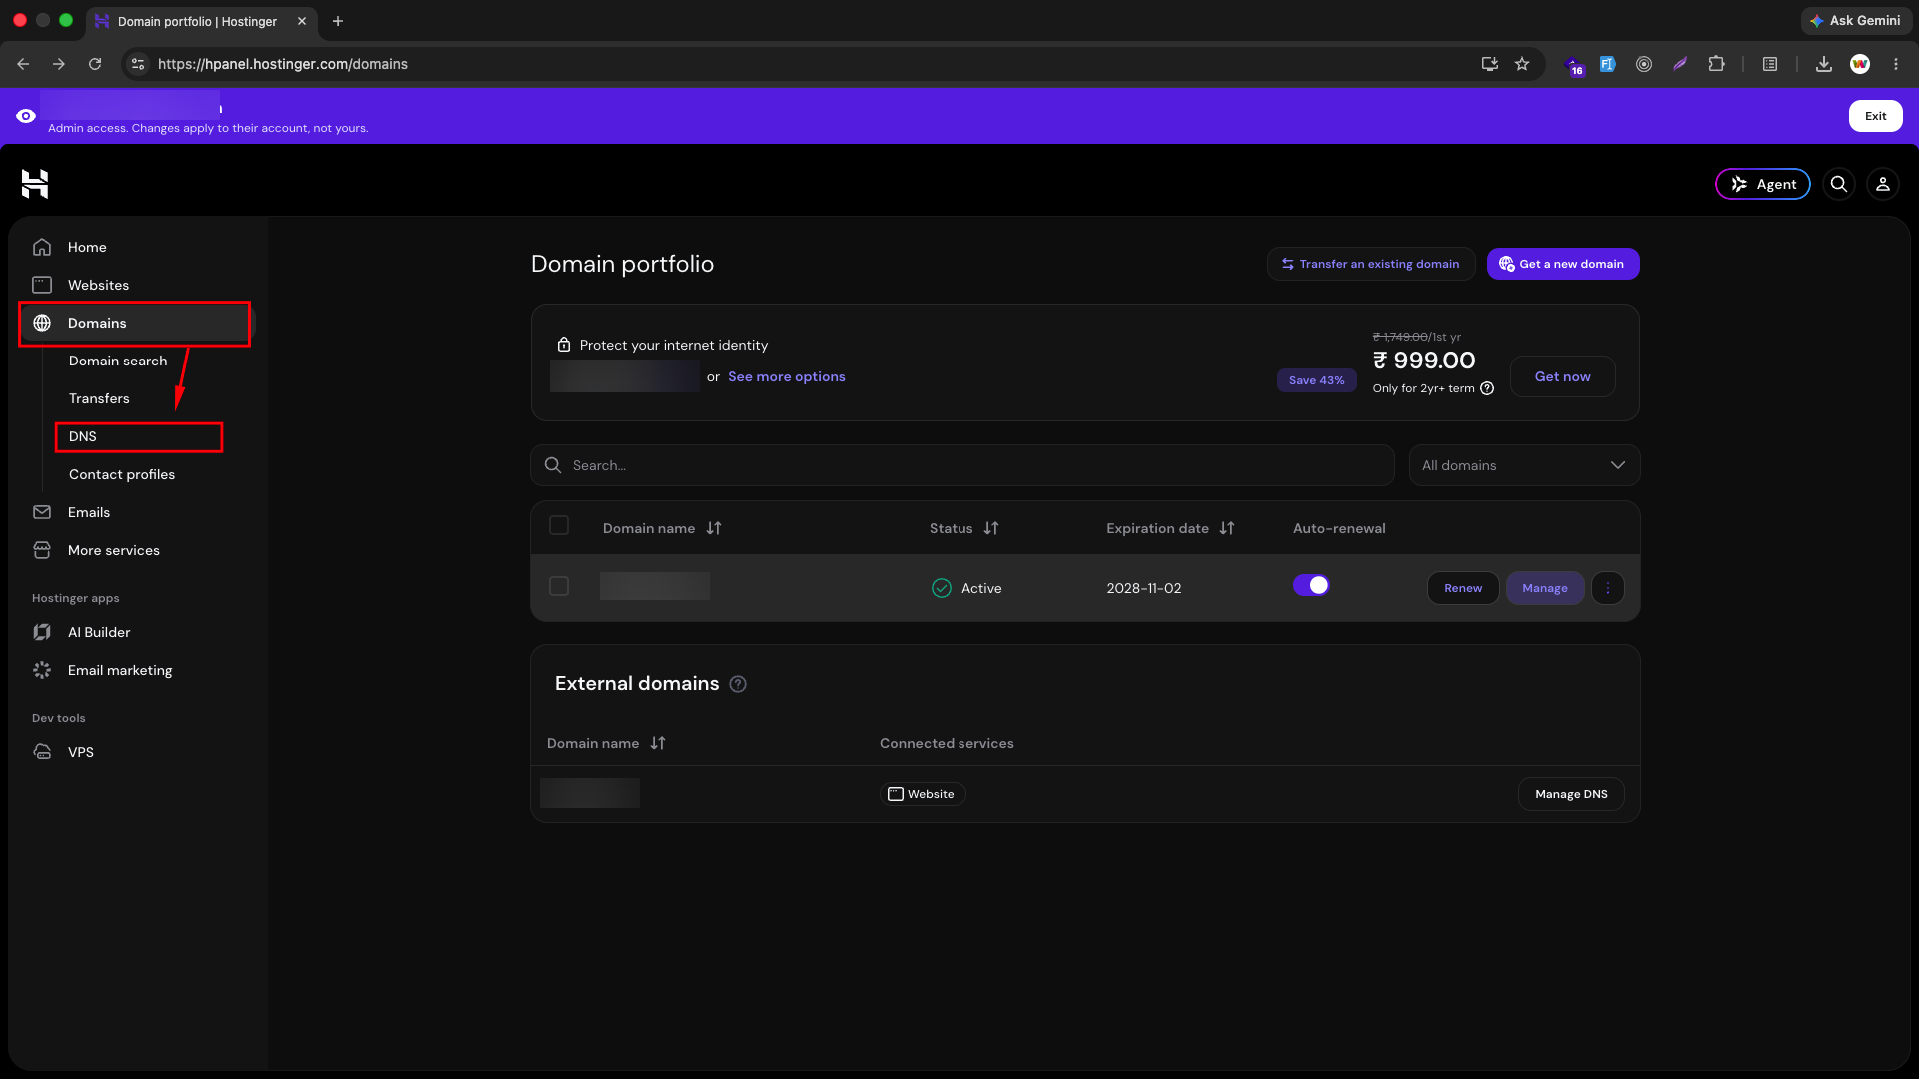
- Scroll down to Manage DNS records and choose CNAME as the record type
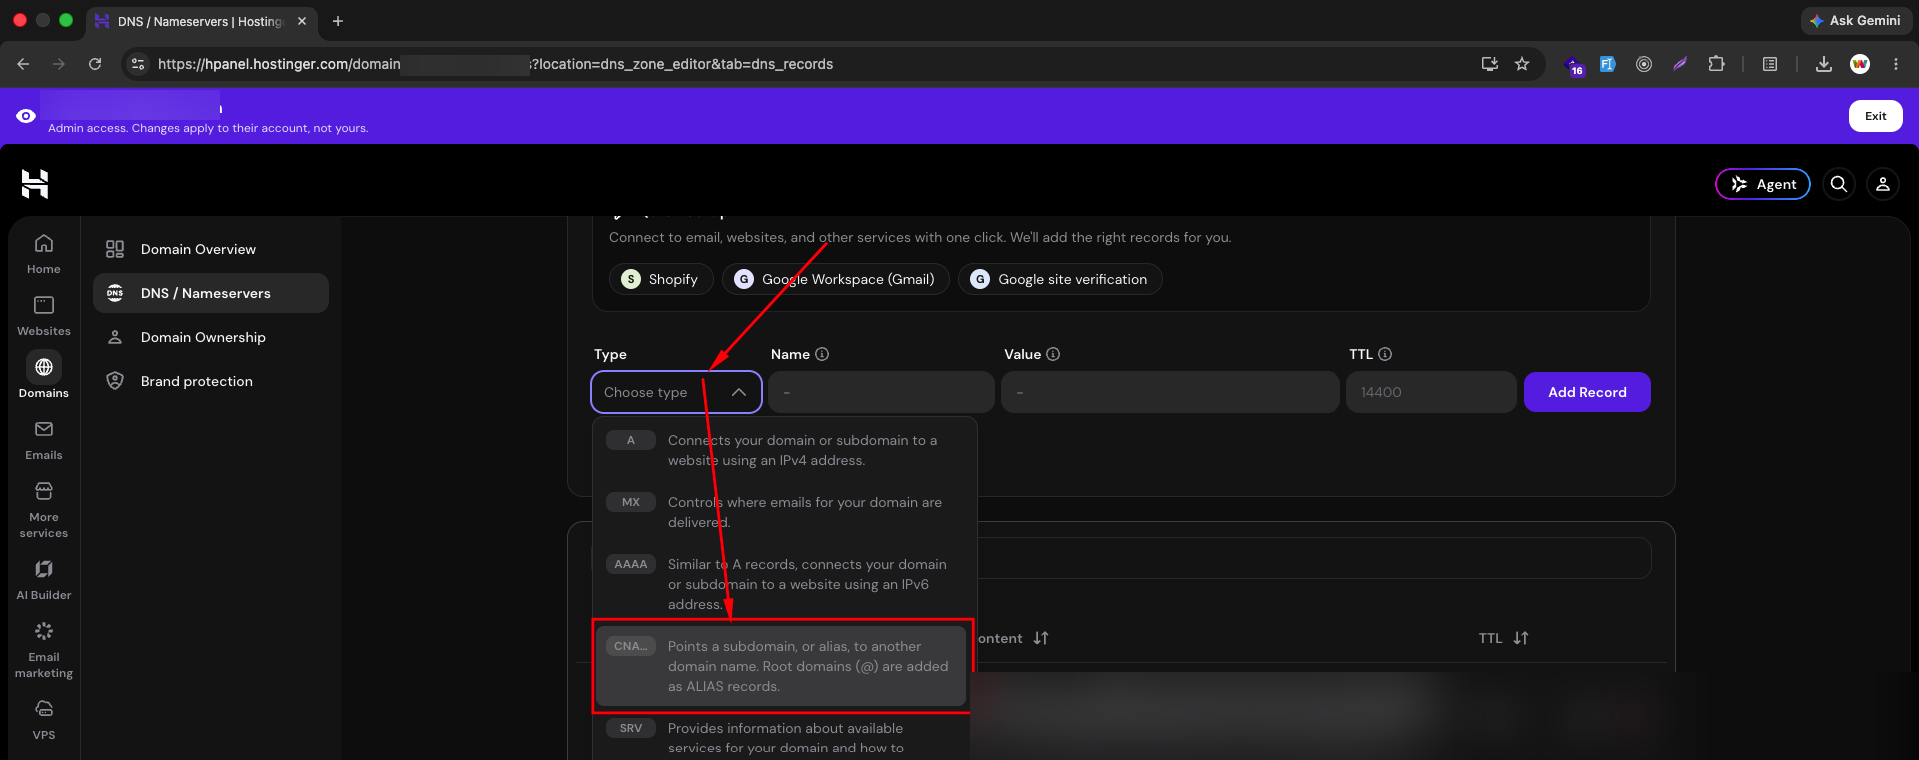
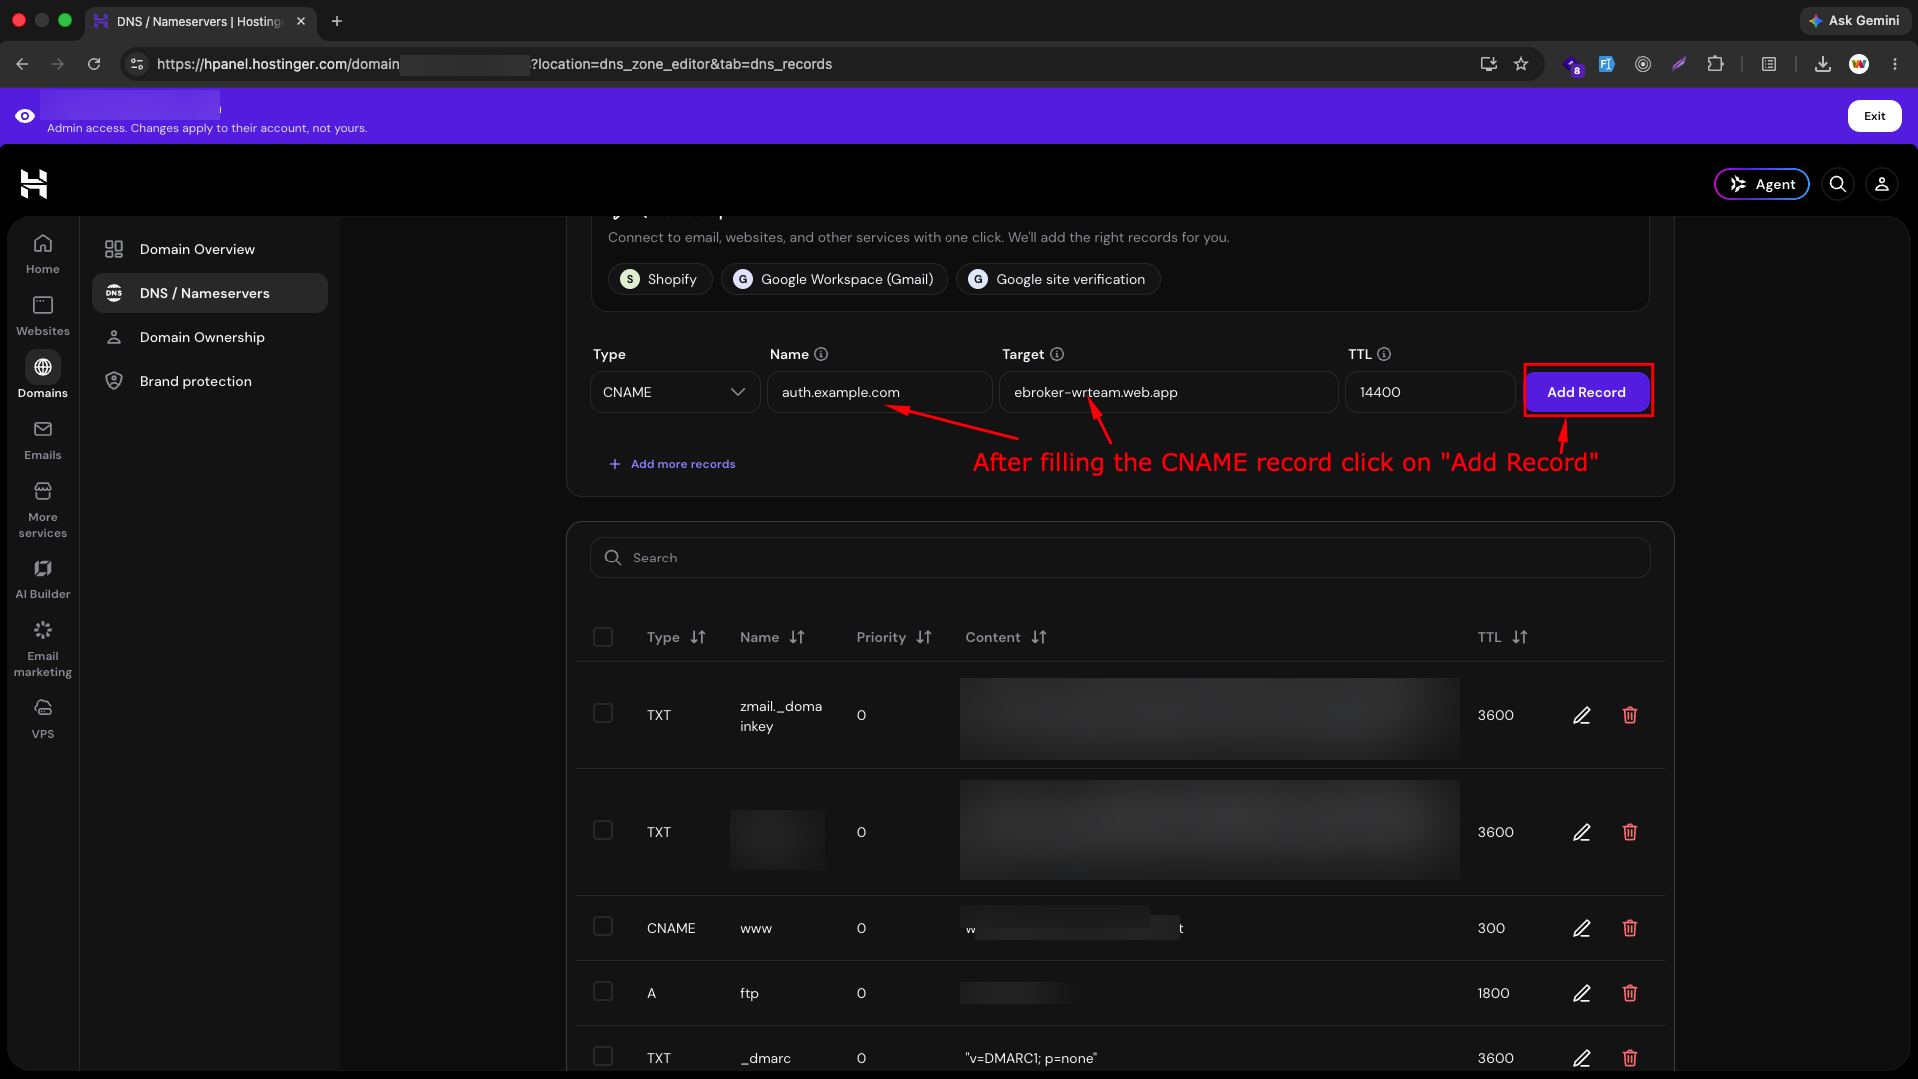
- Fill in the record using the values from Step 5:
- Name: your auth subdomain (e.g.
auth.yourdomain.com) - Target: the value Firebase gave you (e.g.
your-project.web.app) - Click Add Record
- Name: your auth subdomain (e.g.
Step 7: Verify the Domain in Firebase
Go back to the Firebase dialog and click Verify.
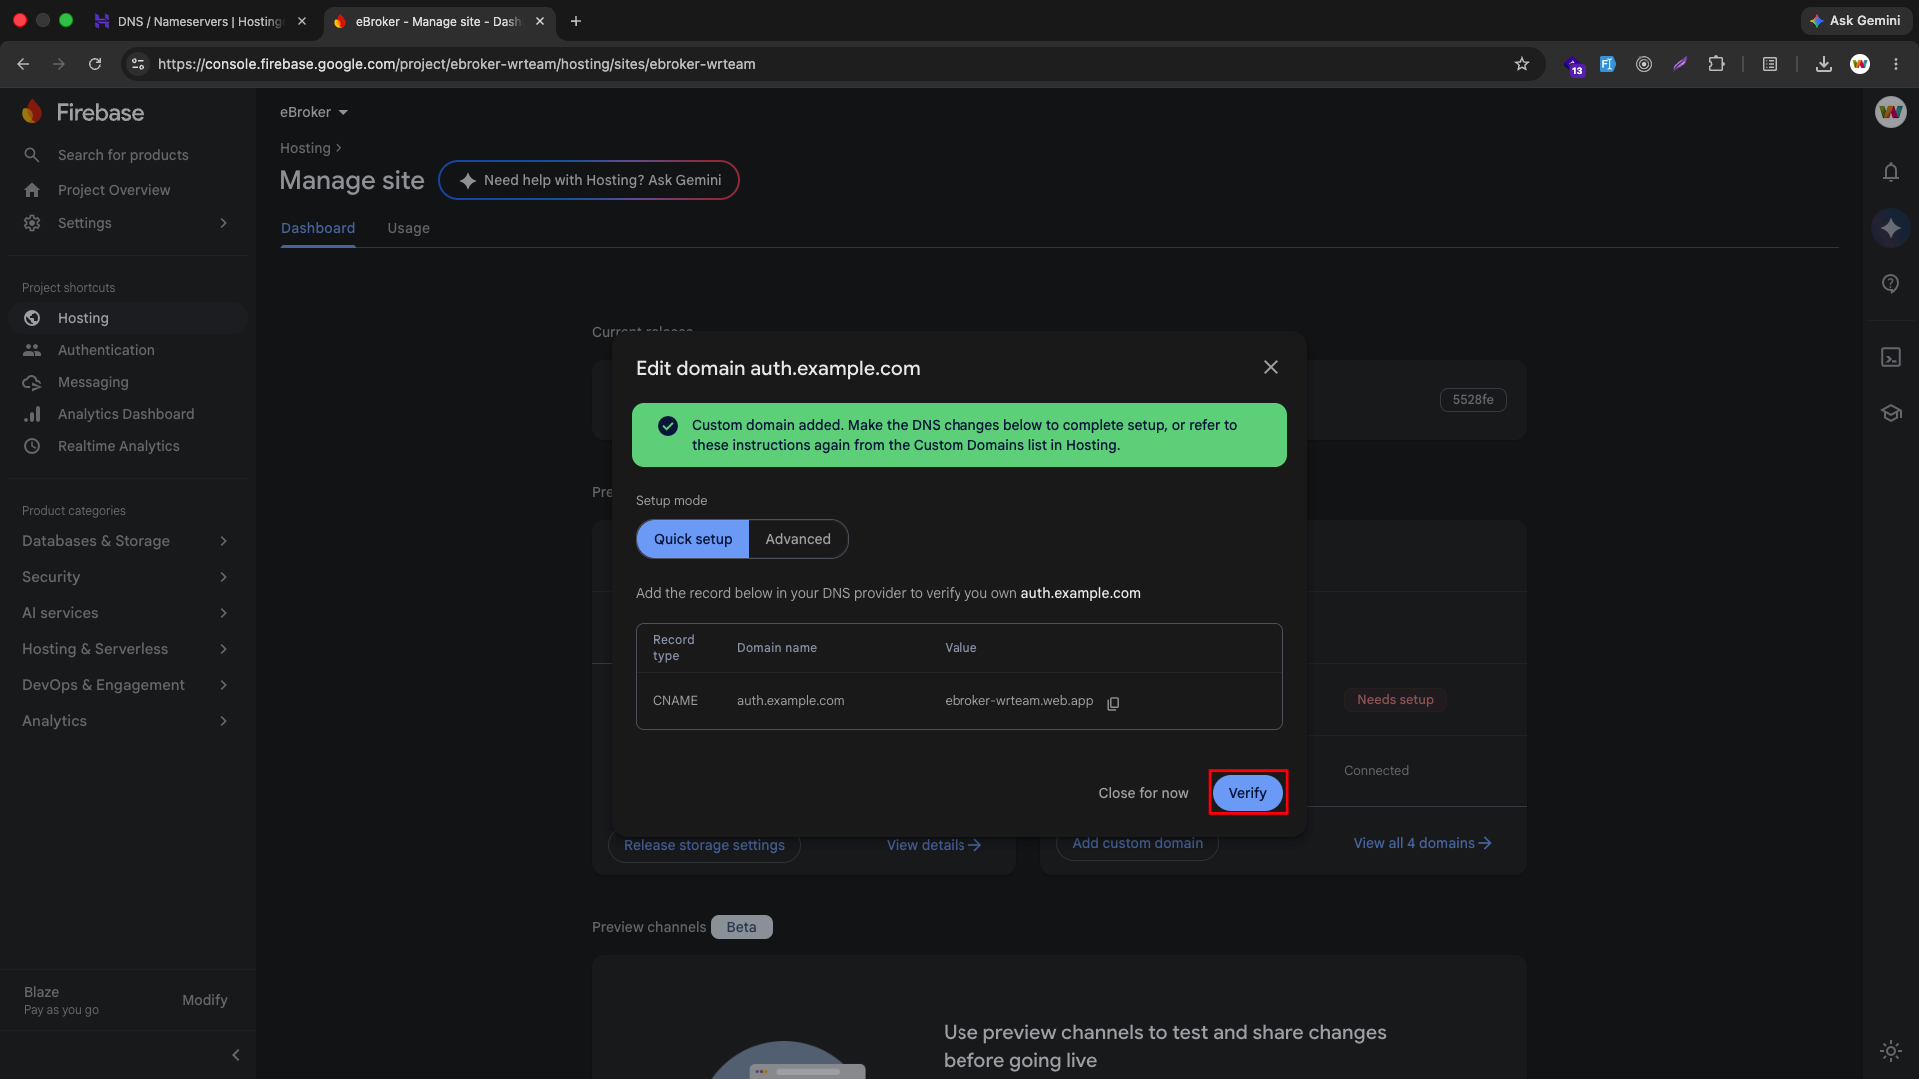
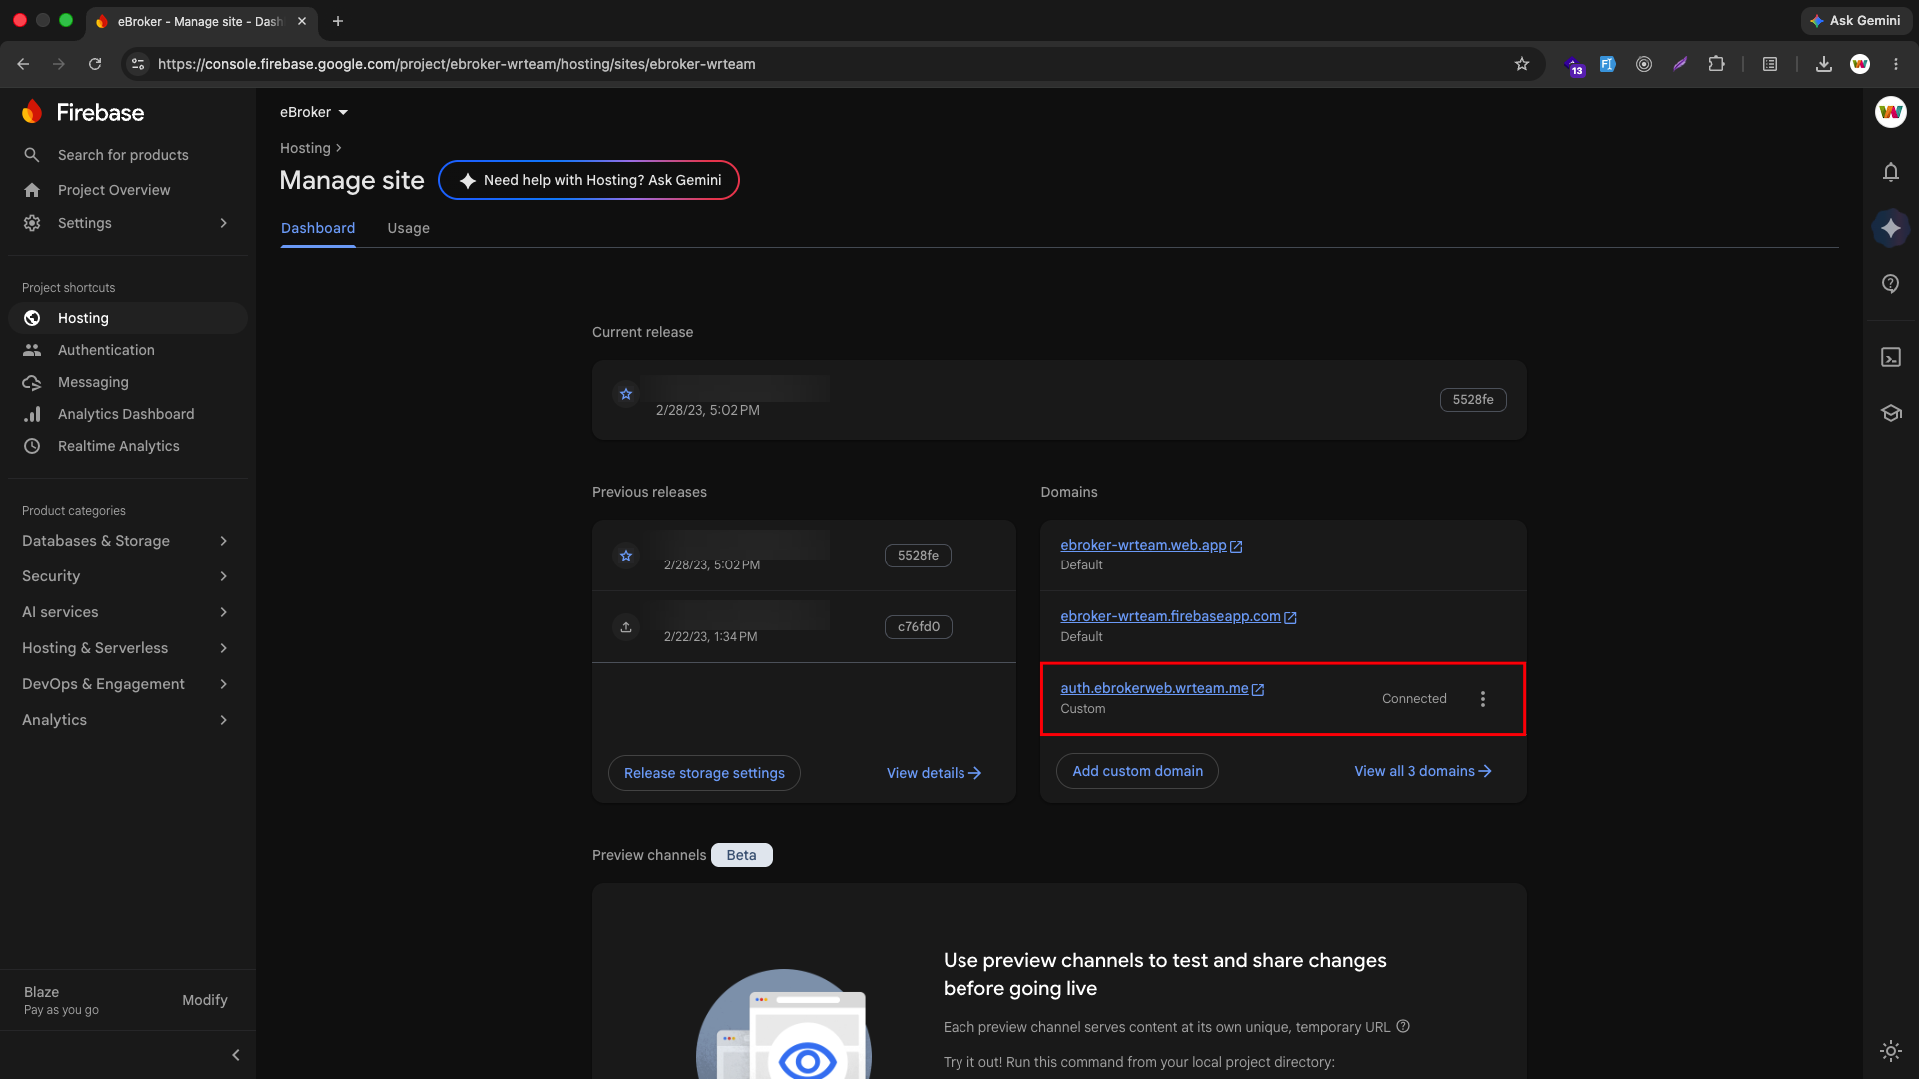
DNS propagation can take anywhere from a few minutes to a few hours. Once verified, the domain status will change to Connected.
Step 8: Update Your .env File
In your eBroker Web project, open the .env file and set NEXT_PUBLIC_AUTH_DOMAIN to your new custom auth subdomain instead of the default your-project.firebaseapp.com.
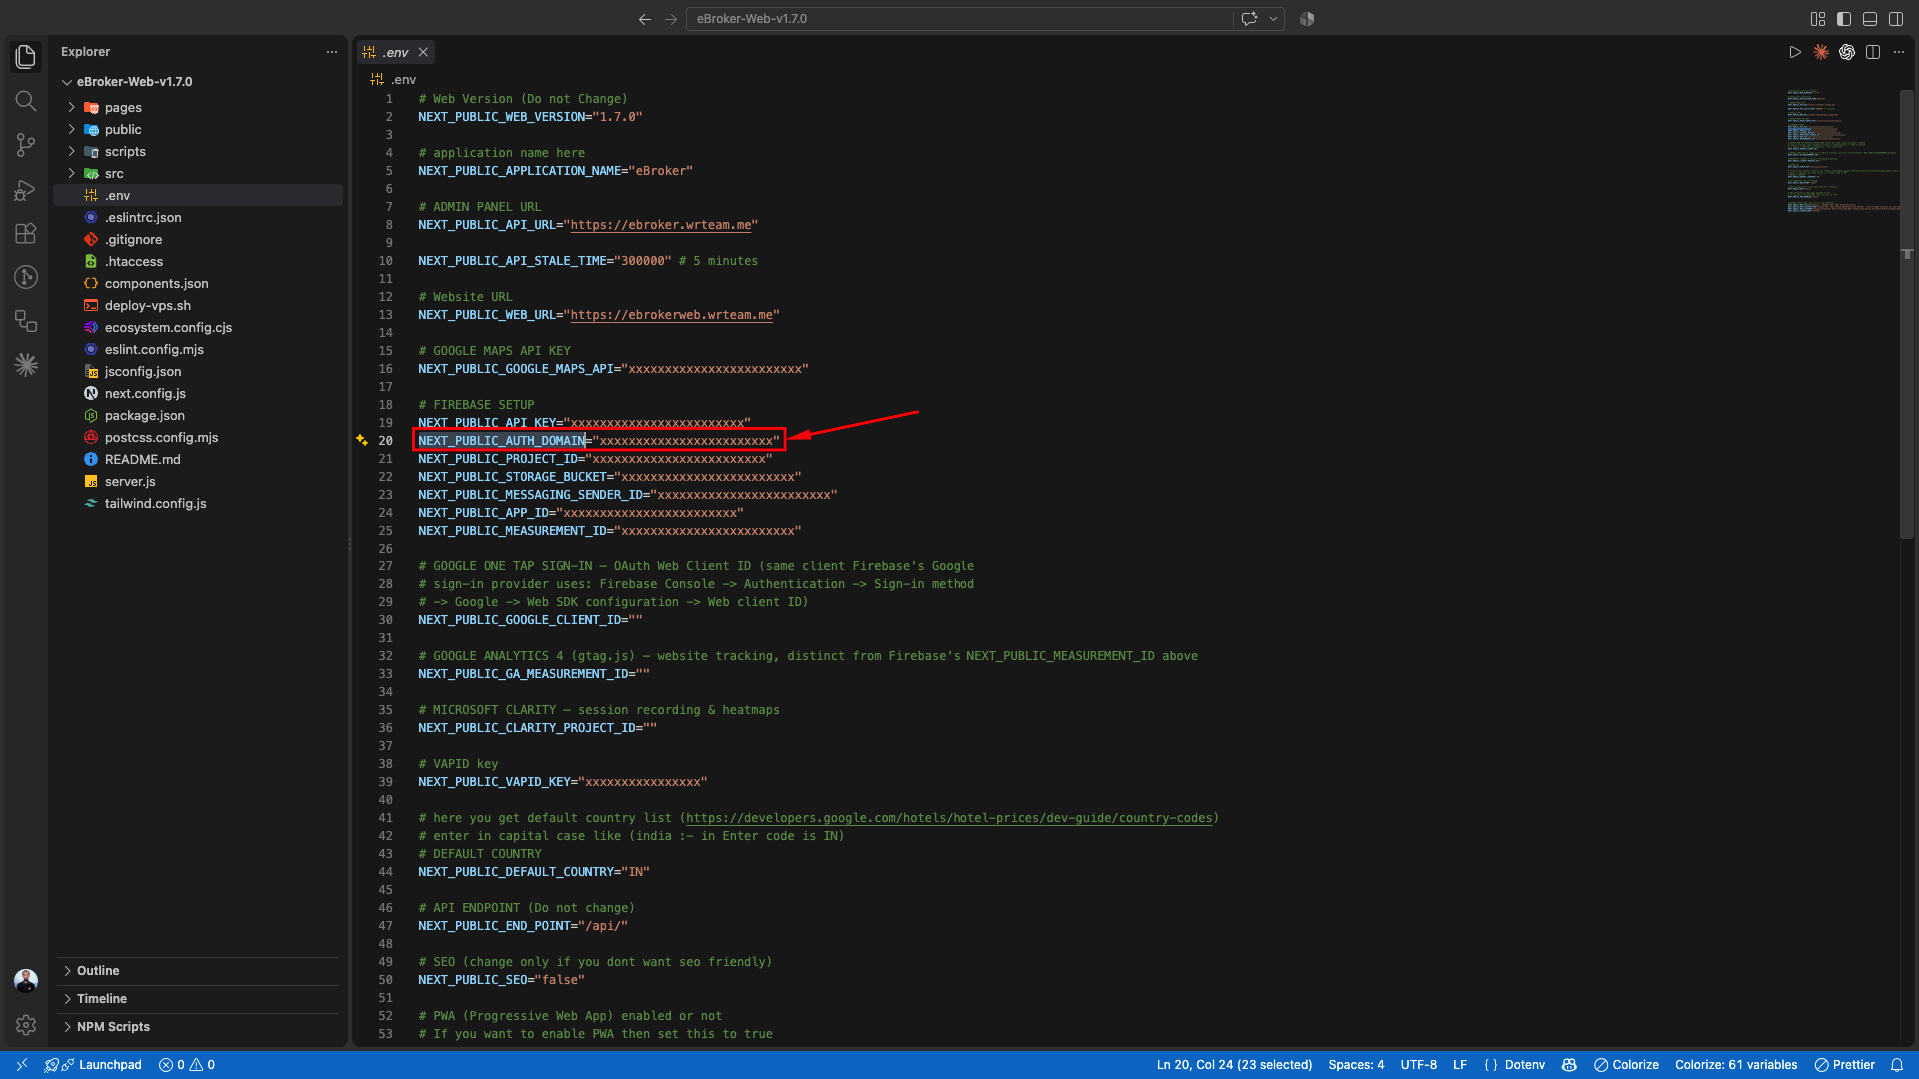
NEXT_PUBLIC_AUTH_DOMAIN="auth.yourdomain.com"
Step 9: Add the Domain to Firebase Authorized Domains
- In the Firebase Console, go to Authentication > Settings > Authorized domains
- Add your custom auth subdomain (e.g.
auth.yourdomain.com) to the list
Step 10: Add the Domain to Your Google API Key Restrictions
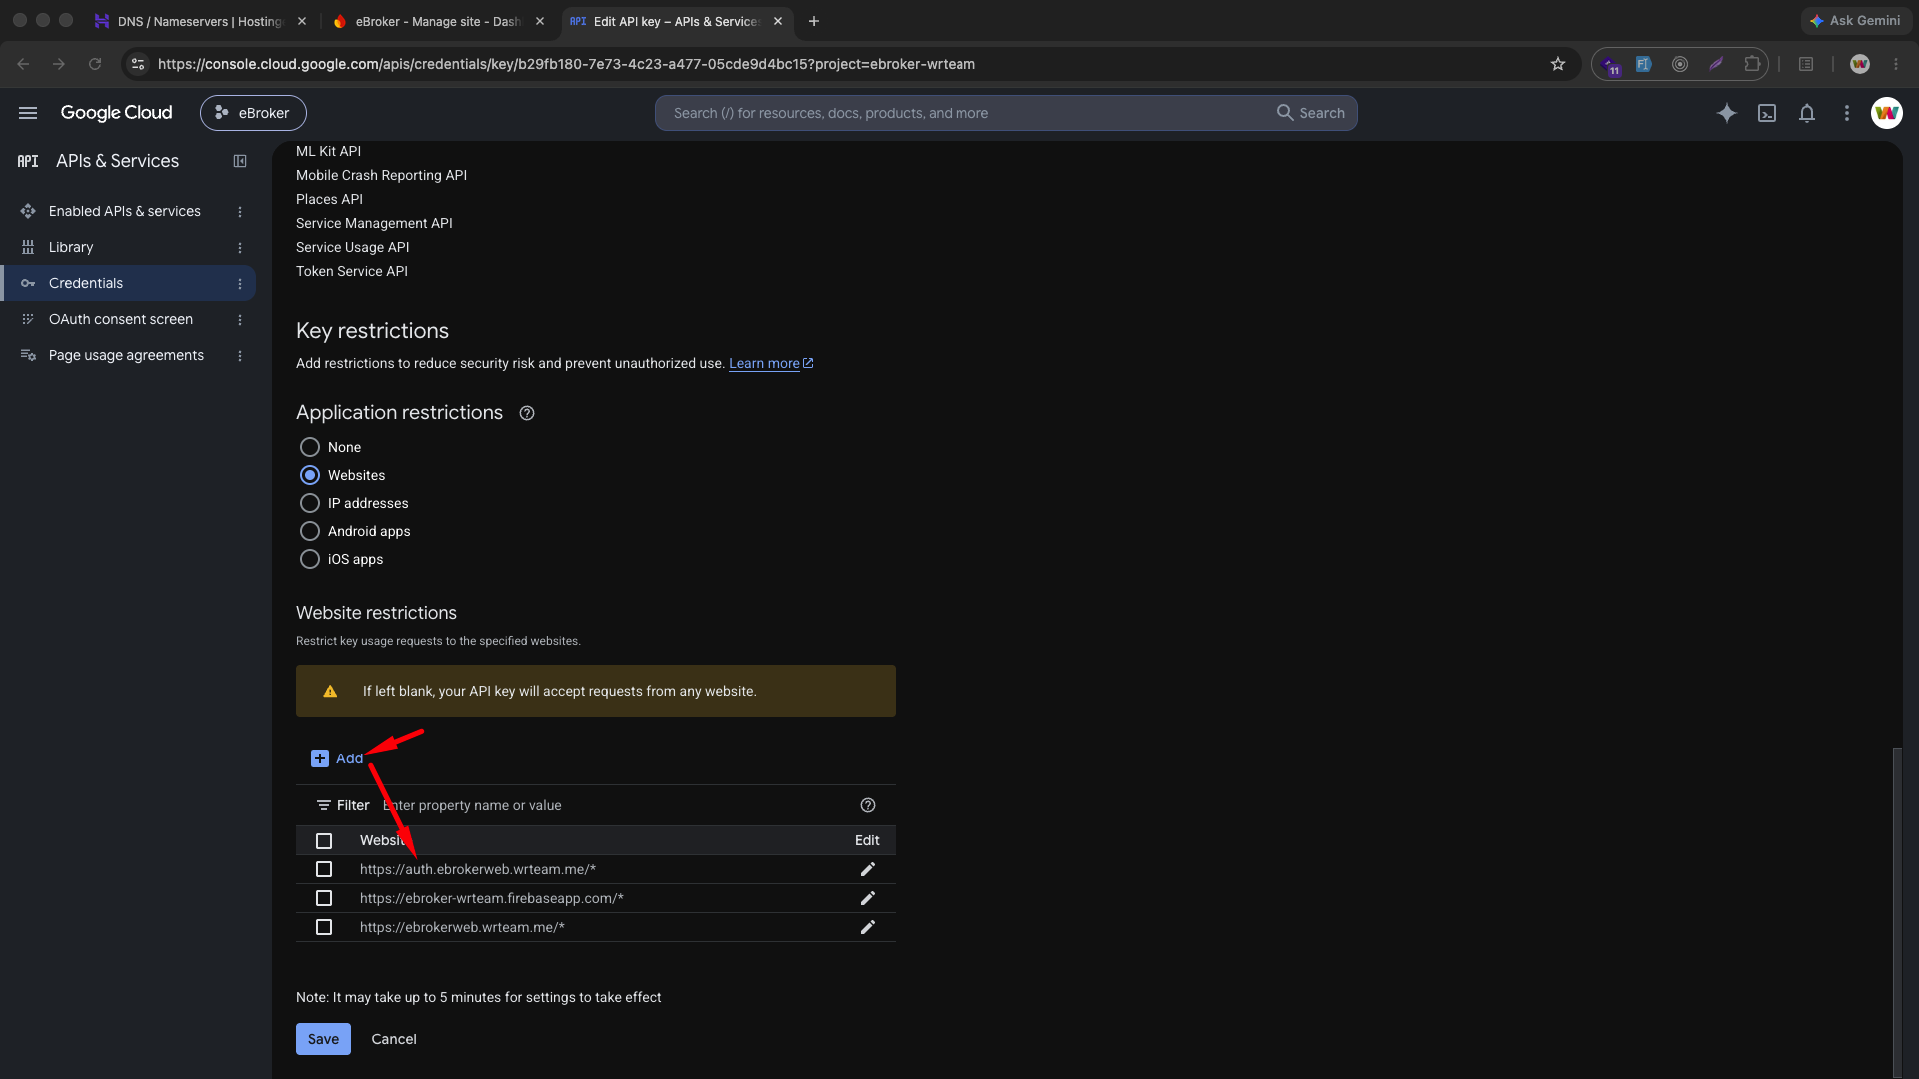
The Google Maps / Firebase API key used by your web app is usually restricted to a set of allowed websites. Your new auth subdomain must be added there too, otherwise requests from it will be rejected.
- Go to the Google Cloud Console Credentials page and make sure the correct project is selected
- Under API Keys, open the key used by your web app
- Under Website restrictions, click Add and enter your subdomain (e.g.
https://auth.yourdomain.com/*) - Click Save
Step 11: Add the Domain to Your OAuth 2.0 Client
Google Sign-In also uses an OAuth 2.0 Client ID, which separately restricts which origins and redirect URLs are allowed.
- On the same Credentials page, scroll down to OAuth 2.0 Client IDs
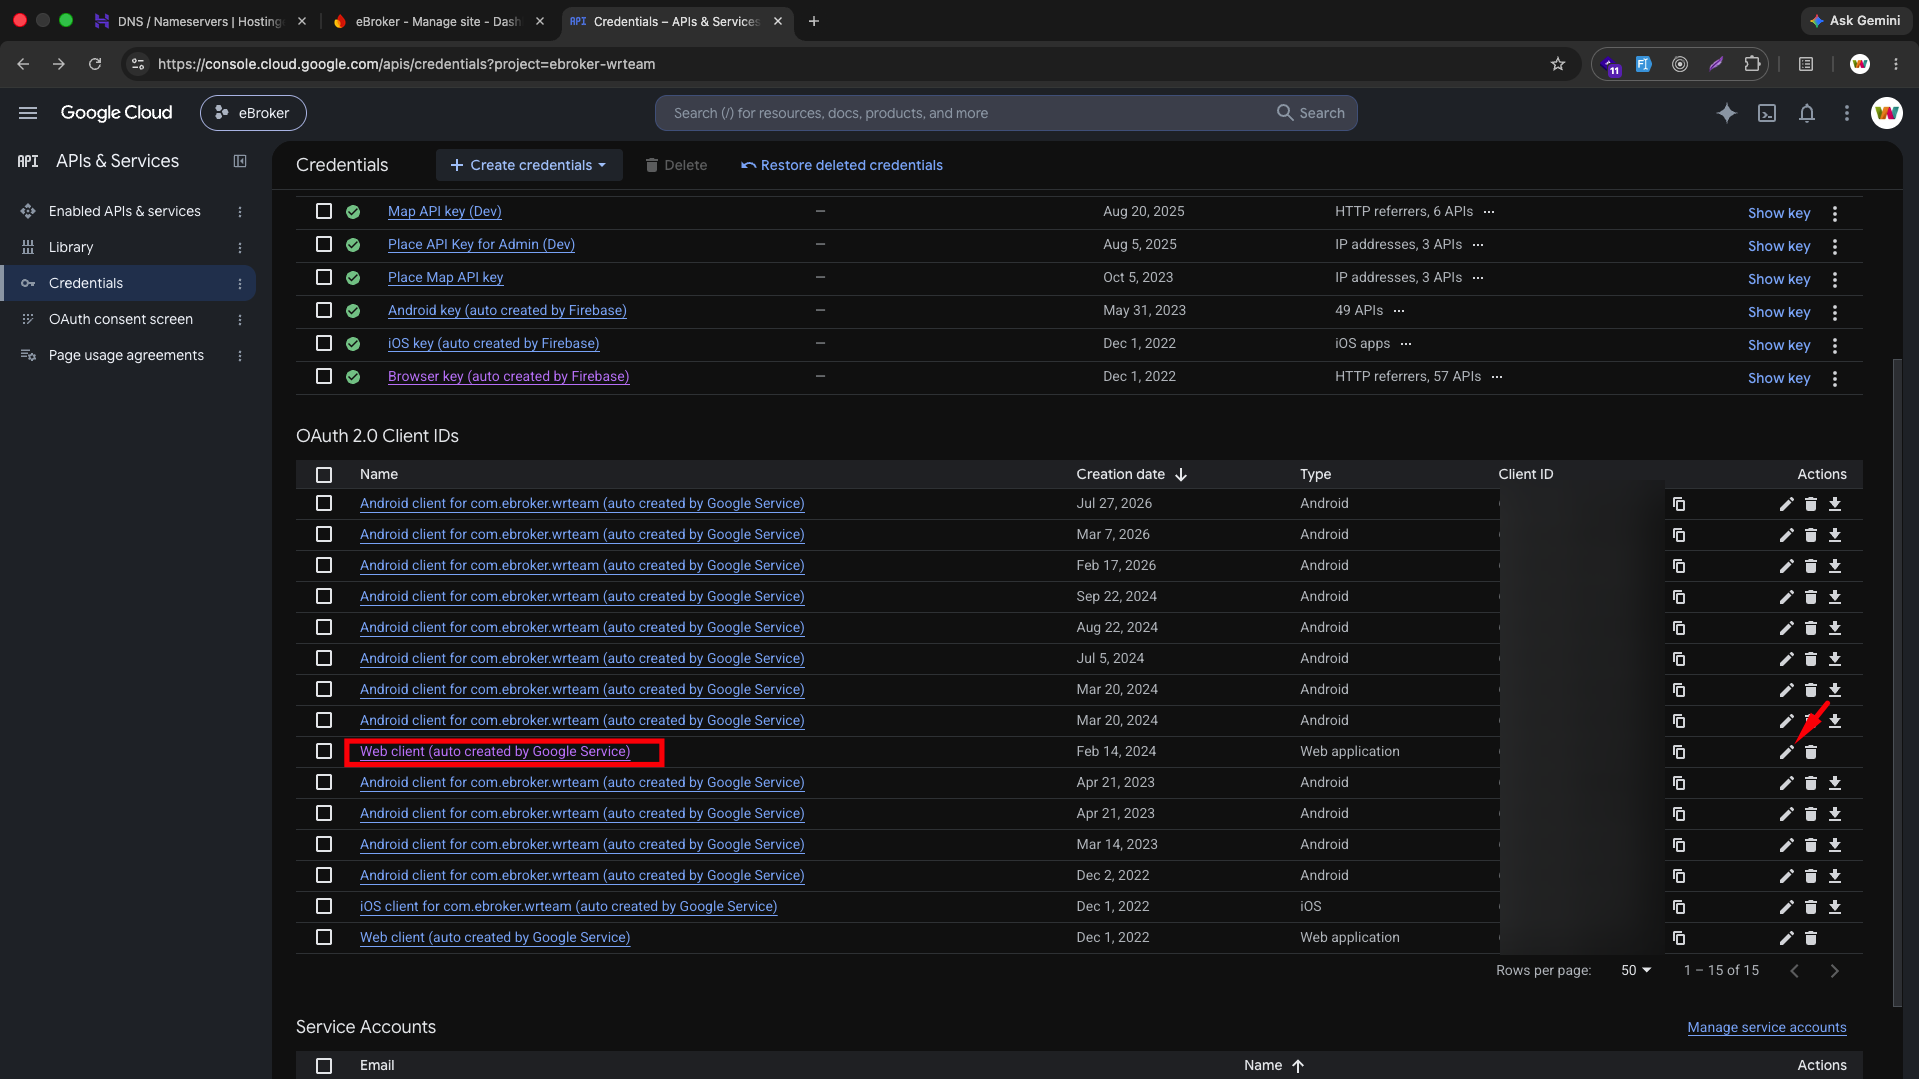
- Open the Web application client used by your web app
- Under Authorized JavaScript origins, click Add URI and add your auth subdomain (e.g.
https://auth.yourdomain.com) - Under Authorized redirect URIs, click Add URI and add the same subdomain with the Firebase auth handler path (e.g.
https://auth.yourdomain.com/__/auth/handler) - Click Save
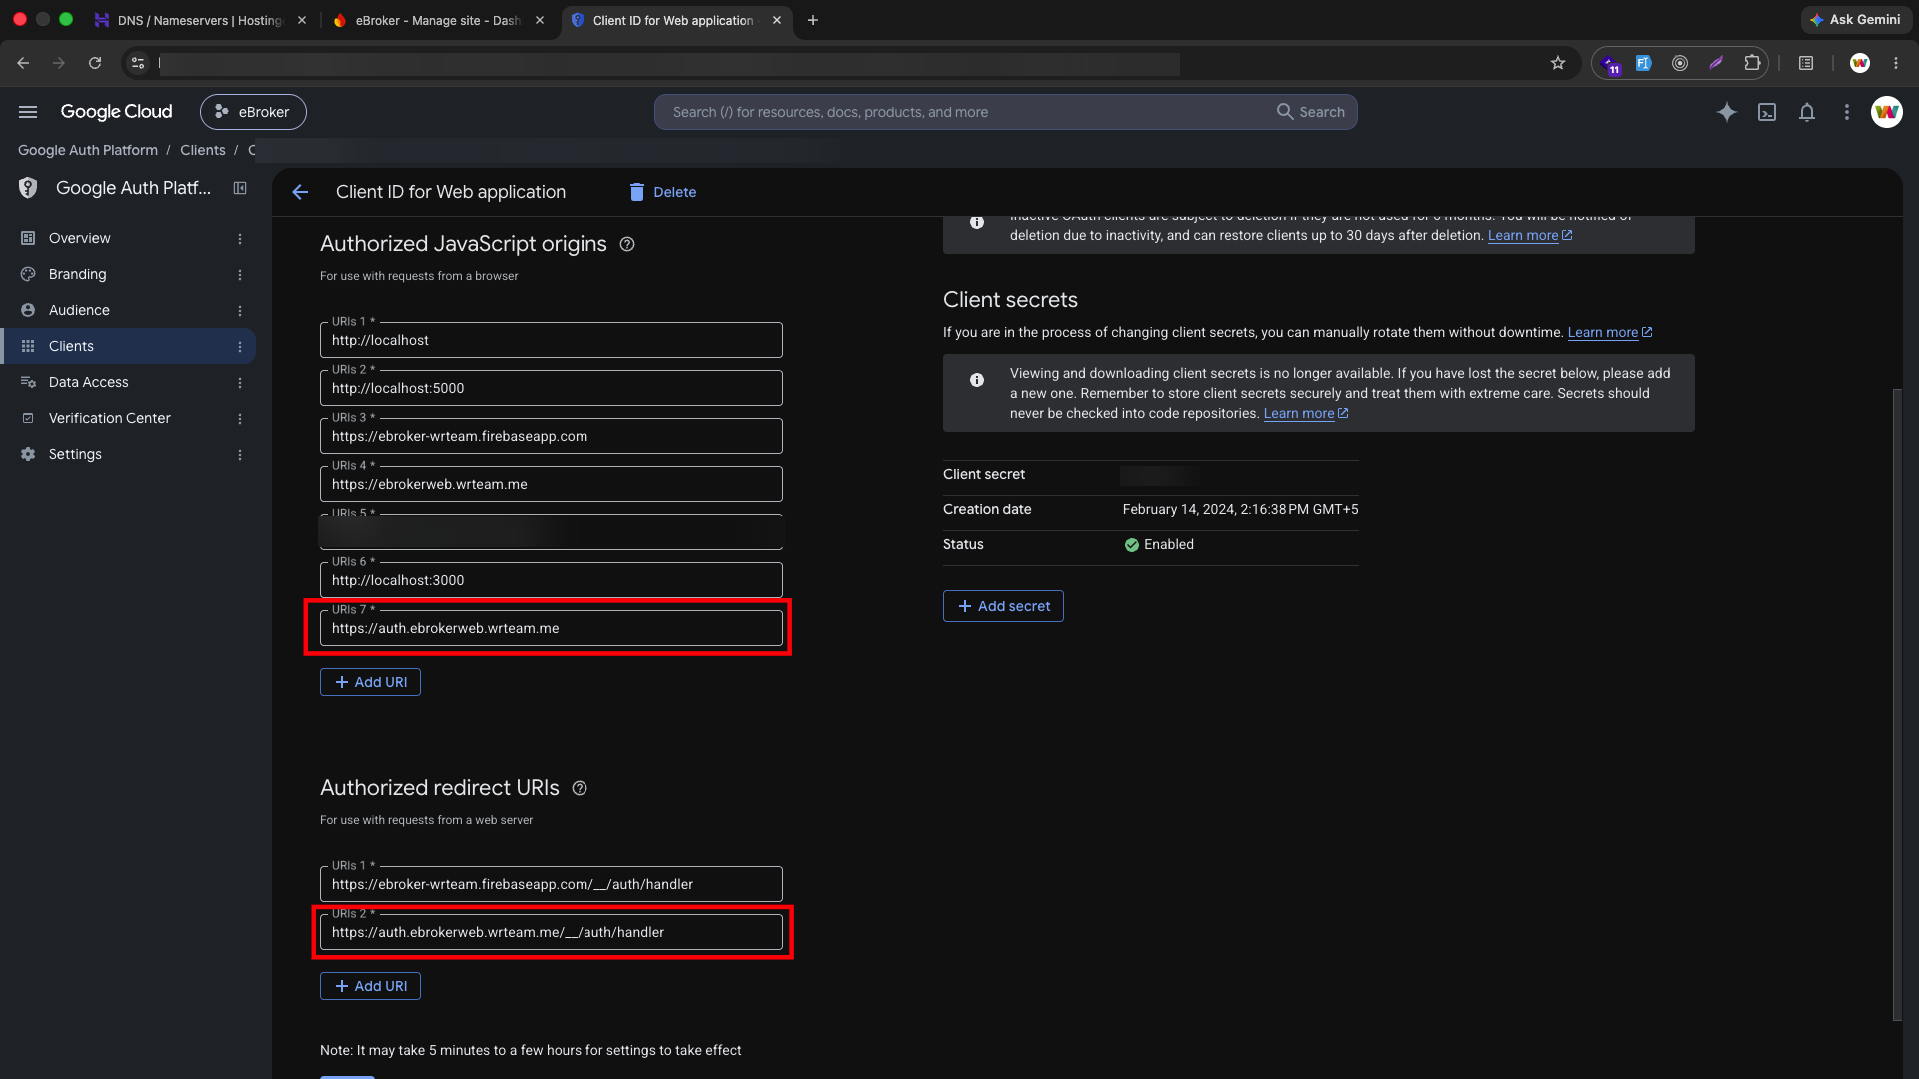
Keep the existing firebaseapp.com entries in both places — you're adding your new subdomain alongside them, not replacing them.
Step 12: Rebuild and Redeploy
Rebuild your Next.js app so the new environment variable is picked up, then redeploy it to your production server.
Result
With authDomain pointed at your own subdomain, Google's OAuth popup opens from a domain the browser trusts as part of your site, which resolves the popup-blocked issue on most browsers/OS combinations. As an extra safety net, eBroker Web still falls back to signInWithRedirect automatically if a popup is blocked for any other reason (browser extensions, OS-level popup blockers, etc.) — see GoogleRedirectHandler for how the redirect result is picked up after the user returns to your site.
Troubleshooting
- Domain stuck on "Needs setup": double-check the CNAME
NameandTargetvalues exactly match what Firebase gave you, and allow more time for DNS propagation. - Still getting
auth/popup-blocked: confirmNEXT_PUBLIC_AUTH_DOMAINin.envwas updated and the app was rebuilt, and that the new subdomain is listed under Firebase's Authorized domains. - Redirect flow doesn't complete: make sure your app is not stripping query parameters on load, since Firebase needs them to resolve the redirect result.