How to Update Panel to Version 1.4.0
Before you run the System Update to v1.4.0, you must complete the manual file replacement steps on this page.
Skipping these steps, or replacing the files in the wrong order, may cause the system update to fail or result in application errors.
Overview
| Step | What you do |
|---|---|
| Step 1 | Back up your existing server files. |
| Step 2 | Replace the vendor/ and bootstrap/ folders. |
| Step 3 | Run the System Update from the admin panel. |
| Final verification | Check that everything works. |
Step 1 — Backup your existing server files
Before making any changes to your hosted server, take a complete backup of your existing eLMS installation.
We strongly recommend keeping a backup of:
- The current
vendor/folder - The current
bootstrap/folder
The backup lets you restore the previous version if the update runs into any unexpected issue. Also back up your database.
Step 2 — Replace vendor and bootstrap folders
We have provided the updated files required for v1.4.0 in the Update v1.4.0 folder of your download package. It contains:
bootstrap.zipvendor.zip
1. Upload the ZIP files
Upload both ZIP files to the root directory of your existing eLMS installation. For example:
/path/to/elms/
2. Delete the old folders
Before extracting the ZIP files, delete the following existing folders from your server:
bootstrap/
vendor/
Your .env file holds your environment configuration. Do not delete or replace it.
3. Extract the ZIP files
Extract bootstrap.zip and vendor.zip directly into your application root directory.
4. Check the folder structure
After extraction, verify that this structure exists:
/path/to/elms/
├── bootstrap/
├── vendor/
├── .env
└── ...
Make sure the folders were extracted correctly and are not nested inside another directory. For example, /path/to/elms/vendor/vendor/ or /path/to/elms/vendor/autoload.php missing is a sign of a wrong extraction.
Step 3 — Proceed with the v1.4.0 System Update
Once all the steps above are complete:
- Open your eLMS Admin Panel.
- Log in using your administrator account.
- Go to Settings → System Update.
- Enter your purchase code, upload the v1.4.0 update package ZIP and click Update.
- Wait for the system update to finish.
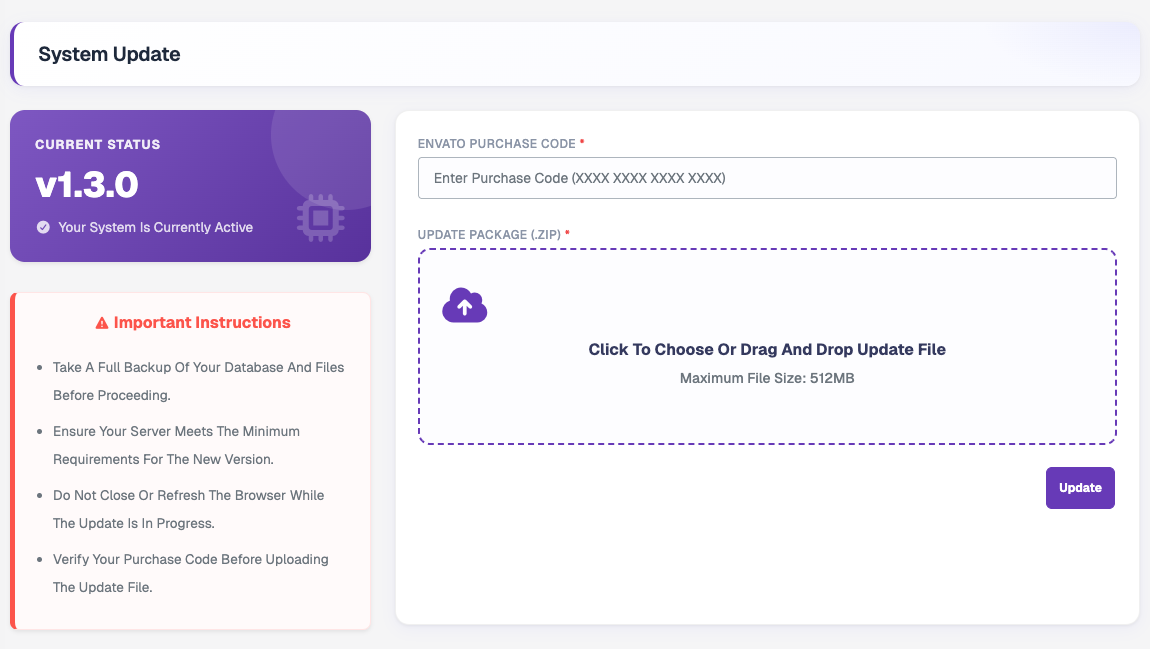
Do not close the browser or interrupt the update while it is running.
For the full System Update page description, see Settings → System Update.
Final verification
After the v1.4.0 update is complete, check the following:
- Admin Panel is accessible.
- Website is accessible.
- Login and logout are working.
- Listings are loading correctly.
- Images and files are loading correctly.
- API requests are working correctly.
- Database operations are working correctly.
- No PHP or Laravel errors are displayed.
- System Update shows the correct version: v1.4.0.
Important notes
Do not delete this file:
.env
Your existing environment configuration must remain unchanged unless the v1.4.0 update documentation specifically tells you otherwise.
- Do not replace the entire application directory blindly.
- Only replace the files and folders specifically mentioned in this update guide.
- Always take a backup before starting the update.