Payment Gateway Settings
The Payment Gateway section lets you connect the payment providers that process your customers' bookings. You can configure a different gateway for each country you operate in, switch between test and live modes, enable or disable each gateway, and set up webhooks so booking and refund statuses update automatically.
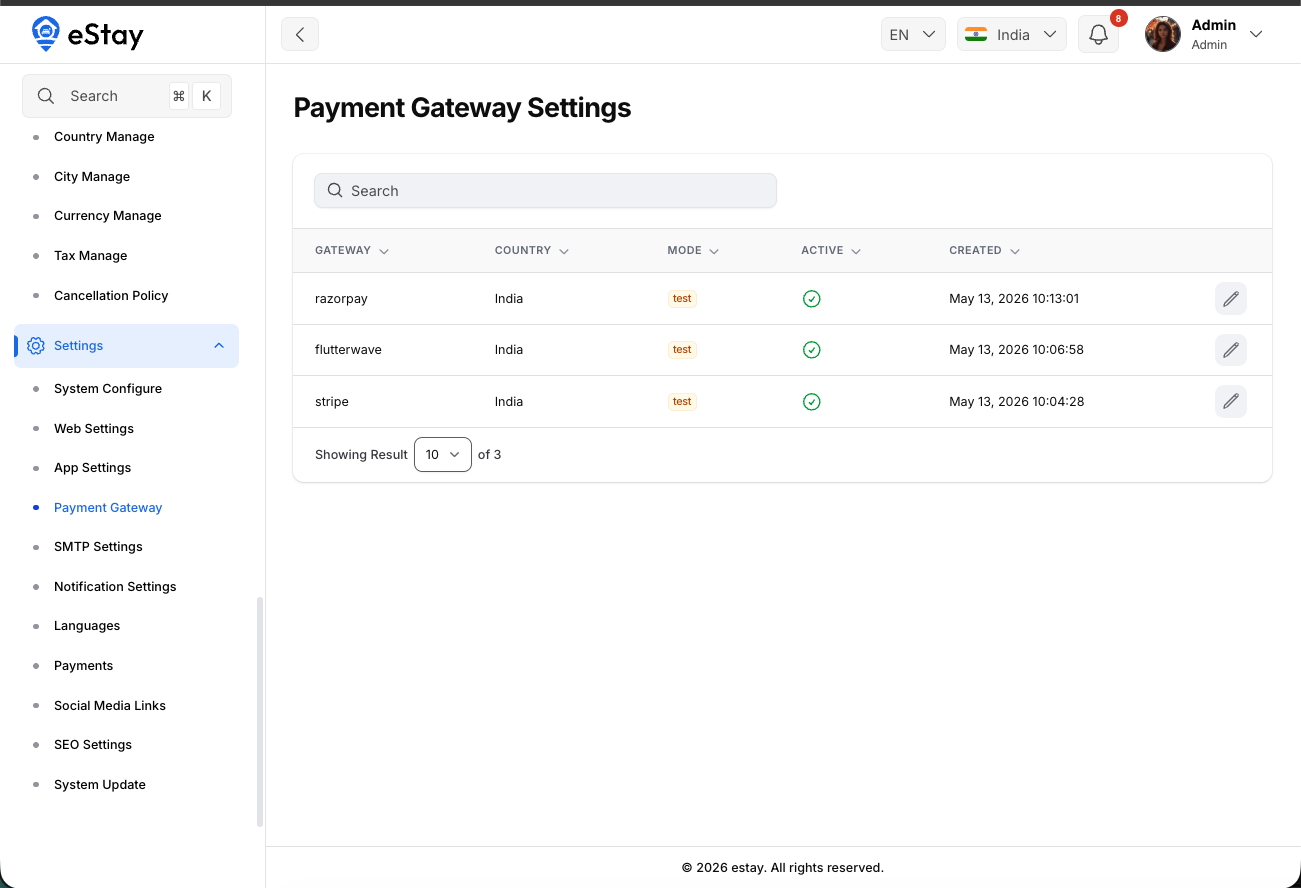
Payment gateways are configured per country. The list and the gateways you add apply to your currently selected country. Switch the country from the topbar to manage gateways for another country.
Supported Gateways
| Gateway | Typically Used For | Credentials Needed |
|---|---|---|
| Razorpay | India and supported regions. | Key ID, Key Secret, Webhook Secret |
| Stripe | Global card payments. | Publishable Key, Secret Key, Webhook Secret |
| Flutterwave | Africa and supported regions. | Public Key, Secret Key, Encryption Key, Secret Hash |
Step 1: Navigate to Payment Gateways
In your admin dashboard, navigate to Settings > Payment Gateway using the left sidebar.
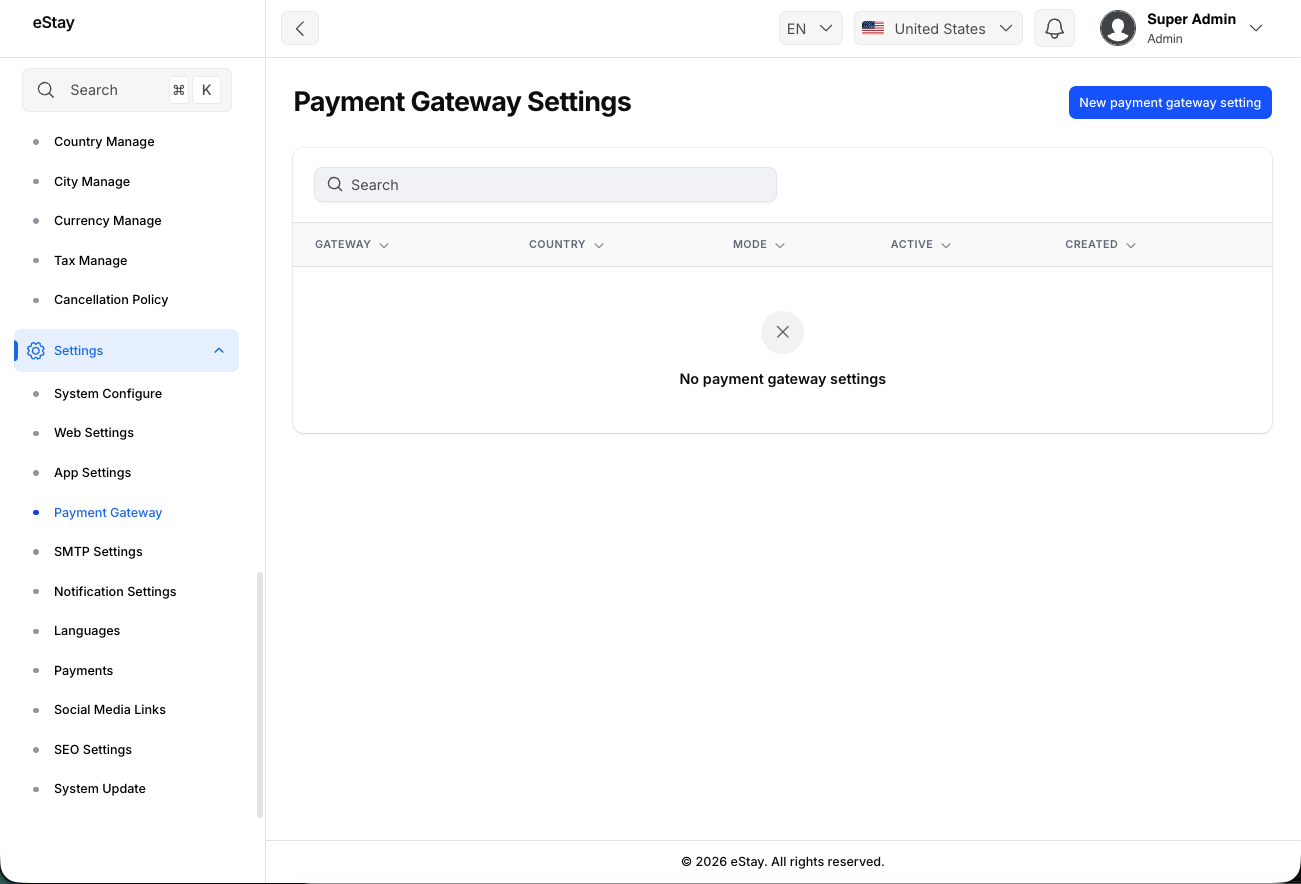
Step 2: Understand the Gateway List
The list shows every gateway configured for the selected country:
| Column | Description |
|---|---|
| Gateway | The payment provider (Razorpay, Stripe, or Flutterwave). |
| Country | The country this gateway is configured for. |
| Mode | Test (orange) for sandbox testing or Live (green) for real payments. |
| Active | Whether this gateway is currently enabled for processing payments. |
| Created | When the gateway was added. |
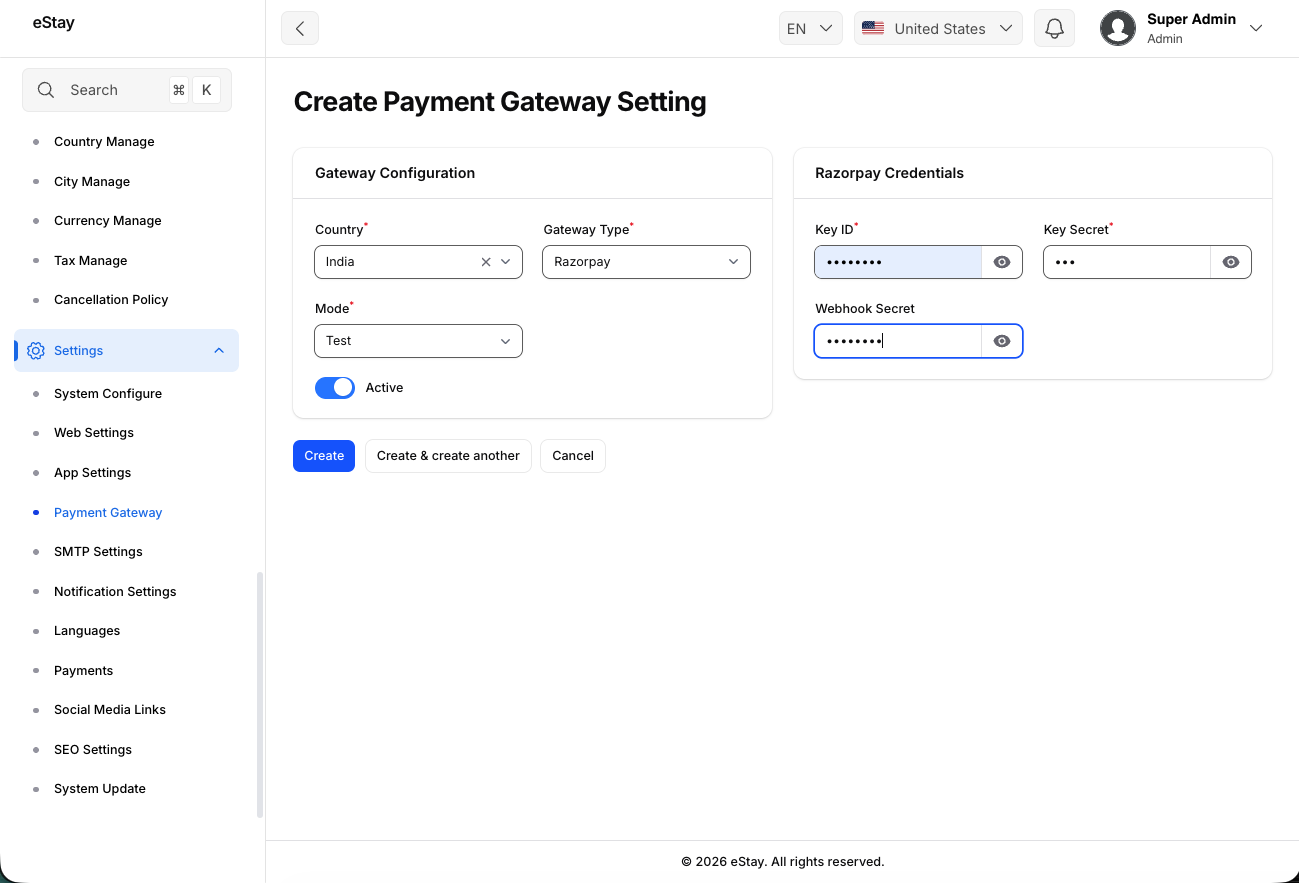
Step 3: Add a New Gateway
Click the Create / New button at the top right of the page to open the gateway form, then fill in the Gateway Configuration section:
| Field | Description |
|---|---|
| Country | The country this gateway applies to. Defaults to your selected country. |
| Gateway Type | Choose Razorpay, Stripe, or Flutterwave. Gateways already configured for the selected country are hidden, so each gateway can only be added once per country. |
| Mode | Choose Test for sandbox credentials or Live for production credentials. |
| Active | Toggle on to enable this gateway for processing payments. |
Each gateway type can only be configured once per country. Once you've added Stripe for a country, for example, it won't appear in the Gateway Type dropdown again for that same country. To use a gateway in another country, switch the country first and add it there.
Step 4: Enter the Gateway Credentials
After selecting a Gateway Type, the matching credentials section appears. Log in to your payment provider's dashboard, copy the keys for the matching mode (test or live), and paste them here.
Razorpay
| Field | Where to Find It | Required |
|---|---|---|
| Key ID | Razorpay Dashboard → Account & Settings → API Keys. | Yes |
| Key Secret | Shown once when you generate the API key in Razorpay. | Yes |
| Webhook Secret | The secret you set when creating the webhook (see Step 6). | Strongly recommended — without it, the payments webhook is rejected and confirmation falls back to the 5-minute check (see Step 6). |
Stripe
| Field | Where to Find It | Required |
|---|---|---|
| Publishable Key | Stripe Dashboard → Developers → API keys (pk_...). | Yes |
| Secret Key | Stripe Dashboard → Developers → API keys (sk_...). | Yes |
| Webhook Secret | The signing secret shown after adding the webhook endpoint (whsec_...). | Strongly recommended — without it, the payments webhook is rejected and confirmation falls back to the 5-minute check (see Step 6). |
Flutterwave
| Field | Where to Find It | Required |
|---|---|---|
| Public Key | Flutterwave Dashboard → Settings → API. | Yes |
| Secret Key | Flutterwave Dashboard → Settings → API. | Yes |
| Encryption Key | Flutterwave Dashboard → Settings → API. | Yes |
| Secret Hash | The hash you set in Flutterwave's webhook settings — it must match the verif-hash Flutterwave sends (see Step 6). | Yes |
 |
All credential fields are masked for security. Click the eye icon inside a field to reveal its value while you confirm it's entered correctly. Make sure the keys you paste belong to the same mode you selected — test keys with Test mode, live keys with Live mode.
Step 5: Save the Gateway
Click Create at the bottom of the form to save your gateway. It will now appear in the list and, if Active, will be used to process payments for the selected country.
Step 6: Configure Webhooks (Important)
Webhooks let the payment provider notify your platform the moment a payment succeeds, fails, or a refund is processed — so booking and refund statuses update automatically and instantly.
You configure webhooks inside each provider's dashboard, pointing them at your platform's webhook URLs.
When a customer pays (or a refund is issued), the provider notifies your platform via the webhook, and the status updates instantly. If the webhook isn't set up, the secret is blank/wrong, or the provider can't reach your server, that notification is rejected.
As a safety net, the platform runs a background reconciliation check every 5 minutes that asks the provider directly about anything still pending — for both payments and refunds. So statuses are confirmed eventually even if a webhook is missed, but:
- Confirmation is delayed (up to a few minutes) instead of immediate.
- It depends on the server's scheduled task (cron) being set up correctly — see the Cron Jobs Setup guide.
- It re-checks recent payments (about the last hour) and recent refunds (about the last 3 days).
For instant confirmation, set up the payments webhook and its secret. The refund side is handled automatically (see below).
Your Webhook URLs
The exact webhook URLs for your domain are shown directly in the gateway form — just scroll to the bottom of the credentials section after selecting a gateway type and click the copy button next to each URL.
For reference, the URLs follow this pattern (replace yourdomain.com with your actual domain):
| Purpose | URL |
|---|---|
| Payments | https://yourdomain.com/api/payments/webhook/{gateway} |
| Refunds (Razorpay only — optional) | https://yourdomain.com/api/refunds/webhook/razorpay |
For example, the Stripe payment webhook URL would be:
https://yourdomain.com/api/payments/webhook/stripe
- Stripe and Flutterwave — create one webhook each (the Payments URL). Refunds are confirmed automatically (instantly when issued, with the reconciliation check as backup), so no refund webhook is needed. Stripe issues a unique secret per endpoint and the platform stores one secret per gateway; Flutterwave supports only one webhook URL — so a single Payments webhook is the correct setup for both.
- Razorpay — create the Payments webhook. You may optionally add the Refunds webhook too if you want refund statuses to update instantly; otherwise the 5-minute reconciliation completes them automatically. Razorpay lets you set the webhook secret yourself, so the same Webhook Secret works for both of its webhooks.
Events to Subscribe To
| Gateway | Webhook | Events to Subscribe |
|---|---|---|
| Razorpay | Payments | payment.captured, payment.failed, payment_link.paid, payment_link.cancelled |
| Razorpay | Refunds (optional) | refund.created, refund.processed, refund.failed |
| Stripe | Payments (only webhook needed) | checkout.session.completed, checkout.session.expired |
| Flutterwave | Payments (only webhook needed) | charge.completed |
You don't subscribe to refund events for Stripe or Flutterwave. When you issue a refund from the admin panel, the platform confirms it with the provider in the same request and updates the status immediately; the reconciliation check covers the rare case where a provider reports the refund as still pending. Note that the customer's bank still takes the provider's standard 5–10 business days to post the funds — that settlement time is set by the banks, not the platform.
Securing the Webhook (Signature Verification)
Each gateway signs its webhook requests so your platform can verify they're genuine. The secret you set in the provider's dashboard must match the value you saved in Step 4:
| Gateway | What the Provider Sends | Must Match the Field |
|---|---|---|
| Razorpay | X-Razorpay-Signature header | Webhook Secret |
| Stripe | Stripe-Signature header | Webhook Secret |
| Flutterwave | verif-hash header | Secret Hash |
For Flutterwave, the Secret Hash you enter here must be exactly the same value you set as the hash in Flutterwave's webhook settings. If they don't match, Flutterwave's notifications will be rejected.
The webhook endpoints are public (the providers need to reach them without logging in) and always respond with success so the gateway doesn't keep retrying. Security is enforced by the signature check above — which is why entering the correct secret matters.
Step 7: Edit an Existing Gateway
To update a gateway's credentials, mode, or active status, click the Edit icon (pencil) next to it in the list.
!Edit Gateway
The Country and Gateway Type cannot be changed once a gateway is created. To use a different country or gateway type, create a new gateway instead. You can still update the mode, credentials, webhook secret, and active status at any time.
Gateways cannot be deleted from the UI. If you need to stop using a gateway, toggle it Inactive instead.
Going Live Checklist
Before accepting real payments, confirm the following for each gateway:
- Mode is set to Live.
- The credentials entered are your provider's live keys (not test/sandbox).
- The payments webhook is created in the provider's dashboard pointing at your live domain's URL (plus the optional Razorpay refunds webhook, if you use it).
- The Webhook Secret / Secret Hash in the provider matches what you saved here.
- The gateway is toggled Active.
While testing your setup, keep Mode on Test an d use your provider's sandbox credentials so no real money is charged. Only switch to Live with production credentials once everything above is confirmed.